How to use multiple gradients in one object

Post questions on how to use or achieve an effect in Inkscape.
compose
Posts: 11
Joined: Sat Aug 13, 2011 6:22 am

How to use multiple gradients in one object

Postby compose » Sat Aug 13, 2011 6:29 am

Hi,

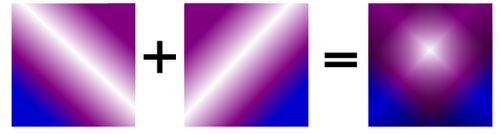
I have a rectabgle on which I want to use two gradients :tool_gradient: . I can't find a way how to do that. Clicking the gradient tool appears two return always to the same gradient.

regards,

Arnold

User avatar
druban
Posts: 1917
Joined: Fri Nov 20, 2009 10:48 pm

Re: How to use multiple gradients in one object

Postby druban » Sat Aug 13, 2011 2:37 pm

Sorry, arnold, this can't be done in Inkscape. You might have some luck duplicating the object and applying a different gradient to the one on top - if your gradient is transparent it might look like two grdients applied to one object.
Your mind is what you think it is.

compose
Posts: 11
Joined: Sat Aug 13, 2011 6:22 am

Re: How to use multiple gradients in one object

Postby compose » Sat Aug 13, 2011 3:18 pm

Pity it can't be done. Thanks for your suggestion, I'll try that out.

User avatar
brynn
Posts: 10309
Joined: Wed Sep 26, 2007 4:34 pm
Location: western USA
Contact:

Re: How to use multiple gradients in one object

Postby brynn » Sun Aug 14, 2011 8:25 am

I often use 2 or 3 gradients (duplicated objects with gradients) on top of each other. But it only works if the opacity is very low....20 or less, and ideally 10 or less. Sometimes I've found that I can use a radial gradient, to kind of fake it. But so much depends on exactly what effect you're trying to depict.

EDIT
What would happen if we could take a radial gradient, and move one of the handles to some angle besides 90 degrees to the other? That would be Awesome! I'm guessing this would be very difficult to create/code into the program. But such a great feature that I have half a mind to request at Launchpad, lol. Maybe I'll start a topic our Ideas forum.... :D

User avatar
druban
Posts: 1917
Joined: Fri Nov 20, 2009 10:48 pm

Re: How to use multiple gradients in one object

Postby druban » Sun Aug 14, 2011 2:49 pm

brynn wrote:What would happen if we could take a radial gradient, and move one of the handles to some angle besides 90 degrees to the other? That would be Awesome!


Although it sounds like it might be something other than what we have now, in fact it would be no different ... the same gradient nodes are on each axis of the radial gradients. in effect, you only have one set of nodes that describe colour, although they are, for convenience, duplicated on each arm. The reason for having two arms is to describe the shape of the ellipse, in other words, the length of the short arm specifies the minor axis, the other arm the major axis.

You could describe the ellipse by establishing another angle (other than 90) for the second arm, but it would still be an ellipse, just with a needlessly more complicated calculation ...

If you are thinking of having a third "handle" that would be entirely independent of the other two, of course this would be quite different, not an ellipse, certainly not a quadratic (2nd degree), and something to give the SVG developers a bit of a nightmare...
Your mind is what you think it is.

User avatar
BobSongs
Posts: 324
Joined: Fri Sep 14, 2007 2:18 pm
Location: Montreal, Canada

Re: How to use multiple gradients in one object

Postby BobSongs » Sun Aug 14, 2011 2:58 pm

I'm wondering what exactly compose was after.

When I drag the :tool_gradient: tool, I get a black-to-transparent gradient by default. True. But that gradient can be edited to be, say, red to yellow to green to orange with varying degrees of transparency for each colour.

Is this what you were after, compose?

Your question seemed fairly basic but we kinda assumed you wanted overlapping gradients. Perhaps you're wondering how to edit the default one once it's created?
Attachments
rectangle with gradient1.svg
This is a rectangle with a default gradient stroked across it. Nothing fancy.
(3.37 KiB) Downloaded 381 times
rectangle with gradient2.svg
This rectangle had the gradient edited: Ctrl+Shift+F, "Fill" tab, "Edit" button and then adjust in the "Gradient editor".
(3.8 KiB) Downloaded 408 times
rectangle with gradient3.svg
The same as above, but a thick stroke was added, a gradient added to the stroke and then selected the pre-edited gradient theme.
(4.92 KiB) Downloaded 369 times

User avatar
brynn
Posts: 10309
Joined: Wed Sep 26, 2007 4:34 pm
Location: western USA
Contact:

Re: How to use multiple gradients in one object

Postby brynn » Sun Aug 14, 2011 7:53 pm

druban wrote:Although it sounds like it might be something other than what we have now, in fact it would be no different ... the same gradient nodes are on each axis of the radial gradients.

Ahh, I see what you mean druban. I guess I was thinking that the 2 handles would describe 2 gradients, with the origins occupying the same spot. But I certainly would not want to give the developers nightmares, lol. I still think it's an interesting idea though....what did I see it was called, in something I read many months ago....gradient mesh, I think? Or is that something else (it's late where I am, I should probably call it a day, lol)?

compose
Posts: 11
Joined: Sat Aug 13, 2011 6:22 am

Re: How to use multiple gradients in one object

Postby compose » Mon Aug 15, 2011 12:41 am

@BobSongs
The question is pretty basic, I agree. I'll describe what I have done and what effect I try to create.
I have a rectangle that runs from purple to blue. at about 1/5 and 2/5 I have inserted to points to insert white. I have the following gradients
start-1st point: purple to white
point 1-2: white to purple
point 2-end: purple to blue.
Well, the colors might nog be everybodies taste :-), but the effect I get is something like a flash. I like it. The gradient runs from upper left to lower right. In this flash I have inserted a logo. Now I would like to position exactly the same effect 90 degrees transposed on it. The idea is that I get another flash, 90 degrees transposed. Where the flashes cross you have a beautiful spot to brighten up something, in my case the logo. I stumbled upon the effect while experimenting with gradients (great tool btw). Beginner as I am I thought I could use any number of gradients :-).

Any workaround is appreciated.

regards,

Arnold

User avatar
BobSongs
Posts: 324
Joined: Fri Sep 14, 2007 2:18 pm
Location: Montreal, Canada

Re: How to use multiple gradients in one object

Postby BobSongs » Mon Aug 15, 2011 8:12 am

Ahhh! Clarity! Excellent.

What you *could* try is the following (essentially what druban suggested):

1. Duplicate said rectangle (select item, Ctrl+D).
2. Click the :tool_gradient: Gradient tool on the top-most rectangle and give it a 50% transparency via the Fill and Stroke dialogue.

I'm going to do that now.

Essentially I created a square (for ease of demonstration) and flipped the object to the left 90 degrees. However, if you're using a shape that doesn't permit such a flip, the next solution is to move the gradient line itself in the duplicated rectangle into opposite corners.

More adjustments could be made if the bottom rectangle were black and the two top rectangles only contained the purple flares. The black underneath can have its own unique pattern. And if the logo sits on top of the central area, the odd "ball" effect won't be visible.

The notion of using several layers to achieve an effect in vector art isn't new. If you study how Inkscape adds a stroke you'll see immediately that this tool won't satisfy everyone. Simply put: the thicker the line, the more it consumes real estate inside the rectangle. This becomes obvious if you exaggerate the line's thickness. So how would I add a nice thick outer stroke without it taking any room inside the rectangle? By creating two such rectangles and giving the bottom one the stroke. Lay the non-stroked rectangle on top and the effect is complete.

Let me know how this work-around helps.

:)
Attachments
rectangle with two gradients 2.svg
Top rectangle is set at 50% transparency. Examine where I put the fade nodes. I "works" but leaves an odd sort of central circular ball.
(6.15 KiB) Downloaded 310 times
rectangle with two gradients.svg
Top rectangle is set at 50% transparency. Tell me what you think.
(3.97 KiB) Downloaded 282 times

User avatar
druban
Posts: 1917
Joined: Fri Nov 20, 2009 10:48 pm

Re: How to use multiple gradients in one object

Postby druban » Mon Aug 15, 2011 11:17 am

brynn wrote: I certainly would not want to give the developers nightmares, lol. I still think it's an interesting idea though....what did I see it was called, in something I read many months ago....gradient mesh, I think?


Exactly, yes, gradient mesh. I think the Inkscape developers could handle the coding for this with great ease, but the SVG developers' specifications that they are following will not accomodate it...

To compose: here is another way to get what you might want.
g3211.png
g3211.png (50.57 KiB) Viewed 19789 times
bitmap.png
bitmap.png (76.07 KiB) Viewed 19789 times
Your mind is what you think it is.

compose
Posts: 11
Joined: Sat Aug 13, 2011 6:22 am

Re: How to use multiple gradients in one object

Postby compose » Wed Aug 17, 2011 3:52 pm

@BobSongs & Druban
Thank you both very much for your suggestions! It helps me to think in a more flexible way about gradients. Your solution is, alas, not the one I am looking for. I *am* looking for the effect, that's exactly what I want. But I realised that I did not make myself clear: what I want is a gradient from upper left to lower right just in the way from purple to blue. In your solution a new competing gradient is introduced. That is not what I wanted.

But as I said, you taught me to think more flexible about gradients. I added a white square in layer 2 with the new gradient. It runs from transparant to white, to white again and then to transparant. The effect is more like i would like to have, but now it applies an undesired 3D effect. And it is a little bit too light on the lower side of picture. I thing I can circumvent the last with extra points, i must experiment with ths 3D thing.
Attachments
gradients.png
gradients.png (18.96 KiB) Viewed 19744 times

User avatar
druban
Posts: 1917
Joined: Fri Nov 20, 2009 10:48 pm

Re: How to use multiple gradients in one object

Postby druban » Wed Aug 17, 2011 5:34 pm

You might want to look at overlaying a blurred white object over a gradient filled object? A lot of irregular gradient shapes can be effectively simulated using blurs.
This one uses two four point white stars over a gradient filled rectangle.
rect3089.png
rect3089.png (47.41 KiB) Viewed 19739 times
Your mind is what you think it is.

compose
Posts: 11
Joined: Sat Aug 13, 2011 6:22 am

Re: How to use multiple gradients in one object

Postby compose » Thu Aug 18, 2011 6:26 am

@Druban, this bis great! Just what I would like to have. I'll try to reproduce that tomorrow, else it will be next week.

User avatar
druban
Posts: 1917
Joined: Fri Nov 20, 2009 10:48 pm

Re: How to use multiple gradients in one object

Postby druban » Fri Aug 19, 2011 12:44 pm

Well, in case you need it, here is an SVG and PNG to give you an idea...
star.png
star.png (35.55 KiB) Viewed 19684 times
Attachments
star.svg
(7.49 KiB) Downloaded 323 times
Your mind is what you think it is.

compose
Posts: 11
Joined: Sat Aug 13, 2011 6:22 am

Re: How to use multiple gradients in one object

Postby compose » Wed Aug 24, 2011 4:28 am

This is a very clever group of objects you have pieced together. Would you mind explaining it it? I just don't understand what you have done. Pointing to the manual might be enough, but I am just not able to "decipher" the objects you've used and what operations you have used.

User avatar
brynn
Posts: 10309
Joined: Wed Sep 26, 2007 4:34 pm
Location: western USA
Contact:

Re: How to use multiple gradients in one object

Postby brynn » Wed Aug 24, 2011 1:42 pm

There's a status bar along the bottom of the Inkscape window, in the middle. Using the Selection tool, you can learn about each thing that you click on. So if there's a Group, it will say Group of 4 or whatever. You can really learn a lot about what's happening in an image using the status bar. Just a tip :D

User avatar
druban
Posts: 1917
Joined: Fri Nov 20, 2009 10:48 pm

Re: How to use multiple gradients in one object

Postby druban » Wed Aug 24, 2011 2:55 pm

compose wrote:This is a very clever group of objects you have pieced together. Would you mind explaining it it? I just don't understand what you have done. Pointing to the manual might be enough, but I am just not able to "decipher" the objects you've used and what operations you have used.


It's kind of you to say so, but it's not particularly clever... Here's a quick explanation, let me know if it is still confusing!

1. there are only three objects - from back to front, they are:

i) a background square, containing a purple to blue gradient,

ii) a four point star object (star tool, enter 4 in the control bar, reduce the spoke ratio to something that looks right to you) filled with white, and then BLURRED in the fill and stroke dialog box to be quite soft,

iii) another, smaller, four point star (you could just duplicate the first one and then edit it) with a larger spoke ratio but shorter arms, also filled with white, and also blurred but, importantly, not as much as the first one. This gives the "core" of the star effect.

That's it! The spoke ratio is a little hard to adjust on canvas without getting a twist in the star so I recommend doing it from the control bar, but otherwise it's all straightforward...
Your mind is what you think it is.

syednayab
Posts: 25
Joined: Thu Jan 27, 2011 10:58 pm
Contact:

Re: How to use multiple gradients in one object

Postby syednayab » Sat Dec 03, 2011 12:09 am

However when i try import AI gradiant files, it shows up the gradiants..

You can try gradiant editor in toolbox and it works

syednayab
Posts: 25
Joined: Thu Jan 27, 2011 10:58 pm
Contact:

Re: How to use multiple gradients in one object

Postby syednayab » Mon Dec 05, 2011 11:49 pm

here is one tutorial, hope it help..i have created

http://www.youtube.com/watch?v=meZQfolj ... ideo_title

LibreVurto
Posts: 2
Joined: Sun Jul 14, 2013 12:36 pm

Re: How to use multiple gradients in one object

Postby LibreVurto » Sun Jul 14, 2013 12:56 pm

I use a cutout square and add blur to produce a pseudo-square-gradient effect. I'll attach an example and .png (for some reason it doesn't show up properly on the svg when viewed in an image viewer.)

Image
Attachments
squarefadient.svg
(2.97 KiB) Downloaded 274 times
squarefadient.png
squarefadient.png (6.45 KiB) Viewed 17968 times

bypass666
Posts: 1
Joined: Mon Jul 22, 2013 10:58 pm

Re: How to use multiple gradients in one object

Postby bypass666 » Tue Jul 23, 2013 8:31 pm

Hey there

How did you make the black outer edge to transparent centre?

I opened the file but could not spot the attribute that achieved this?

Many thanks

LibreVurto
Posts: 2
Joined: Sun Jul 14, 2013 12:36 pm

Re: How to use multiple gradients in one object

Postby LibreVurto » Wed Jul 24, 2013 8:23 pm

Sorry I should have explained. First make the shape you want to use for the gradient, I made a smaller square inside a larger square and then used PATH>>DIFFERENCE to leave a cut out square. Then blur the shape and use another square to tidy up the edges by clipping them together.

Salty
Posts: 1
Joined: Sun Nov 03, 2019 2:46 am

Re: How to use multiple gradients in one object

Postby Salty » Sun Nov 03, 2019 2:58 am

Made an acc just for this.
- For newbies to Inkscape.

You start off with a shape. Select that shape.
Click this :tool_gradient: icon.
Click and drag on the object (a gradient would appear).
Change the color of the gradient by clicking on the vertexes (aka the box and the balls) and clicking on the fill and stroke tab on your right. You can now change the colors of that vertex (note: if you want a transparent vertex for, like, shading, turn down the bar with the checkerboard pattern (also known as alpha))
You want more colors on the gradient? ctrl+alt+click on the line between the vertexes to create another vertex.

Duplicate the gradient (it is an object - look in the objects tab on your right to see if you have the gradient)
Change the duplicated gradient in the exact same way as you did earlier but turn down alpha on the vertex you want to be transparent.

You can also do this with mesh gradients, but those are not easy.


Return to “Help with using Inkscape”