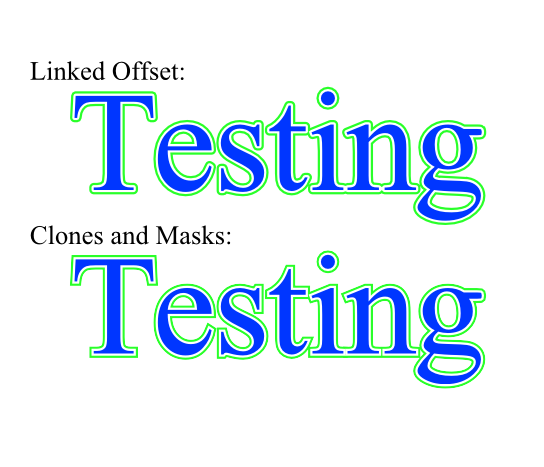
Unfortunately, offsets tend to look wrong on text because the corners get smoothed. Sometimes that's what you want, of course, but from the image in the original post, I'm guessing not in this case. The correct way to do it and keep the text editable is using clones. Due the styling behavior with clones, though, it gets a bit complicated, which is what c-quel was referring to earlier.
We're actually going to need one text object and four clones: one clone for the text fill, and three to make up the offset stroke.
- Type your original text. Set both its fill and stroke to Unset. This is necessary to be able to style the clones.
- Clone the text (Alt+d) to make the fill clone (C-fill). Move C-fill away, we don't need it until the end.
- Clone the text to make the offset stroke clone (C-stroke). Move it away, so we can work with it without the original getting in the way. At this point, you can move the original completely out of the way because we don't need to work with it any more.
- Now figure out the offset stroke dimensions you want: how thick you want the transparent area, and how thick you want the visible offset stroke. For this example, let's say the transparent area will be 2px wide, and the offset stroke will be 3px wide.
- Set C-stroke's stroke to the final outline color you want, and 10px wide (double the sum of the final width and the transparent area).
- Duplicate C-stroke (Ctrl+d) to make the opaque mask clone (C-omask). Set C-omask's fill and stroke to white, and its stroke to be 10px wide (double the sum of the final width and the transparent area).
- Duplicate C-omask (Ctrl+d) to make the transparent mask clone (C-tmask). Set C-tmask's fill and stroke to be black, and its stroke to be 4px wide (double the width of the transparent area).
- At this point it should look like your text with a thick white outline and black fill. The white areas will show through on the final outline, the black areas will become transparent. That's how masks work. We had to double all the stroke widths because a stroke's width is centered on the edge of the object, meaning half the stroke is on the inside of the object and half is on the outside, and only the outside part of the stroke matters to us here.
- Group C-omask and C-tmask. You can do so by first selecting C-tmask, which should be on top, then holding Shift and Alt and click it again. That will select the object beneath C-tmask, which should be C-omask. Then group them with Ctrl+g.
- Hold Shift and Alt again and click the new group, and it should select C-stroke, which is sitting beneath that group. Set the mask by going to the Object menu, Mask -> Set.
- Now you should see just a thin outline of your text with a most of the inner area transparent.
- Find C-fill and align it with the outline using the Align and Distribute dialog (Shift+Ctrl+a).
At this point you can change the stroke color by selecting the stroke object and changing its stroke color, or change the fill color by selecting the fill object and changing its fill color. You might want to group the two objects so they stay aligned if you move them. If you need to change the offset stroke's width, you'll need to unset the outline object's mask, change the widths of C-omask and C-tmask, and then set the mask again.
The last thing to deal with is the original text object, which is still hanging around. That needs to be kept, but you can make it invisible by either moving it outside the bounds of the document page (where normal renderers won't go), placing it on an invisible layer, or putting it in its own group (select it and press Ctrl+g) and setting the group's opacity to 0. If you chose one of the last two options and need to change the text, go to outline mode to find it (View menu, Display mode -> Outline).
It seems complicated, but once you understand
clones and
masks it's pretty straightforward. Although, honestly, this is something Inkscape could handle automatically with some UI enhancements.


