Hello,
I have retraced an emblem with inkscape. Now I would like to color the areas between the paths. I know I can fill a path with color, but this is not working perfect because I guess I did not draw the paths in a perfect way for later coloring. With the paintbucket the results are bad. How can I fill the space between two different paths best way?
Thanks and regards,
Pingpong
Filling space between path with color
Re: Filling space between path with color
Could you upload the SVG? There may be an optimal way, but it would be easier to make suggestions if we know what exactly is in the file.
Something doesn't work? - Keeping an eye on the status bar can save you a lot of time!
Inkscape FAQ - Learning Resources - Website with tutorials (German and English)
Inkscape FAQ - Learning Resources - Website with tutorials (German and English)
Re: Filling space between path with color
Usually the trick to making a path to be filled with color, it needs to be one, single, closed path. Often newbies draw paths in pieces, and don't immediately see how to make them connected.
Often it can be done while drawing the path. Did you notice while you were drawing a path, that there is tiny square at the beginning of a path? There's also one at the end of a path. You can only see them while the either Pen/Bezier or Pencil/Freehand tool is enabled.
So if you draw one single path, when you're coming back around to the place where you started, you need to place the mouse inside that square. You might notice that the square turns red when the mouse is in the right place. Then just click once with the mouse inside that square, and the path will be closed.
Or if you draw the outline in a few different pieces, then select the last part that you were drawing, and switch to the Pen or Pencil tool. Place the mouse inside the square and click once. Then whatever you draw from there will automatically be part of the last section.
Or, if you have the pieces already drawn, you can use node editing, with the Node tool, to more or less splice pieces together. Using the Node tool, select 2 end nodes, and click either "Join selected nodes" or "Join selected nodes with a new segment" button on the Node tool control bar. You have to do that for each section, so depending how many pieces you have, it might be a lot of work. Some people like to avoid node editing, but it doesn't really bother me much.
If you're drawing something that's more complex, you might have places where sections of different closed paths overlap each other. Or depending on the style of the drawing, sometimes using the Paint Bucket tool is the best choice. As Moini suggested, we can give more targetted suggestions if we could see your drawing (SVG file is best).
Basics - Help menu > Tutorials
Manual - Inkscape: Guide to a Vector Drawing Program
Inkscape Community - Inkscape FAQ - Gallery
Inkscape for Cutting Design
Manual - Inkscape: Guide to a Vector Drawing Program
Inkscape Community - Inkscape FAQ - Gallery
Inkscape for Cutting Design
-
Pingponguin
- Posts: 17
- Joined: Fri Apr 07, 2017 9:48 am
Re: Filling space between path with color
Thank you for your answers. I have attached the file. I could not attach the file with original .png because it was too big.
- Attachments
-
- NeuesClanLogoBasisohneHintergrund.svg
- (173.19 KiB) Downloaded 301 times
Re: Filling space between path with color
Many of the paths can already be colored by setting a fill color.
Some new areas can to be created from the existing paths so they can get a fill color later.
Just a hint on what to look up, I don't have time now for the full tutorial (but others may):
You will need to duplicate paths for this, to learn what 'Path -> Combine' and 'Path -> Break apart' do, and to learn how to use the node tool to split and reconnect path ends, to create these areas.
Something doesn't work? - Keeping an eye on the status bar can save you a lot of time!
Inkscape FAQ - Learning Resources - Website with tutorials (German and English)
Inkscape FAQ - Learning Resources - Website with tutorials (German and English)
Re: Filling space between path with color
There's not much more I can add. It looks like you've done a good job, especially for a first start!
As I mentioned above about places where you might have 2 (or maybe even more) closed paths which share parts of the same border -- I see you already have done a lot of that. For 100% zoom, you can't really notice it. But I'm always zooming in, to see things more closely. So once zoomed in, I can see that the overlapping of borders isn't precise. If you wanted to fix that, we can explain some path operations, which would be much faster (and more precise) than node editing.
Especially if you're planning to use it with some kind of cutter (such as CNC or laser cutter, or the home/craft type of paper cutter)) it would be a very good idea to fix those.
Where the arrow goes through the horseshoe, I guess you would want either the arrow or the horseshoe on top of the other? If you'll be using fully opaque color (and not cutting/plotting), and every piece will have color, then whatever object is on top (in z-order) blocks out what's under it. But if any of it will have transparent areas (partial or full transparency) and you need to get rid of the lines that cross over, then either the arrow or the horshoe will need to be broken into 2 pieces. That could be done fairly quickly with path operations as well.
Let us know, and we can explain those things. But you could also look them up in the manual, which is in the Help menu > Inkscape Manual, and give it a try yourself. Or if you have any specific areas where you're stuck, just let us know and we can give you specific steps.
Just for your info, there is a way to make the Paint Bucket tool give better results. But in my opinion, it's better to go with the raw paths, like you've almost finished already.
Edit
Oh, one more comment. Especially the paths which make the tank, and the small circle and oval decorations have a really large number of nodes. And I know it's because you traced it by hand, and probably were zoomed in too. That's exactly how I would do it, because you get more precise results. But in the end, I would use Path menu > Simplify. If you do it just once, it will reduce the number of nodes without distorting the paths very much. You might notice a little corner where it got more rounded. But if you do it twice, the paths will definitely be distorted. If the small distortion from doing it once is too much, you can adjust the threshold in Inkscape Preferences (yet still be able to reduce the number of nodes).
Basics - Help menu > Tutorials
Manual - Inkscape: Guide to a Vector Drawing Program
Inkscape Community - Inkscape FAQ - Gallery
Inkscape for Cutting Design
Manual - Inkscape: Guide to a Vector Drawing Program
Inkscape Community - Inkscape FAQ - Gallery
Inkscape for Cutting Design
-
tylerdurden
- Posts: 2344
- Joined: Sun Apr 14, 2013 12:04 pm
- Location: Michigan, USA
Re: Filling space between path with color
To share the .png file, you can upload the file to a cloud storage service like dropbox.com and share a link to the file.
Have a nice day.
I'm using Inkscape 0.92.2 (5c3e80d, 2017-08-06), 64 bit win8.1
The Inkscape manual has lots of helpful info! http://tavmjong.free.fr/INKSCAPE/MANUAL/html/
I'm using Inkscape 0.92.2 (5c3e80d, 2017-08-06), 64 bit win8.1
The Inkscape manual has lots of helpful info! http://tavmjong.free.fr/INKSCAPE/MANUAL/html/
-
Pingponguin
- Posts: 17
- Joined: Fri Apr 07, 2017 9:48 am
Re: Filling space between path with color
Moini wrote:Many of the paths can already be colored by setting a fill color.
I will try which ones I can use as they are.
Moini wrote:Some new areas can to be created from the existing paths so they can get a fill color later.
Just a hint on what to look up, I don't have time now for the full tutorial (but others may):
You will need to duplicate paths for this, to learn what 'Path -> Combine' and 'Path -> Break apart' do, and to learn how to use the node tool to split and reconnect path ends, to create these areas.
Ok, thands for this hint. I will read more about it and try it.
-
Pingponguin
- Posts: 17
- Joined: Fri Apr 07, 2017 9:48 am
Re: Filling space between path with color
brynn wrote:There's not much more I can add. It looks like you've done a good job, especially for a first start!
You already gave me a lot of usefull information I can build on.
brynn wrote:As I mentioned above about places where you might have 2 (or maybe even more) closed paths which share parts of the same border -- I see you already have done a lot of that. For 100% zoom, you can't really notice it. But I'm always zooming in, to see things more closely. So once zoomed in, I can see that the overlapping of borders isn't precise. If you wanted to fix that, we can explain some path operations, which would be much faster (and more precise) than node editing.
Especially if you're planning to use it with some kind of cutter (such as CNC or laser cutter, or the home/craft type of paper cutter)) it would be a very good idea to fix those.
That would be great. What I'm actually up to, is to build a 3D-Logo.
brynn wrote:Where the arrow goes through the horseshoe, I guess you would want either the arrow or the horseshoe on top of the other? If you'll be using fully opaque color (and not cutting/plotting), and every piece will have color, then whatever object is on top (in z-order) blocks out what's under it. But if any of it will have transparent areas (partial or full transparency) and you need to get rid of the lines that cross over, then either the arrow or the horshoe will need to be broken into 2 pieces. That could be done fairly quickly with path operations as well.
The arrow is on top the horeseshoe. That is something I have to experiment with. I plan using Blender or Aurora 3D Text & Logo Maker for the 3D-Logo. I have already made some trials with Aurora 3D Text & Logo Maker and it looks pretty good.
brynn wrote:Let us know, and we can explain those things. But you could also look them up in the manual, which is in the Help menu > Inkscape Manual, and give it a try yourself. Or if you have any specific areas where you're stuck, just let us know and we can give you specific steps.
Just for your info, there is a way to make the Paint Bucket tool give better results. But in my opinion, it's better to go with the raw paths, like you've almost finished already.
I can look them up by myself. Now I have information and particularly keywords to look for. I have made the experience that one of the biggest barrier is the lack of vocabulary to look for, when I teach myself a new software or technique.
brynn wrote:Edit
Oh, one more comment. Especially the paths which make the tank, and the small circle and oval decorations have a really large number of nodes. And I know it's because you traced it by hand, and probably were zoomed in too. That's exactly how I would do it, because you get more precise results. But in the end, I would use Path menu > Simplify. If you do it just once, it will reduce the number of nodes without distorting the paths very much. You might notice a little corner where it got more rounded. But if you do it twice, the paths will definitely be distorted. If the small distortion from doing it once is too much, you can adjust the threshold in Inkscape Preferences (yet still be able to reduce the number of nodes).
I have tried Simplify on the base paths and it worked pretty good. But on the more complex paths like the tank and the font the distortion was too big. Thanks for the hint that I can adjust the threshold, so I can give it another try.
Thank you very much for your extensive support. You pushed me a big step forward.
Re: Filling space between path with color
Oh, I know what you mean about the vocabulary or terminology. That's the hardest part!
When I used Select All, and then Simplify, the tank and the text was distorted. But if I selected only the tank, it was ok. The text should not need simplify, and the larger shield shape, and big arrow, and the big plus sign are all fine. Not too many nodes. Try selecting only the tank parts. And only the little ovals and circles.
If you mean using a 3d printer, having those areas crisp and clean would be necessary. I'm not sure about (what I refer to as) simulated 3d, like with Blender. It might not matter as much there. But I'll explain anyway.
I'll use the attached image for an example (ta1.png) I made it red, just for clarity. The easiest way to get this type of precision, is to use Snapping. If you haven't learned about it yet, here's the manual info: http://tavmjong.free.fr/INKSCAPE/MANUAL ... pping.html Set it up so that nodes snap to paths. Then you can snap the end nodes of the red path to the straight diagonal line.
However, you still can't give a fill to that piece. Well you could, and it would fill correctly, since the end nodes are snapped to a straight line. But it's not a closed path, and it might cause some trouble when you make it 3D. To close it, select both end nodes of the red path, and click "Join selected end nodes with a new segment" button on the Node tool control bar. There's a key shortcut, if you prefer, but I don't know it off the top of my head. Anyway, since the diagonal line is straight, and the end nodes of the red path are snapped to it, then the straight segment between them will match the diagonal line of the big arrow.
For those pieces which already are closed paths, but they don't match the straight line, I'll use the line of little ovals near the top for example (ta2.png attachment). First, select all the ovals, and do Path menu > Combine. (This makes the ovals all subpaths of a single compound path. So when you select one, you select them all. This is reversible for later, if necessary. If you ever need them to be separated lated, do Path menu > Break apart.)
In some places, the little ovals go above the line, and in other cases, the top edge of them is below the line. Since more go above than below, use the Node tool to drag the nodes that are below the line. Drag them so they are above the line. They could be above by a lot, it doesn't matter if they're close to the line or not. You just want to make sure all the ovals either go above the line, or they're already equal to the line. So you can see that I dragged a few upwards.
Next, notice the blue rectangle that I added. You'll need to draw something like that. Just make sure that the top edge of the rectangle matches the original horizontal line at the top of the ovals, and that the bottom edge is not touching the bottom of the ovals. Next, select both the ovals paths and the blue rectangle, and do Path menu > Intersection. Here's my result in ta3.png
I have tried Simplify on the base paths and it worked pretty good. But on the more complex paths like the tank and the font the distortion was too big. Thanks for the hint that I can adjust the threshold, so I can give it another try.
When I used Select All, and then Simplify, the tank and the text was distorted. But if I selected only the tank, it was ok. The text should not need simplify, and the larger shield shape, and big arrow, and the big plus sign are all fine. Not too many nodes. Try selecting only the tank parts. And only the little ovals and circles.
You already gave me a lot of usefull information I can build on.
brynn wrote: As I mentioned above about places where you might have 2 (or maybe even more) closed paths which share parts of the same border -- I see you already have done a lot of that. For 100% zoom, you can't really notice it. But I'm always zooming in, to see things more closely. So once zoomed in, I can see that the overlapping of borders isn't precise. If you wanted to fix that, we can explain some path operations, which would be much faster (and more precise) than node editing.
Especially if you're planning to use it with some kind of cutter (such as CNC or laser cutter, or the home/craft type of paper cutter)) it would be a very good idea to fix those.
That would be great. What I'm actually up to, is to build a 3D-Logo.
If you mean using a 3d printer, having those areas crisp and clean would be necessary. I'm not sure about (what I refer to as) simulated 3d, like with Blender. It might not matter as much there. But I'll explain anyway.
I'll use the attached image for an example (ta1.png) I made it red, just for clarity. The easiest way to get this type of precision, is to use Snapping. If you haven't learned about it yet, here's the manual info: http://tavmjong.free.fr/INKSCAPE/MANUAL ... pping.html Set it up so that nodes snap to paths. Then you can snap the end nodes of the red path to the straight diagonal line.
However, you still can't give a fill to that piece. Well you could, and it would fill correctly, since the end nodes are snapped to a straight line. But it's not a closed path, and it might cause some trouble when you make it 3D. To close it, select both end nodes of the red path, and click "Join selected end nodes with a new segment" button on the Node tool control bar. There's a key shortcut, if you prefer, but I don't know it off the top of my head. Anyway, since the diagonal line is straight, and the end nodes of the red path are snapped to it, then the straight segment between them will match the diagonal line of the big arrow.
For those pieces which already are closed paths, but they don't match the straight line, I'll use the line of little ovals near the top for example (ta2.png attachment). First, select all the ovals, and do Path menu > Combine. (This makes the ovals all subpaths of a single compound path. So when you select one, you select them all. This is reversible for later, if necessary. If you ever need them to be separated lated, do Path menu > Break apart.)
In some places, the little ovals go above the line, and in other cases, the top edge of them is below the line. Since more go above than below, use the Node tool to drag the nodes that are below the line. Drag them so they are above the line. They could be above by a lot, it doesn't matter if they're close to the line or not. You just want to make sure all the ovals either go above the line, or they're already equal to the line. So you can see that I dragged a few upwards.
Next, notice the blue rectangle that I added. You'll need to draw something like that. Just make sure that the top edge of the rectangle matches the original horizontal line at the top of the ovals, and that the bottom edge is not touching the bottom of the ovals. Next, select both the ovals paths and the blue rectangle, and do Path menu > Intersection. Here's my result in ta3.png
- Attachments
-

- ta3.png (30.94 KiB) Viewed 5668 times
-

- ta2.png (37.92 KiB) Viewed 5668 times
Basics - Help menu > Tutorials
Manual - Inkscape: Guide to a Vector Drawing Program
Inkscape Community - Inkscape FAQ - Gallery
Inkscape for Cutting Design
Manual - Inkscape: Guide to a Vector Drawing Program
Inkscape Community - Inkscape FAQ - Gallery
Inkscape for Cutting Design
-
Pingponguin
- Posts: 17
- Joined: Fri Apr 07, 2017 9:48 am
Re: Filling space between path with color
Hello brynn,
meanwhile I have finished the file, unfortunately before I read your answer about snapping. This would have saved me a lot of time I guess.
Well, the file isn't perfect and I can still work on it.
I have two questions how to fix errors in the attached file emblem.svg:
here you can see that there is a little bit of blue shining through and I didn't manage to fix it without messing up everything else around. I could just put a "band aid" on top, but maybe there is a better way.
here is this flat blue area below the horseshoe. The blue is from layer "inner contour" in the file. For some reason between two knots of the contour of the path ( can I say: of the pathes contour? ) the blue filling breaks through.
Maybe you can tell me what is wrong.
In your answer about snapping you mentioned
Thanks and regards, Pingpong
meanwhile I have finished the file, unfortunately before I read your answer about snapping. This would have saved me a lot of time I guess.
Well, the file isn't perfect and I can still work on it.
I have two questions how to fix errors in the attached file emblem.svg:

- Screenshot_1.png (55.01 KiB) Viewed 5605 times
here you can see that there is a little bit of blue shining through and I didn't manage to fix it without messing up everything else around. I could just put a "band aid" on top, but maybe there is a better way.

- Screenshot_2.png (19.57 KiB) Viewed 5605 times
here is this flat blue area below the horseshoe. The blue is from layer "inner contour" in the file. For some reason between two knots of the contour of the path ( can I say: of the pathes contour? ) the blue filling breaks through.
Maybe you can tell me what is wrong.
In your answer about snapping you mentioned
, but I can't see an image ta1.png, did you mean ta3.png ?I'll use the attached image for an example (ta1.png)
Thanks and regards, Pingpong
- Attachments
-
- emblem.svg
- (124.59 KiB) Downloaded 261 times
Re: Filling space between path with color
Break apart the blue path (Path -> Break apart, it's in the locked layer which you need to unlock first), then remove the object that has the wrong contour there. It seems somehow the contour is duplicated partially, in the same path, with both duplicates lying almost exactly above one another.
You also don't need a blue version of the horseshoe and can remove those nodes.
At the bottom, just drag the lowermost node of the blue shape up a bit, then it won't show through.
For a first-time project, well done
(later, you will find out how to better organize the parts of the drawing - many can be unioned, and many overlaps could be reduced. Also you would probably try to avoid using any strokes in a drawing like this - a more experienced user might have created the dark background first, then put all the colored parts on it, just letting the background shine through instead of drawing some of it back on top, except for the tank and the cross, maybe).
Something doesn't work? - Keeping an eye on the status bar can save you a lot of time!
Inkscape FAQ - Learning Resources - Website with tutorials (German and English)
Inkscape FAQ - Learning Resources - Website with tutorials (German and English)
-
Pingponguin
- Posts: 17
- Joined: Fri Apr 07, 2017 9:48 am
Re: Filling space between path with color
Moini wrote:Break apart the blue path ...
Thank you very much. I don't know why I drew the blue line twice. I just deleted one and closed the left over path the way, that I fixed the other problem at once.
-
Pingponguin
- Posts: 17
- Joined: Fri Apr 07, 2017 9:48 am
Re: Filling space between path with color
Two more questions regarding the emblem. Can I make the embelm consist of one path? I have a problem with multiple paths in Blender.
In Inkscape I tried to group and all kind of path functions, but when I import the svg to Blender I always have multiple paths.
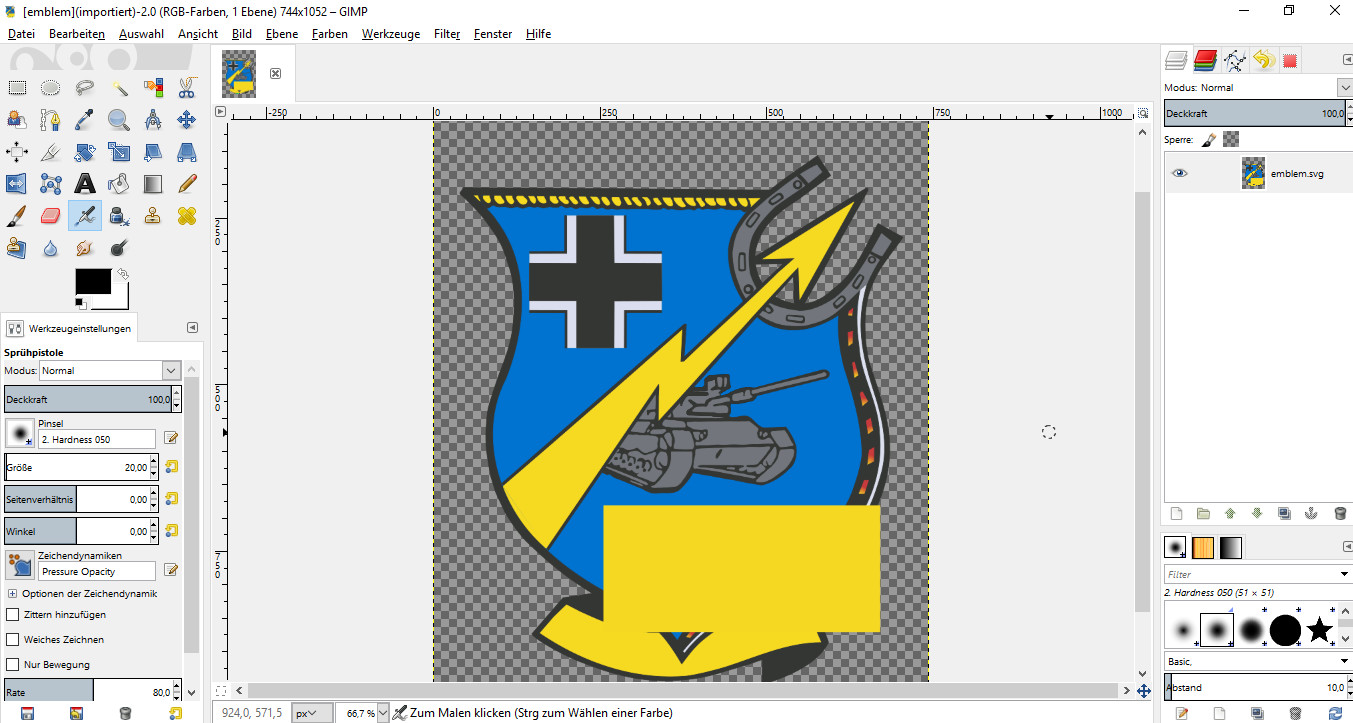
Second is, that when I open the svg in Gimp I have this big yellow rectangle. I only see it in Gimp. How can I fix this?
Thanks and regards, Pingpong
In Inkscape I tried to group and all kind of path functions, but when I import the svg to Blender I always have multiple paths.
Second is, that when I open the svg in Gimp I have this big yellow rectangle. I only see it in Gimp. How can I fix this?
- Screenshot_1.png (196.83 KiB) Viewed 5506 times
Thanks and regards, Pingpong
Re: Filling space between path with color
You can - in many cases - use just 1 path per color in your drawing. Sometimes this may make sense, and sometimes it doesn't.
For the flowed text (which is what you've been using) there's a longer explanation in the FAQ:
https://inkscape.org/de/lernen/haufig-g ... orted_file
You can also convert the text to paths (Edit -> Object to Path) which is probably more useful in this case.
For the flowed text (which is what you've been using) there's a longer explanation in the FAQ:
https://inkscape.org/de/lernen/haufig-g ... orted_file
You can also convert the text to paths (Edit -> Object to Path) which is probably more useful in this case.
Something doesn't work? - Keeping an eye on the status bar can save you a lot of time!
Inkscape FAQ - Learning Resources - Website with tutorials (German and English)
Inkscape FAQ - Learning Resources - Website with tutorials (German and English)
-
tylerdurden
- Posts: 2344
- Joined: Sun Apr 14, 2013 12:04 pm
- Location: Michigan, USA
Re: Filling space between path with color
Hi,
The rectangle is the flowed-text. I'd convert that text to paths for use in Gimp.
How do you intend to use the image in Blender?
The rectangle is the flowed-text. I'd convert that text to paths for use in Gimp.
How do you intend to use the image in Blender?
Have a nice day.
I'm using Inkscape 0.92.2 (5c3e80d, 2017-08-06), 64 bit win8.1
The Inkscape manual has lots of helpful info! http://tavmjong.free.fr/INKSCAPE/MANUAL/html/
I'm using Inkscape 0.92.2 (5c3e80d, 2017-08-06), 64 bit win8.1
The Inkscape manual has lots of helpful info! http://tavmjong.free.fr/INKSCAPE/MANUAL/html/
-
Pingponguin
- Posts: 17
- Joined: Fri Apr 07, 2017 9:48 am
Re: Filling space between path with color
Moini wrote:You can - in many cases - use just 1 path per color in your drawing. Sometimes this may make sense, and sometimes it doesn't.
Can I turn color to path?
-
Pingponguin
- Posts: 17
- Joined: Fri Apr 07, 2017 9:48 am
Re: Filling space between path with color
tylerdurden wrote:The rectangle is the flowed-text. I'd convert that text to paths for use in Gimp.
Greate, that worked.
tylerdurden wrote:How do you intend to use the image in Blender?
I would like to make a 3D logo/emblem. There are many tutorials on how to do it. They all look simple, but I failed so far.
Re: Filling space between path with color
Pingponguin wrote:Moini wrote:You can - in many cases - use just 1 path per color in your drawing. Sometimes this may make sense, and sometimes it doesn't.
Can I turn color to path?
Every selection in GIMP can be transformed into a path and exported as a SVG - if that´s what you wanted to know.
Cheers
P.
-
Pingponguin
- Posts: 17
- Joined: Fri Apr 07, 2017 9:48 am
Re: Filling space between path with color
Thank you, yes, I was wondering if this is possible.