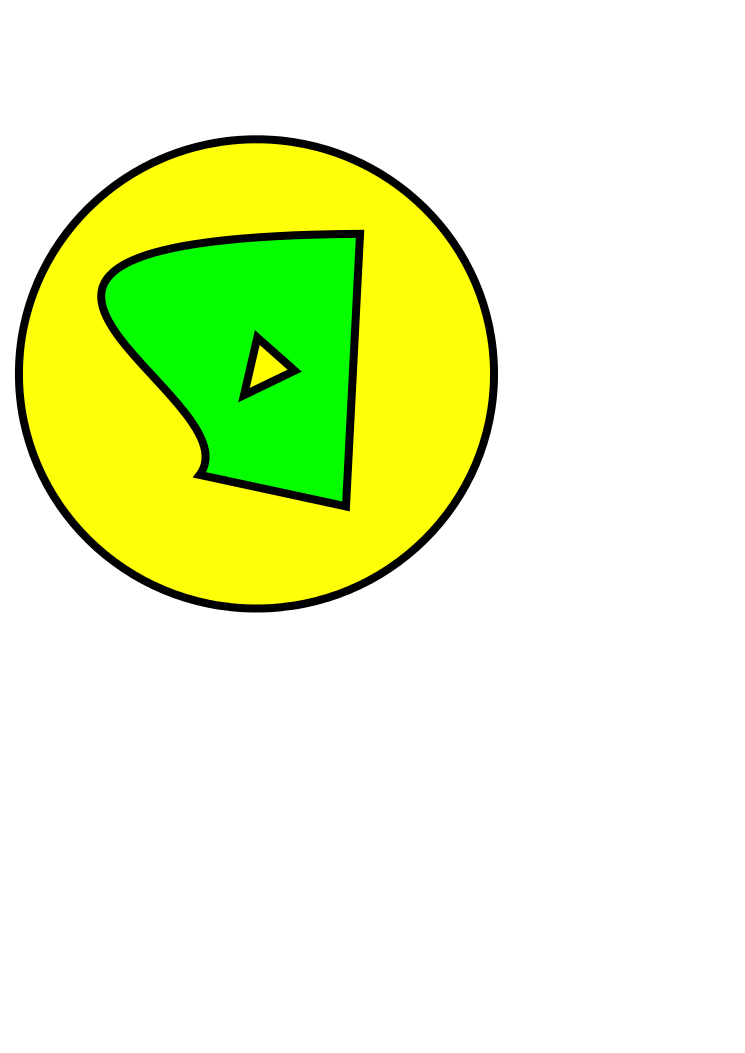
I am new to Inkscape so I may have my terms and concepts a little off. I have this svg - see attached and I have combined the two paths. What I want to do but cannot figure out how to do it is to first fill the svg with green such that image fills except the triangle in the center... or, the entire image fills and I set the triangle as transparent.
Then, I want to be able to add an oval, fill it with yellow so that I end up with a yellow oval containing a green image with a yellow triangle in the middle. Yellow because the triangle is either not filled or the triangle is set to transparent.
I just seem to have no success doing this.
Is there a particular trick or technique I should use?
transparency and combined paths
transparency and combined paths
- Attachments
-
- testimg.svg
- (2.42 KiB) Downloaded 183 times

Re: transparency and combined paths
dasadler wrote:.. so that I end up with a yellow oval containing a green image(?!) with a yellow triangle in the middle...
It seams to me that you made it more complicated than it should be. Could you draw the final result, by hand or in some other app?
Still, have to ask - You are aware of the Path Operations and/or Clipping and Masking in Inkscape, right?
 <<< click! - but, those with a cheaper tickets should go this way >>>
Re: transparency and combined paths
Hi.
Check for the non-zero fill rule at the bottom:
http://tavmjong.free.fr/INKSCAPE/MANUAL/html/Attributes-Fill-Stroke.html
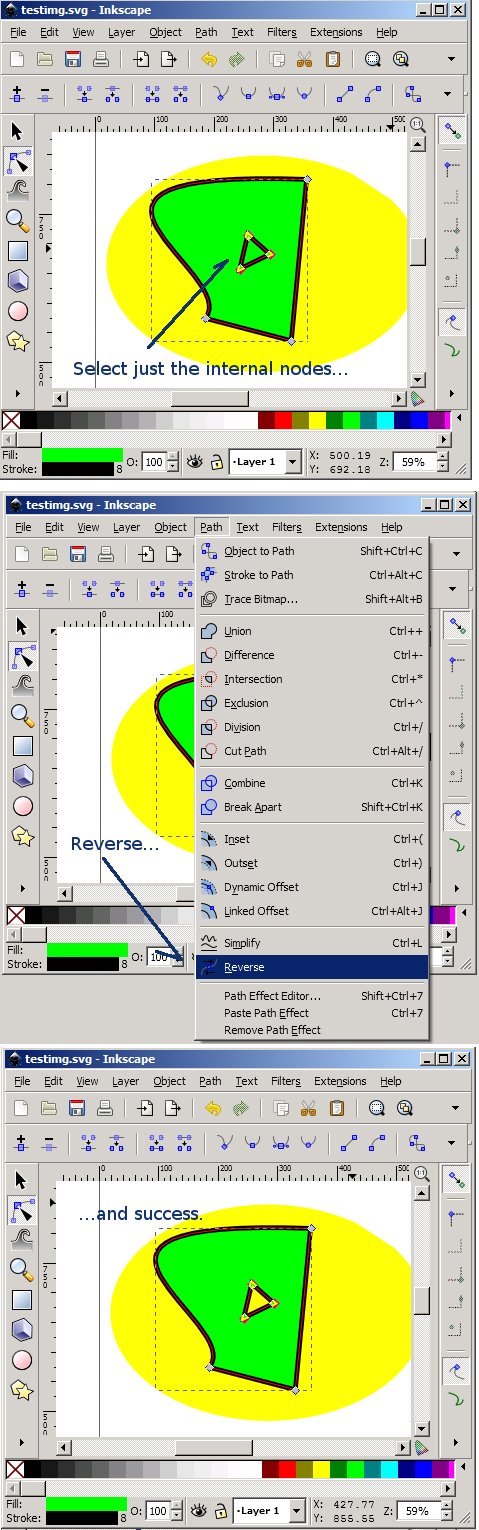
To make the hole "appear" you need to reverse the subpath's direction:
select the triangle's nodes with the node tool and click on path/reverse direction.
Check for the non-zero fill rule at the bottom:
http://tavmjong.free.fr/INKSCAPE/MANUAL/html/Attributes-Fill-Stroke.html
To make the hole "appear" you need to reverse the subpath's direction:
select the triangle's nodes with the node tool and click on path/reverse direction.
Re: transparency and combined paths
I appreciate the help.. I am still working on it. I attached what I want to achieve - did it in another application. This is just a working image to figure out what I need. Once I learn how to do it I will be using the technique for pictures where I have cut a person out of a jpg and the person is standing with one hand on their hip such that there is a 'hole' between their arm and their torso. I need to have that hole be transparent so when I place the image of the person on another background that the background will show through the hole.
Does that make sense? It does to me... just not sure I explained it correctly.
Does that make sense? It does to me... just not sure I explained it correctly.
- Attachments
-
- testimg2.png (35.87 KiB) Viewed 4603 times
Re: transparency and combined paths
It does make sense but what would be your "weapon of choice" is up to you ,)
I`d go with this or you can go with that.
I`d go with this or you can go with that.
<<< click! - but, those with a cheaper tickets should go this way >>> Re: transparency and combined paths
Thus far when doing this with people images, I used the Bezier tool to create an outline path around the entire image... Then, using the Bezier tool again, I created another path outlining the gap between the arm and the torso. I combined the two paths then used Object|Clip|Set to extract what I wanted.
So far so good but when I try to fill the fill the image - to create a silhouette - the entire image fills, including the 'hole' (second path). In any case, whether I make a silhouette or not, I need to have the hole transparent.
So far so good but when I try to fill the fill the image - to create a silhouette - the entire image fills, including the 'hole' (second path). In any case, whether I make a silhouette or not, I need to have the hole transparent.
Re: transparency and combined paths
And if you could now add the Path operations to your arsenal - woohoo! ,)
<<< click! - but, those with a cheaper tickets should go this way >>> Re: transparency and combined paths
Do you want to end up with something like this?

Or is there a special reason for not masking the photo to a transparent png in gimp for example?
Or is there a special reason for not masking the photo to a transparent png in gimp for example?
Re: transparency and combined paths
@Maestral: I know you're being helpful but I don't understand what you mean. Being new to this having only ever used powerpoint or microsoft publisher for any graphic work, this program is overwhelming and I believe my head is having a tough time moving from a raster paradigm to vectors. I will get it eventually.
@Lazur URH: That is exactly the effect I am hoping to achieve where the 'holes' do not fill and, indeed, are transparent allowing any background image or color to show through. I do not use gimp and I like the sounding masking to a transparent png but don't know how to do that. The only photo/graphic applications I have are Photoscape and Inkscape.
@Lazur URH: That is exactly the effect I am hoping to achieve where the 'holes' do not fill and, indeed, are transparent allowing any background image or color to show through. I do not use gimp and I like the sounding masking to a transparent png but don't know how to do that. The only photo/graphic applications I have are Photoscape and Inkscape.
Re: transparency and combined paths
That's two different thing.
Masking a photograph may work better in a raster editor program, while, if only the silhouette is needed, it's better kept in a vector format.
With gimp, once you opened the jpeg, you can crop the image to the right size,
add a layer mask to it, and use black and white brush strokes to make clean cuts on the image, then export it as a png with transparency.
While, with inkscape, the path you would use for clipping, can be filled with whatever colours itself, and no need for any modifications.
Re: transparency and combined paths
Lazur,
I was able to successfully use Inkscape to make the path for clipping - problem is that I have two paths - total outline and the 'hole' between arm and body. When I fill the path, the entire outline fills including the 'hole'. I am trying to find a way to keep the hole transparent. Is that possible?
I was able to successfully use Inkscape to make the path for clipping - problem is that I have two paths - total outline and the 'hole' between arm and body. When I fill the path, the entire outline fills including the 'hole'. I am trying to find a way to keep the hole transparent. Is that possible?
Re: transparency and combined paths
Maestral wrote:dasadler wrote:.. so that I end up with a yellow oval containing a green image(?!) with a yellow triangle in the middle...
It seams to me that you made it more complicated than it should be. Could you draw the final result, by hand or in some other app?
Still, have to ask - You are aware of the Path Operations and/or Clipping and Masking in Inkscape, right?
Don`t get me wrong but have you checked those Path Operations?
<<< click! - but, those with a cheaper tickets should go this way >>> Re: transparency and combined paths
Thanks for the link... I looked but did not find your original reference to path operations - don't know how I missed it. So far, this looks promising - the exclusion operation seems to be what I needed.
Re: transparency and combined paths
dasadler wrote:Lazur,
I was able to successfully use Inkscape to make the path for clipping - problem is that I have two paths - total outline and the 'hole' between arm and body. When I fill the path, the entire outline fills including the 'hole'. I am trying to find a way to keep the hole transparent. Is that possible?
May I bump my previous reply solving the problem.
Lazur URH wrote:Hi.
Check for the non-zero fill rule at the bottom:
http://tavmjong.free.fr/INKSCAPE/MANUAL/html/Attributes-Fill-Stroke.html
To make the hole "appear" you need to reverse the subpath's direction:
select the triangle's nodes with the node tool and click on path/reverse direction.
Re: transparency and combined paths
@Lazur URH: I probably did it incorrectly but I did reverse the path direction and it had no discernible effect on the image but, as I said, I probably did it wrong. I will continue to try, though, as I am sure there is more than one solution to my problem.
By the way, the exclusion path operation is based on the non zero rule. I was trying to figure out how to apply that rule and as I experimented with clicking, selecting, combining, and breaking apart paths, I must have just done it wrong. In any case, that path operation based on non zero seems to have provided what I need for now. I will push forward until I learn this thing then be back to offer advice to others in my position.
Thanks for your indulgence.
-
tylerdurden
- Posts: 2344
- Joined: Sun Apr 14, 2013 12:04 pm
- Location: Michigan, USA
Re: transparency and combined paths
Maybe illustration?
Hope this helps.
- ReversePath.jpg (177.94 KiB) Viewed 4450 times
Hope this helps.
Have a nice day.
I'm using Inkscape 0.92.2 (5c3e80d, 2017-08-06), 64 bit win8.1
The Inkscape manual has lots of helpful info! http://tavmjong.free.fr/INKSCAPE/MANUAL/html/
I'm using Inkscape 0.92.2 (5c3e80d, 2017-08-06), 64 bit win8.1
The Inkscape manual has lots of helpful info! http://tavmjong.free.fr/INKSCAPE/MANUAL/html/