I really like the "Chalk and Sponge" filter (found under "Filters -> Distort"), but for one of the objects I'm using it on, I still need to maintain the boundaries of the original object. The issue is that the core of the filter is the displacement map, which, by definition, moves things around and distorts the edges.
While it's easy to use a composite filter to crop off the excess area (those that fall beyond the edge of the original object) by linking it to the "Source Graphic" using the "In" operator, this still leaves transparent "holes" near the edges. My first thought to solve this problem was to upscale the object, apply the filter, and then use a Clip/Mask function to crop it down to the dimensions of the original object. Unfortunately, though, this won't work as the Clip/Mask always takes place before all the filters (Clipping/Masking is not part of the filter editor).
I was also wondering if it's possible to use a separate object as part of the composite filter, i.e. use a scaled up object to apply the Chalk and Sponge effect, and then composite using the original sized object elsewhere in the document, but it doesn't appear to be possible. Please correct me if I'm wrong, or if you have any suggestions on how to go about getting the effect I want.
[solved] 'Chalk and Sponge' filter with original edges?
-
SpaceJunkie
- Posts: 4
- Joined: Sun Apr 17, 2016 5:14 am
-
Espermaschine

- Posts: 892
- Joined: Thu Jun 05, 2014 9:10 pm
Re: 'Chalk and Sponge' filter with original edges?
Like this, right ?
- Attachments
-
- rect4202.png (74.35 KiB) Viewed 3181 times
-
SpaceJunkie
- Posts: 4
- Joined: Sun Apr 17, 2016 5:14 am
Re: 'Chalk and Sponge' filter with original edges?
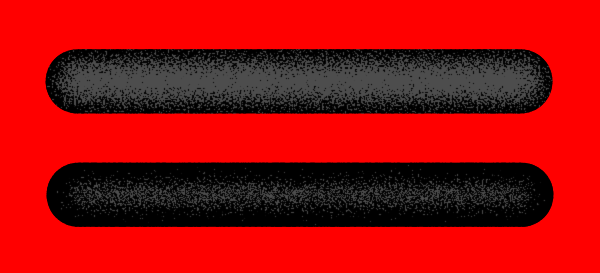
Almost. The main issue is I want the effect throughout the entirety of the object. For example, like this, but clipped to just the area within the black circle:

Does that make sense?
EDIT - A better example of what the final product I hope would look like (cheating with a raster editor here):

Does that make sense?
EDIT - A better example of what the final product I hope would look like (cheating with a raster editor here):
Last edited by SpaceJunkie on Sun Apr 17, 2016 7:21 am, edited 1 time in total.
-
Espermaschine
- Posts: 892
- Joined: Thu Jun 05, 2014 9:10 pm
Re: 'Chalk and Sponge' filter with original edges?
Im sure Lazur will have an idea. He knows his filters.
Re: 'Chalk and Sponge' filter with original edges?
The mentioned composite-in should do the job; you probably just need to add a backdrop to the filter.
It could be a simple flood fill or the original object or something else.
It could be a simple flood fill or the original object or something else.
-
SpaceJunkie
- Posts: 4
- Joined: Sun Apr 17, 2016 5:14 am
Re: 'Chalk and Sponge' filter with original edges?
Ah, perfect, that's what I needed. I had an additional problem, as in the actual image I'm working on I had several other filters in the process (turbulence) before I even added the "Chalk and Sponge" at the end, and I was trying to composite off of the "Source Graphic" (as your example does). While that works fine if you don't have other filters, when you do have other filters you have to instead first composite off of the last of your previous filters, so that you are compositing on top of your filtered (e.g. turbulance) image and not the original image for the effect to look correct.
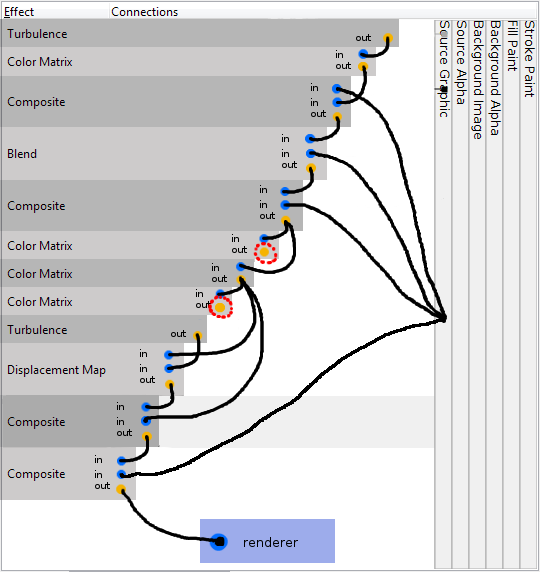
But, now that I've got that sorted out, everything looks great! Final filter layout is this for my object (with the key compositing linkage selected):

Thanks for all the help!
Edit: Actually one of those color matrices isn't being used in that image, so I deleted that one.
But, now that I've got that sorted out, everything looks great! Final filter layout is this for my object (with the key compositing linkage selected):
Thanks for all the help!
Edit: Actually one of those color matrices isn't being used in that image, so I deleted that one.
Re: 'Chalk and Sponge' filter with original edges?
Glad you could solve it!
-There are two unused color matrix in that image.-
-There are two unused color matrix in that image.-
Re: 'Chalk and Sponge' filter with original edges?
How do you know they are unused?
Basics - Help menu > Tutorials
Manual - Inkscape: Guide to a Vector Drawing Program
Inkscape Community - Inkscape FAQ - Gallery
Inkscape for Cutting Design
Manual - Inkscape: Guide to a Vector Drawing Program
Inkscape Community - Inkscape FAQ - Gallery
Inkscape for Cutting Design
Re: 'Chalk and Sponge' filter with original edges?
They are not in the chain.
Nothing connects to the first and the third color matrix.
The connectors are black, and the interface is horrible.
Nothing connects to the first and the third color matrix.
The connectors are black, and the interface is horrible.
Re: 'Chalk and Sponge' filter with original edges?
Doesn't the 2nd part of the 1st Composite connect to the first one? And the 2nd and 3rd ones are connected to Composite above? (I gotta read that tutorial one of these days....)
Basics - Help menu > Tutorials
Manual - Inkscape: Guide to a Vector Drawing Program
Inkscape Community - Inkscape FAQ - Gallery
Inkscape for Cutting Design
Manual - Inkscape: Guide to a Vector Drawing Program
Inkscape Community - Inkscape FAQ - Gallery
Inkscape for Cutting Design
Re: 'Chalk and Sponge' filter with original edges?
A very quick mockup in gimp.
The bottom-most link between the last filter primitive and the renderer is hard-wired.
- gui mock.png (45.36 KiB) Viewed 2977 times
The bottom-most link between the last filter primitive and the renderer is hard-wired.

Re: 'Chalk and Sponge' filter with original edges?
Perfect place for a node interface like Blender
Your mind is what you think it is.
Re: 'Chalk and Sponge' filter with original edges?
Ooohh....the in and the out is totally not intuitive. I never could figure out how you decide where to make the connections. I've spent so many hours just trying connections randomly, and poring over existing filters, and hoping to find some kind of pattern. But there are just too many variables. And now to find out they put primitives in there that aren't used. I'm not going to blame myself too much for not to be able to figure it out.
Plus, the way it works, how you drag out the connectors, it's backwards. The "ins" act like "outs". And the "outs" act like "ins".
Plus, the way it works, how you drag out the connectors, it's backwards. The "ins" act like "outs". And the "outs" act like "ins".
Basics - Help menu > Tutorials
Manual - Inkscape: Guide to a Vector Drawing Program
Inkscape Community - Inkscape FAQ - Gallery
Inkscape for Cutting Design
Manual - Inkscape: Guide to a Vector Drawing Program
Inkscape Community - Inkscape FAQ - Gallery
Inkscape for Cutting Design
Re: 'Chalk and Sponge' filter with original edges?
Can only pull a connector from one "in" end to an "out" end above that filter primitive or to the far right sources.
What I meant was that you pull the connector out of the "in" socket and you plug it in to the "out" socket!
Basics - Help menu > Tutorials
Manual - Inkscape: Guide to a Vector Drawing Program
Inkscape Community - Inkscape FAQ - Gallery
Inkscape for Cutting Design
Manual - Inkscape: Guide to a Vector Drawing Program
Inkscape Community - Inkscape FAQ - Gallery
Inkscape for Cutting Design
-
SpaceJunkie
- Posts: 4
- Joined: Sun Apr 17, 2016 5:14 am
Re: 'Chalk and Sponge' filter with original edges?
Yeah, the filter layout takes some getting used to. However, I found an even better way to address the original problem, as my previous post could still create a few artifacts near the edges (at least when rasterized, as my end result will be as it's a texture for a 3D model), like this:

The image has been upscaled to show the odd pixels that appear near the edges; this is only a small sample of the full object, with the "edge" of the object on the right side of the image.
Mulling it over, I found that the "Morphology" filter in dilate mode will actually scale the object up if it's a single-colored object, as mine is (though you could in theory use the "Flood" filter in the chain to make a temporary single colored one for the filter chain). By scaling it up first, and using that scaled up object, the effect is cleaner when exported at the end, and doesn't have those oddball pixels in there. The chain looks like this:

And now there are no more odd pixels near the edges. Just wanted to let others know in case they stumbled on this post.
The image has been upscaled to show the odd pixels that appear near the edges; this is only a small sample of the full object, with the "edge" of the object on the right side of the image.
Mulling it over, I found that the "Morphology" filter in dilate mode will actually scale the object up if it's a single-colored object, as mine is (though you could in theory use the "Flood" filter in the chain to make a temporary single colored one for the filter chain). By scaling it up first, and using that scaled up object, the effect is cleaner when exported at the end, and doesn't have those oddball pixels in there. The chain looks like this:
And now there are no more odd pixels near the edges. Just wanted to let others know in case they stumbled on this post.
Re: 'Chalk and Sponge' filter with original edges?
Let's have a cup of coffee then; marking it as solved.

Re: 'Chalk and Sponge' filter with original edges?
brynn wrote:Ooohh....the in and the out is totally not intuitive. I never could figure out how you decide where to make the connections. I've spent so many hours just trying connections randomly, and poring over existing filters, and hoping to find some kind of pattern. But there are just too many variables. And now to find out they put primitives in there that aren't used. I'm not going to blame myself too much for not to be able to figure it out.
Plus, the way it works, how you drag out the connectors, it's backwards. The "ins" act like "outs". And the "outs" act like "ins".
Brynn, although I don't have anything like the same filtering skills as some of the people here, you might be interested to know that my Inkscape Tutorials in Full Circle Magazine are about to move onto filters. The next article is due out soon, and includes these paragraphs:
As well as having the triangular input nodes, each primitive also has a single output. There’s no obvious output node, instead it’s the bottom edge of the primitive that acts as the output in the Inkscape UI. It’s possible to connect the bottom of one primitive to the input triangles of other primitives, thus building a chain, but the output from the last primitive is always used as the output from the chain as a whole.
In a slightly back-to-front operation, we can link this source to the Blur’s input by clicking and holding on the triangle, then dragging the mouse to the Source Alpha column before releasing (yes, you drag from input to source, rather than the other way around).
You're not the only one to find the filter editor unintuitive!