Greetings,
I'm using Inkscape 0.48.2
I've created various shapes, swirls and symbols. I'm trying to apply patterns to these shapes. I have images of marble tiles, leaves, stone, wood, etc.
I want to create the effect that my shapes are either popping out of or 'engraved' into these images (patterns).
Please inform me of the video tutorial for this lesson. Please....
Thank You in advanced.
AtomStar
Patterns (or photos) applied to shapes
Re: Patterns (or photos) applied to shapes

Welcome AtomStar!
I don't know of a specific tutorial, but my forum signature contains links to a couple of nice collections
Basics - Help menu > Tutorials
Manual - Inkscape: Guide to a Vector Drawing Program
Inkscape Community - Inkscape FAQ - Gallery
Inkscape for Cutting Design
Manual - Inkscape: Guide to a Vector Drawing Program
Inkscape Community - Inkscape FAQ - Gallery
Inkscape for Cutting Design
Re: Patterns (or photos) applied to shapes
Thanks for the 'Welcome' brynn.
I've been trying to figure it out for the past week but literally hours after posting my quiry.... I'm thinking
my problem is that I may need to use 2 separate programs to achieve this. I prefer working with Vector programs (and images) but maybe I need
a 'Photo' Editing program to reach my goal. I may be wrong but I used to work with Adobe Illustrator years ago (and I was able to merge images into vector shapes) and thought this action was possible in Inkscape. Hopefully, someone can prove me wrong.
Re: Patterns (or photos) applied to shapes
Oh, I'm pretty sure it can be done, and done with Inkscape alone. But since you asked for an existing video tutorial, I had to answer IDK. I may not be the best person to come up with a reasonable technique, but I'll play around and let you know if I come up with anything. I haven't learned how to make videos yet though.
Do you have any examples of the result you want? My idea of "engraved" or "popping out" might be different than what you had in mind.
OH! Well for one, really easy way, there are some filters that will do it pretty much automatically. I'll let you know if I come up with anything
Do you have any examples of the result you want? My idea of "engraved" or "popping out" might be different than what you had in mind.
OH! Well for one, really easy way, there are some filters that will do it pretty much automatically. I'll let you know if I come up with anything
Basics - Help menu > Tutorials
Manual - Inkscape: Guide to a Vector Drawing Program
Inkscape Community - Inkscape FAQ - Gallery
Inkscape for Cutting Design
Manual - Inkscape: Guide to a Vector Drawing Program
Inkscape Community - Inkscape FAQ - Gallery
Inkscape for Cutting Design

Re: Patterns (or photos) applied to shapes
AtomStar wrote:I want to create the effect that my shapes are either popping out of or 'engraved' into these images (patterns).
A picture is worth a lot in these instances - i can think of too many ways to interpret this to give you any advice. Can you show us an example of what you are envisioning?
Here's an earlier response to something that might - or might not - be what you are thinking of.
Off topic:
Look, Brynn and D*****(Maestral), I used that coding thing to hide the url behind some text that both of you showed me how to do!Your mind is what you think it is.
Re: Patterns (or photos) applied to shapes
Greetings brynn and druban ! !
Thanks again for responding. I apologize for not "showing" you the desired effect.
In GIMP, you can see a video tutorial on the effect(s) I'm trying to achieve.
The tutorial only uses text but I'm guessing it will be the same with vector shapes.
http://www.youtube.com/watch?v=vfPV1Yp_ ... ure=relmfu
YouTube : Video titled : GIMP Text Effects - Pop out Text
http://www.youtube.com/watch?v=p1K3L7Rd ... ure=relmfu
YouTube : Video titled : GIMP Text Effects - Engraved Text
In response to druban, I want to thank you for making a great guess at what I was trying to describe.
The links you provided are pretty close to what I'm trying to do.
I hope this last message helps.
Thanks you guys...
Re: Patterns (or photos) applied to shapes
Same idea-
Use the texture fill on the background shape.
Add text. Give it the same textured fill then with "Affect Patterns" toggled, move the text a little to inset it's pattern.
Duplicate the text and set its fill to black, 10% to look shaded.
Duplicate again and set an inset filter effect:

(Forgive the gaps in the pattern fill - known issue and I didn't bother to work around for this quick demo)
-Rob A>
Use the texture fill on the background shape.
Add text. Give it the same textured fill then with "Affect Patterns" toggled, move the text a little to inset it's pattern.
Duplicate the text and set its fill to black, 10% to look shaded.
Duplicate again and set an inset filter effect:
(Forgive the gaps in the pattern fill - known issue and I didn't bother to work around for this quick demo)
-Rob A>

Re: Patterns (or photos) applied to shapes
Thanks to brynn , druban and RobA.
I'm actually VERY (VERY) new to Inkscape.
Although druban has provided a link showing my desired effect,...
I was unable to produce my desired effect because I'm not actually working with text but rather complex shapes.
I'm trying to make shapes and symbols that resemble : Biohazard symbol, Yin & Yang, Tribal tattoos, etc.
and make them POP out of (or sink into) a chosen pattern or photo (you wouldn't know it's there until you create a shadow effect)
The link I gave for the GIMP 'version' of this effect is pretty much what I'm trying to do and it works for Non-text as well.
I just couldn't figure out how to do it in Inkscape.
Thanks again guys... I really appreciate all your help.
Re: Patterns (or photos) applied to shapes
This is what I thought of, from your description. It's made with Inkscape

If no one else does, before you answer, I'll be glad to tell you how. I just want to make sure it's what you want. The engraving thing is a little different, but not much harder to do.
Btw, that's my Inkscape easter egg
Edit
Maybe I should show the original:

If no one else does, before you answer, I'll be glad to tell you how. I just want to make sure it's what you want. The engraving thing is a little different, but not much harder to do.
Btw, that's my Inkscape easter egg
Edit
Maybe I should show the original:
Basics - Help menu > Tutorials
Manual - Inkscape: Guide to a Vector Drawing Program
Inkscape Community - Inkscape FAQ - Gallery
Inkscape for Cutting Design
Manual - Inkscape: Guide to a Vector Drawing Program
Inkscape Community - Inkscape FAQ - Gallery
Inkscape for Cutting Design
Re: Patterns (or photos) applied to shapes
Here are some images I found online that are examples of what I'm trying to achieve.
I do not own these images ! ! !
Obviously, I'm trying to do this effect with vectors shapes I created.
Again, because I'm new to Inkscape... it sure would be helpful if there was a video tutorial.
Otherwise, instructional literature will do fine.
I do not own these images ! ! !
Obviously, I'm trying to do this effect with vectors shapes I created.
Again, because I'm new to Inkscape... it sure would be helpful if there was a video tutorial.
Otherwise, instructional literature will do fine.
- Attachments
-
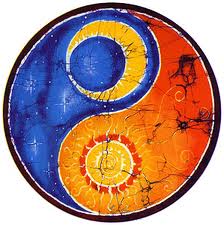
- YinYang.jpg (13.08 KiB) Viewed 3983 times
-
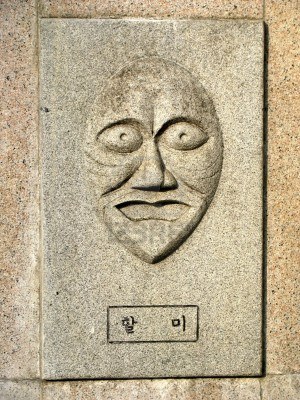
- Engrave3.jpg (53.97 KiB) Viewed 3983 times
-
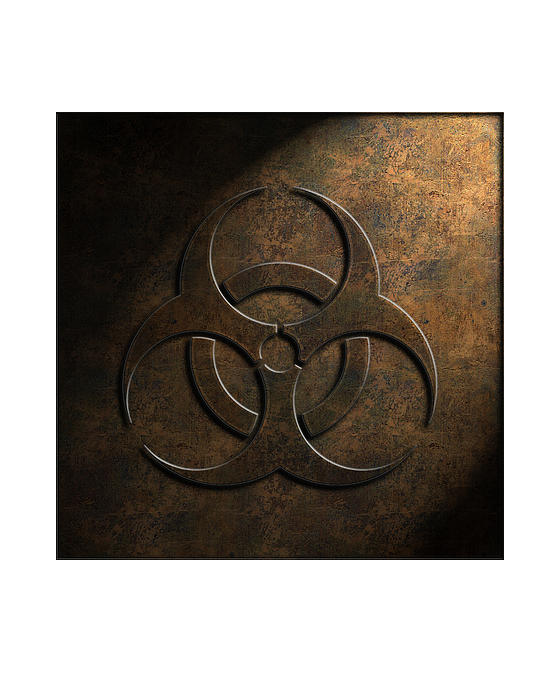
- Engrave2.jpg (108.99 KiB) Viewed 3983 times
Re: Patterns (or photos) applied to shapes
I don't see an engraved or popping out effect on the first one, but the other 2 I see it. The 2nd one (in the middle) might probably be better done with a 3d program such as Blender. Someone with a lot of Inkscape experience might be able to do it, but it won't be easy. The bottom one could be done with Inkscape, and is not that much different than what I did....easier, actually.
First, the shape you use needs to be vector, even though the background texture can be raster (or a photo).
1 - Duplicate the texture/photo once, and duplicate the shape path twice. If the shape is made up of more than 1 path, you'll need to use Path menu > Combine (before duplicating) to make this work.
2 - Select one texture/photo and one shape/path, first making sure that the path is on top of the texture/photo. Then do Object menu > Clip > Set.
3 - Fill one of the path duplicates black (or some dark color). Fill the other one white (or some light color).
4 - Using Object menu > Raise, Lower, Raise to Top and Lower to Bottom, and Selection tool, place the 4 objects in this z-order:
clipped texture/photo
white path
black path
original texture/photo
5 - Using Selection tool, and Alt + click, you can select object that are below other objects.
6 - Alt + click + click selects the white object. Using arrow keys, move it up by the same number of steps as you move to the right (up 2, right 2, ect.)
7 - Alt + 3 clicks selects the black object. Using arrow keys, same thing except move down and to the left (down 2, left 2, etc.)
That should do it. You may want to add some blur to the black and white objects, maybe a little more to the black one. You may also want to move the black object down and to the left a little further than you moved the white one up and to the right. Also, you might want to Group all the objects together, so you can move them around altogether.
Now as I look more closely, the bottom image seems to have some other lighting and shading (darker on left side, lighter in top right corner). That can be simulated with a rectangle the same size and shape of the original texture/photo. Fill it with a radial gradient, where one handle is more than twice as long as the other. The center stop will be white, and placed where the lightest area of the photo is. The outer stop will be black. Then the opacities will need to be finessed, and I think another stop or 2 will need to be added, to create the sudden light to dark areas. Actually I think that image uses some specular lighting, but that's something I have not yet learned. I don't know if someone else might want to explain how to use or not. But I also don't know if you need lighting exactly like that anyway.
So that's for the popped out effect. The engraved effect would be different. But again, you might be able to use a filter for that. Actually a filter could be made for the popped out effect, and I don't know if there is one or not.
PS -- I used all the same words and phrases you'll see in the Inkscape manual, and Help menu > Tutorials, so that you should be able to find things easily, without needing a video. But if you get stuck, just let me know
Basics - Help menu > Tutorials
Manual - Inkscape: Guide to a Vector Drawing Program
Inkscape Community - Inkscape FAQ - Gallery
Inkscape for Cutting Design
Manual - Inkscape: Guide to a Vector Drawing Program
Inkscape Community - Inkscape FAQ - Gallery
Inkscape for Cutting Design
Re: Patterns (or photos) applied to shapes
Greetings brynn and Thanks again for responding.
I can see that this forum can get quite busy at times, huh ?
I'll give your method a shot and let you know.
By the way, the first image I posted is "somewhat" an example of what I'm trying to achieve.
I was looking for a popping out or engraved in effects but the main point was combining vector shapes
with images, patterns or photos. The YinYang symbol has two (main) images : the yellowish-orange marble
stone pattern and a 'starry night' picture. In case you were wondering why I put that picture.
I understand that typical 3D effects is a matter of adding shadows, gradients, and light perspectives (shine).
I hope I can do it. It looks complicated but I think that's cause I'm new to Inkscape.
Thank you so much Brynn ! ! Maybe this headache of mine will go away. hehehe
Re: Patterns (or photos) applied to shapes
Greetings brynn !
By the way, for future reference.... What is this technique or method called ?
I wish someone could do a video tutorial... It's not working for me but then again, it could be my error(s).
By the way, for future reference.... What is this technique or method called ?
I wish someone could do a video tutorial... It's not working for me but then again, it could be my error(s).
Re: Patterns (or photos) applied to shapes
Busy? I guess it depends on your perspective. To me, it's not a very busy forum. Maybe moderately busy at times.
I'm not sure what it's called.
Tell me where you're getting stuck, and maybe I can help. I pretty much glossed over the clipping, but depending on the vector shape, it might be tricky.
I'm not sure what it's called.
Tell me where you're getting stuck, and maybe I can help. I pretty much glossed over the clipping, but depending on the vector shape, it might be tricky.
Basics - Help menu > Tutorials
Manual - Inkscape: Guide to a Vector Drawing Program
Inkscape Community - Inkscape FAQ - Gallery
Inkscape for Cutting Design
Manual - Inkscape: Guide to a Vector Drawing Program
Inkscape Community - Inkscape FAQ - Gallery
Inkscape for Cutting Design
Re: Patterns (or photos) applied to shapes
Well... um, what about I post two images and see what you can do ?
...(as far as creating what I'm looking for)
...(as far as creating what I'm looking for)
Re: Patterns (or photos) applied to shapes
Greetings brynn.
I'm trying to make the black shapes have this stone pattern.
It doesn't have to look carved or engraved (per se).
I'm "almost" sure I can work with shadows and gradients without problems.
I'm trying to make the black shapes have this stone pattern.
It doesn't have to look carved or engraved (per se).
I'm "almost" sure I can work with shadows and gradients without problems.
- Attachments
-
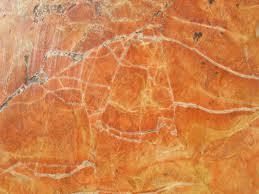
- Stone.jpg (10.11 KiB) Viewed 3921 times
-
- SymVector.svg
- (100.19 KiB) Downloaded 177 times
Re: Patterns (or photos) applied to shapes
The problem is that the black shape is not a vector path. It appears to be a PNG image (which is a raster format). But you can convert it to vector using Path menu > Trace Bitmap.
PS - the name for this effect is called embossing, and there are some emboss filters.
PS - the name for this effect is called embossing, and there are some emboss filters.
Basics - Help menu > Tutorials
Manual - Inkscape: Guide to a Vector Drawing Program
Inkscape Community - Inkscape FAQ - Gallery
Inkscape for Cutting Design
Manual - Inkscape: Guide to a Vector Drawing Program
Inkscape Community - Inkscape FAQ - Gallery
Inkscape for Cutting Design