Hi Friends,
We've had a few requests lately for making embossed text, so I've written up a quick tutorial. Comments welcome
Note that I have the darkest text moved up and to the left (and the lightest down and to the right) because the reason I made this is for someone who needs the text at a 45 degree angle. For horizontal text, I would probably put the darkest text down and to the right, while the lightest I would put up and to the left.
A lot variations to this are possible, by tweaking colors and shades or tones (sorry, I'm a little confused with technical terms regarding color); blurring; and positioning of light and dark text.
Have fun
Edit
Actually, now that I think about it, this is probably more like engraved font. But by changing the placement of the lightest and darkest text, it could be made to look embossed as well.
engraved or embossed text without using a filter
Last edited by brynn on Wed Oct 24, 2012 11:08 pm, edited 1 time in total.
Reason: edti title
Reason: edti title
Basics - Help menu > Tutorials
Manual - Inkscape: Guide to a Vector Drawing Program
Inkscape Community - Inkscape FAQ - Gallery
Inkscape for Cutting Design
Manual - Inkscape: Guide to a Vector Drawing Program
Inkscape Community - Inkscape FAQ - Gallery
Inkscape for Cutting Design
Re: engraved or embossed text without using a filter
I tend to use a variation on this approach in my comics. The only step that's slightly different is the first...
1) Type text, and change the fill to "unset" - it will appear black
1a) Clone the text three times.
2) Set the fill of the clones to dark, middle and light colours, per Brynn's step 2 and carry on from there...
The advantage of this approach is, of course, that you can edit the original text and the clones will update automatically. It does mean that you're left with the original text as well, but I usually just hide it behind my embossed text. You could use the original text for the "dark" colour and only have two clones, if you want your dark colour to be black - however I don't like to rely on the assumption that "unset" will always be rendered as "black" (not only in Inkscape, but other apps as well), so I prefer to use three clones and explicitly set the colours.
I use this technique quite often, but it usually ends up hidden away in Easter Eggs. The same basic technique was used for the text in the "Recycling" strip:
http://www.peppertop.com/greys/2012/02/recycling/
But a better example - albeit one that you'll need to grab the SVG file to see properly - is the "engraved" text on John Hampden's statue:
http://www.peppertop.com/greys/2011/08/john-hampden/
The technique isn't limited to text either, as you can see if you download the SVG file and zoom in to see the "embossing" on our Paralympians' medals (this is also an example of using a single source image with different colours on the clones to produce gold, silver and bronze medals):
http://www.peppertop.com/greys/2012/09/paralympians/
Re: engraved or embossed text without using a filter
Also look at the rope-3d.svg example included with inkscape to show how you can add in blurred objects and clipping masks to make more 3d like effects.
-Rob A>
-Rob A>
Re: engraved or embossed text without using a filter
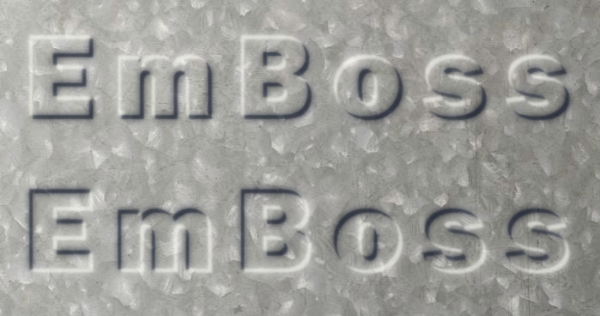
just an example of embossing with a few tweaks to Brynn's method...
The only additional procedure is to trim the highlight and shadow paths with the central path using boolean difference. The central path is then deleted... The paths are blurred slightly... A duplicate of the pair simply has its fills reversed to change the embossing to a debossing effect. Doing it this way has the slight benefit that you can change wht's behind it without affecting the visual effect very much but it does add effect to pick colors for the shadow and highlight that are harmonious with the background...
Viewing them so close to each other might be a little trippy as they might seem to flip flop in relief! Viewed separately they should be perfectly normal.
Last edited by druban on Thu Oct 25, 2012 5:23 am, edited 2 times in total.
Your mind is what you think it is.
Re: engraved or embossed text without using a filter
Wow, nice work guys!
Basics - Help menu > Tutorials
Manual - Inkscape: Guide to a Vector Drawing Program
Inkscape Community - Inkscape FAQ - Gallery
Inkscape for Cutting Design
Manual - Inkscape: Guide to a Vector Drawing Program
Inkscape Community - Inkscape FAQ - Gallery
Inkscape for Cutting Design