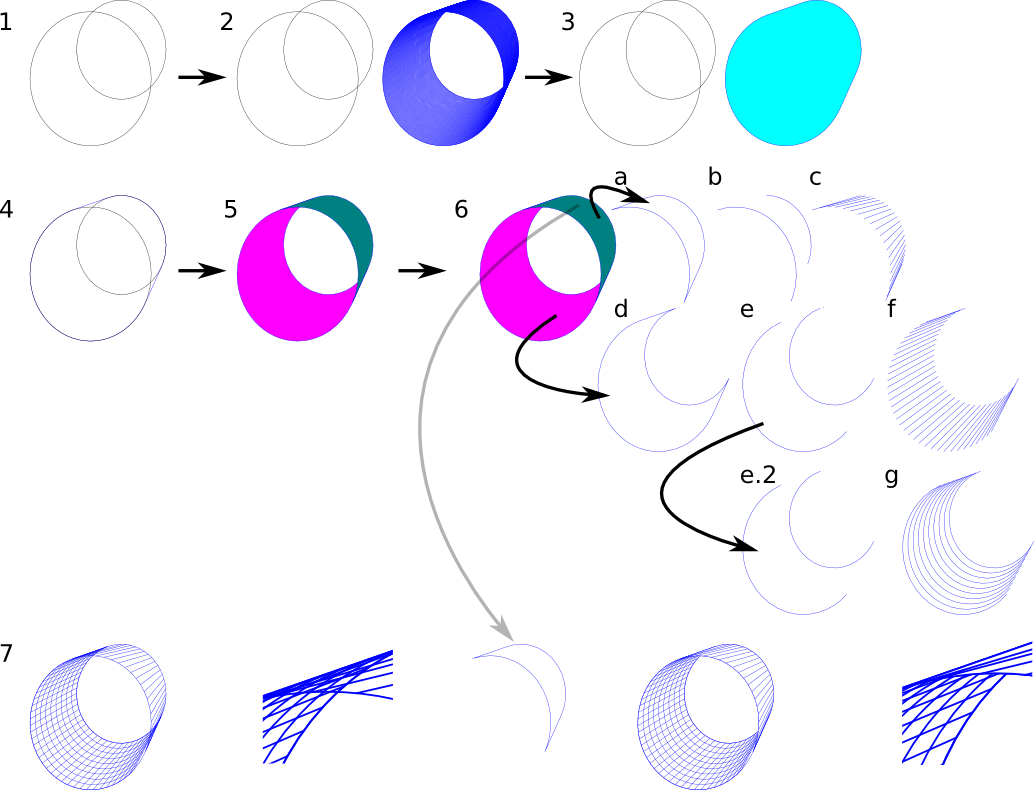
This page in tavmjong's guide is a little misleading, I think, in how to achieve the cylinder effect. If you follow the instructions laid out in brief there, you invariably end up with a gap in your hatching at the bottom inside of your cylinder. This tutorial shows the way around that limitation (bug?).
1. Draw your base ellipse and convert to path. Duplicate it and enlarge the duplicate with constrained ratio. Offset the two ellipse paths.
2. Duplicate your two paths and doe Extensions>Generate from path>Interpolate. Use a high number of steps (I used around 60) to get a nice smooth line.
3. Select your interpolation group, ungroup it and do Path>Union.
4. I've aligned the Unioned path with the original ellipse paths. Duplicate the union path. Select one union path and the large ellipse path and do Path>Difference. This gives the purple filled path seen in 5 and will be the interior surface of your cylinder. Select the other union path and the small ellipse path and do Path>Difference. This gives the greenish filled path seen in 5 and will be the exterior surface of your cylinder.
5. This isn't really a step. Derpaderpderp.
6. a. Duplicate your exterior surface path.
b. Using the node tool delete the nodes between the two end curves. It may help to do Path>Simplify first. Once the extra nodes are deleted, select the segment connecting the two curved segments at the top and "Delete segment between two nodes" and "Break path at selected nodes". Now do Path>Break apart. Select one of the resulting paths (doesn't matter which one) and do Path>Reverse. Now select both curved paths again and do Path>Combine.
c. Do Path>Path effect editor and select Stitch Subpaths from the drop-down menu and set the number of steps to 10-20.
d - f. Repeat a through c for the interior surface path. Note that you don't need to duplicate the original interior surface path, but that you will duplicate it after you have broken it apart, reversed, and re-combined it in step e. In step f the number of steps should be higher than in step c because the inside of your cylinder is presumably darker than the exterior.
e.2. Take the duplicate of the interior surface path that was broken, reversed, and re-combined and do Path>Path effect editor and select Interpolate subpaths with number of steps around 10.
g. Also not really a step but there to show the results of step e.2.
7. Align all your resulting paths to get this lovely cylinder and you're do---WTF? Look at that messy overlap. This is why you duplicated the exterior surface path in step 6.a. Take that duplicate path now and give it a fill. I've done white but that's because I'm unimaginative. Align the filled path with the cylinder and arrange the Z-order so that it is below the stitched exterior surface but above the stitched and interpolated interior surface paths. Ahh, that's better.
Cylinder with stitched subpaths
Re: Cylinder with stitched subpaths
Wooooo. Sweeeeeet.
That's all I can say: Sweeeet.
I'll check this out when I flip back into Linux.
Very nice!
That's all I can say: Sweeeet.
I'll check this out when I flip back into Linux.
Very nice!
 This is a read-only archive of the inkscapeforum.com site. You can search for info here or post new questions and comments at
