Hello,
I wanted to create a normal XY graph in Inkscape. It will be any other graph paper, where every block will be 1 cms and divided into 5 equal parts. I would also want it to be customized, that is I would want to decide the number of rows and columns.
I read something about grids and path effect, but did not understand much.
I am relatively new to the software as well as this forum. So would appreciate a detailed step by step explanation.
Thank you guys in advance.
Best,
Ganesh
Creating a graph paper using Inkscape
Re: Creating a graph paper using Inkscape
Hi ganeshp
Welcome as a new user on the forum.
Use Extensions - Render - Grids - Cartesian grid.
Edit; Follow Blue Text for Imperial (US) Size.
One way to get the correct spacing of the grid;
Set your page size in the document properties Shift + Ctrl + D- I set to A4 - Portrait, jot down the dimensions in mm - 210 x 297 mm in my example.
Set your page size in the document properties Shift + Ctrl + D- I set to Letter - Portrait, jot down the dimensions in inches - 8.5" x 11" in my example.
Change the units to Pixels and jot down the numbers again - 744.09448 x 1052,36218.
Change the units to Pixels and jot down the numbers again - 765.0 x 990.0
Divide the pixel count with corresponding size - 744.09448/210 = 3.5433 - jot down the answer here as well. This number will be pixels per mm.
Divide the pixel count with corresponding size - 765/8.5 = 90.0 - jot down the answer here as well. This number will be pixels per inch.
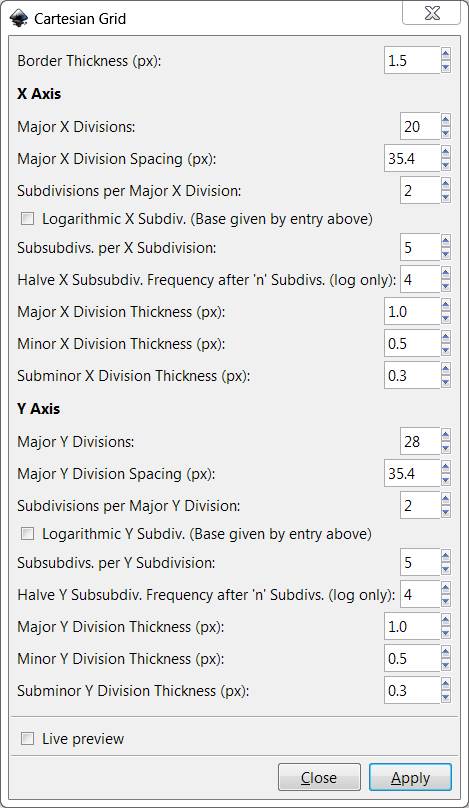
Open the Extensions - Grid - Cartesian grid dialog.
As I want my Major grid spacing to be 10mm I enter the Major X and Major Y spacing as 35.4 (which is the earlier 3.54 x 10).
As I want my Major grid spacing to be 1 inch I enter the Major X and Major Y spacing as 90.0 (which is the earlier 90.0).
My page size was 210 x 297mm so I set the number of divisions to 20 and 28 respectively.
My page size was 8.5 x 11 inch so I set the number of divisions to 8 and 11 respectively.
See example of my Cartesian Grid dialog boxes.
A4___ __US_Letter____ ;
Click images for larger versions.
As I like my Graph paper to be kind of "bluish" I changed the colors of the grid. (The blue does not copy very well on some copiers - copy your finished graph to "get rid of" the grid!)
To change the grid color;
Select one line in the graph and set the stroke color - while still selected do a copy - Ctrl + C.
( I set my stroke style to be ...... as well )
Select another line of same type and go to the Edit - Select Same - Stroke Style - do a CTRL + Shift + V to paste the Stroke style copied by your copy Ctrl + C.
Rinse & Repeat for the other lines you want to change. Changing the whole grid will take you less than one minute.
Example:

Click image for larger version.
Link to SVG - A4 - 10mm Major Grid; http://goo.gl/qYaFc
Link to SVG - Letter Size- 1 Inch Major Grid - 1/16th inch Minor Grid; http://goo.gl/IaYpa
Tip - Save the page as PDF and print from Abobe PDF reader -
I don't have much success in getting the dimensions right printing direct from Inkscape -
too lazy to figure out why as long as there are a working alternative!
Chime back with more questions if anything is unclear!
Good Luck!
RGDS
Ragnar
Welcome as a new user on the forum.
Use Extensions - Render - Grids - Cartesian grid.
Edit; Follow Blue Text for Imperial (US) Size.
One way to get the correct spacing of the grid;
Set your page size in the document properties Shift + Ctrl + D- I set to A4 - Portrait, jot down the dimensions in mm - 210 x 297 mm in my example.
Set your page size in the document properties Shift + Ctrl + D- I set to Letter - Portrait, jot down the dimensions in inches - 8.5" x 11" in my example.
Change the units to Pixels and jot down the numbers again - 744.09448 x 1052,36218.
Change the units to Pixels and jot down the numbers again - 765.0 x 990.0
Divide the pixel count with corresponding size - 744.09448/210 = 3.5433 - jot down the answer here as well. This number will be pixels per mm.
Divide the pixel count with corresponding size - 765/8.5 = 90.0 - jot down the answer here as well. This number will be pixels per inch.
Open the Extensions - Grid - Cartesian grid dialog.
As I want my Major grid spacing to be 10mm I enter the Major X and Major Y spacing as 35.4 (which is the earlier 3.54 x 10).
As I want my Major grid spacing to be 1 inch I enter the Major X and Major Y spacing as 90.0 (which is the earlier 90.0).
My page size was 210 x 297mm so I set the number of divisions to 20 and 28 respectively.
My page size was 8.5 x 11 inch so I set the number of divisions to 8 and 11 respectively.
See example of my Cartesian Grid dialog boxes.
A4___
 __US_Letter____ ;
Click images for larger versions.
As I like my Graph paper to be kind of "bluish" I changed the colors of the grid. (The blue does not copy very well on some copiers - copy your finished graph to "get rid of" the grid!)
To change the grid color;
Select one line in the graph and set the stroke color - while still selected do a copy - Ctrl + C.
( I set my stroke style to be ...... as well )
Select another line of same type and go to the Edit - Select Same - Stroke Style - do a CTRL + Shift + V to paste the Stroke style copied by your copy Ctrl + C.
Rinse & Repeat for the other lines you want to change. Changing the whole grid will take you less than one minute.
Example:
Click image for larger version.
Link to SVG - A4 - 10mm Major Grid; http://goo.gl/qYaFc
Link to SVG - Letter Size- 1 Inch Major Grid - 1/16th inch Minor Grid; http://goo.gl/IaYpa
Tip - Save the page as PDF and print from Abobe PDF reader -
I don't have much success in getting the dimensions right printing direct from Inkscape -
too lazy to figure out why as long as there are a working alternative!
Chime back with more questions if anything is unclear!
Good Luck!
RGDS
Ragnar
Last edited by ragstian on Tue Apr 30, 2013 11:15 am, edited 13 times in total.
Good Luck!
( ͡° ͜ʖ ͡°)
RGDS
Ragnar
( ͡° ͜ʖ ͡°)
RGDS
Ragnar
-
flamingolady

- Posts: 687
- Joined: Wed Jun 10, 2009 1:40 pm
Re: Creating a graph paper using Inkscape
Ragnar,
Once again, thx so much for sharing how to create a grid. I've never been able to get a piece of graph paper created decently until your explanation! On a funny note, had totally forgotten which was the X and the Y axis, so wikipedia'ed it! (BTW for non-math folks Y = vertical/up and down, X = sideways/horizontal).
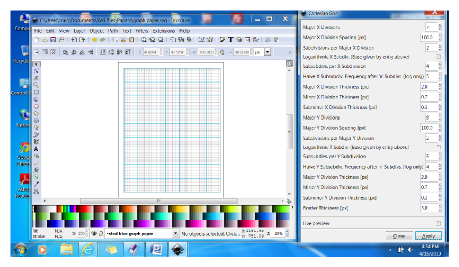
The standard portrait paper size in the US is 8.5 X 11". I was finally able to figure out how to get a decent piece of paper made, yay (sometimes I make designs for people who do plastic canvas or counted cross stitch). So, wanted to show you the result of your excellent teaching skills! and, also wanted to show others what numbers were used to create it, hoping it will save someone else wanting the US standard size some time.
dee
note: edited to change the typo to '8.5 x 11' - sorry about that.
Once again, thx so much for sharing how to create a grid. I've never been able to get a piece of graph paper created decently until your explanation! On a funny note, had totally forgotten which was the X and the Y axis, so wikipedia'ed it! (BTW for non-math folks Y = vertical/up and down, X = sideways/horizontal).
The standard portrait paper size in the US is 8.5 X 11". I was finally able to figure out how to get a decent piece of paper made, yay (sometimes I make designs for people who do plastic canvas or counted cross stitch). So, wanted to show you the result of your excellent teaching skills! and, also wanted to show others what numbers were used to create it, hoping it will save someone else wanting the US standard size some time.
dee
note: edited to change the typo to '8.5 x 11' - sorry about that.
- Attachments
-
- Graph paper screen shot.png (80.27 KiB) Viewed 30596 times
Last edited by flamingolady on Tue Apr 16, 2013 10:29 am, edited 1 time in total.

Re: Creating a graph paper using Inkscape
[
Last edited by druban on Wed May 29, 2013 7:44 pm, edited 1 time in total.
Your mind is what you think it is.
Re: Creating a graph paper using Inkscape
Hi.
Dee;
Thanks for the nice words. Can we see a larger image of your Inkscape screen?
The resolution is a little low to see the numbers in your Cartesian Grid dialog box.
I am also intrigued by the color palette on your Inkscape screen!
You say a "standard US portrait paper size is 8 x 10" - You sure? I thought it was 8.5 x 11 but I might be wrong - it has happened before!! (Just read on!)
Might do a "US addendum" to get the page size in inches and the grid in 64's or something - stay tuned!
Edit; US Version added.
druban;
Thanks for finding the shortcut error - of course the "paste style" key combination is Ctrl + Shift + V - I have updated the earlier post accordingly.
(Shame on me for 30 days!! )
)
As you have probably noticed - my posts go through several "iterations" or "edit cycles" before they are "ready to be published".
It's easy to overlook "missing features" in the major release when I'am using the developer's version. Sorry for the inconvenience to anyone affected!
(Shame on me for another 30 days!! See you mid June! )
RGDS
Ragnar
Dee;
Thanks for the nice words. Can we see a larger image of your Inkscape screen?
The resolution is a little low to see the numbers in your Cartesian Grid dialog box.
I am also intrigued by the color palette on your Inkscape screen!
You say a "standard US portrait paper size is 8 x 10" - You sure? I thought it was 8.5 x 11 but I might be wrong - it has happened before!! (Just read on!)
Might do a "US addendum" to get the page size in inches and the grid in 64's or something - stay tuned!
Edit; US Version added.
druban;
Thanks for finding the shortcut error - of course the "paste style" key combination is Ctrl + Shift + V - I have updated the earlier post accordingly.
(Shame on me for 30 days!!
As you have probably noticed - my posts go through several "iterations" or "edit cycles" before they are "ready to be published".
It's easy to overlook "missing features" in the major release when I'am using the developer's version. Sorry for the inconvenience to anyone affected!
(Shame on me for another 30 days!!
RGDS
Ragnar
Last edited by ragstian on Tue Apr 16, 2013 11:49 pm, edited 1 time in total.
Good Luck!
( ͡° ͜ʖ ͡°)
RGDS
Ragnar
( ͡° ͜ʖ ͡°)
RGDS
Ragnar
-
flamingolady
- Posts: 687
- Joined: Wed Jun 10, 2009 1:40 pm
Re: Creating a graph paper using Inkscape
Ragnar,
You are right, the standard imperial (US) size is 8.5 x 11 - so sorry, I was working on too many things at the same - good catch! On this screen shot I used most of your numbers, mostly changed the stroke line size, and I will make this screen shot larger.
p.s. my pallet is just the standard default colors that appeared whenever I downloaded the program. For those who may not know this (it took me a long time to learn this), there is a tinee tiny little arrow on the far right, bottom side of your Inkscape screen, next to the pallet. It looks a bit like a filled in 'smaller than <' sign. If you click on it, a menu appears and there are many options of pallets that you can choose from. You can also change the pallet sizes too. I simply chose the Inkscape default pallet and at the top chose the size as tiny so a lot of colors could appear.
graph color tips and tricks: I changed the graph to a path, then set the color of the ENTIRE graph (using colors from a blue pallet). Then, I carefully selected the major lines and grouped them, and set their color. Then selected the minor lines, grouped them, and set their color. Then I changed the color of the outmost border. (I did re-group all when done.) Only took a few seconds to change the colors, as it's quicker to select the fewer and larger lines than all those skinny ones - and now since they are grouped by size, I can change the colors so very quickly, voila!
ATTN: Developers/Programmers/Coders: If I had a wish list for the grid maker menu it would be to add a stroke color box for each type of line in the grid menu! Not sure how easy or hard that is to add. I'd even be happy if I could add in the RGB color by it's number.
dee
- Attachments
-
- Graph paper US screen shot.png (162.52 KiB) Viewed 30557 times
Re: Creating a graph paper using Inkscape
Hi
Dee;
Thanks for the tips, I have repeated below how to get the palette menu - hope you don't mind!
Nothing to be sorry about - to err is human - to really mess things up you need a computer!
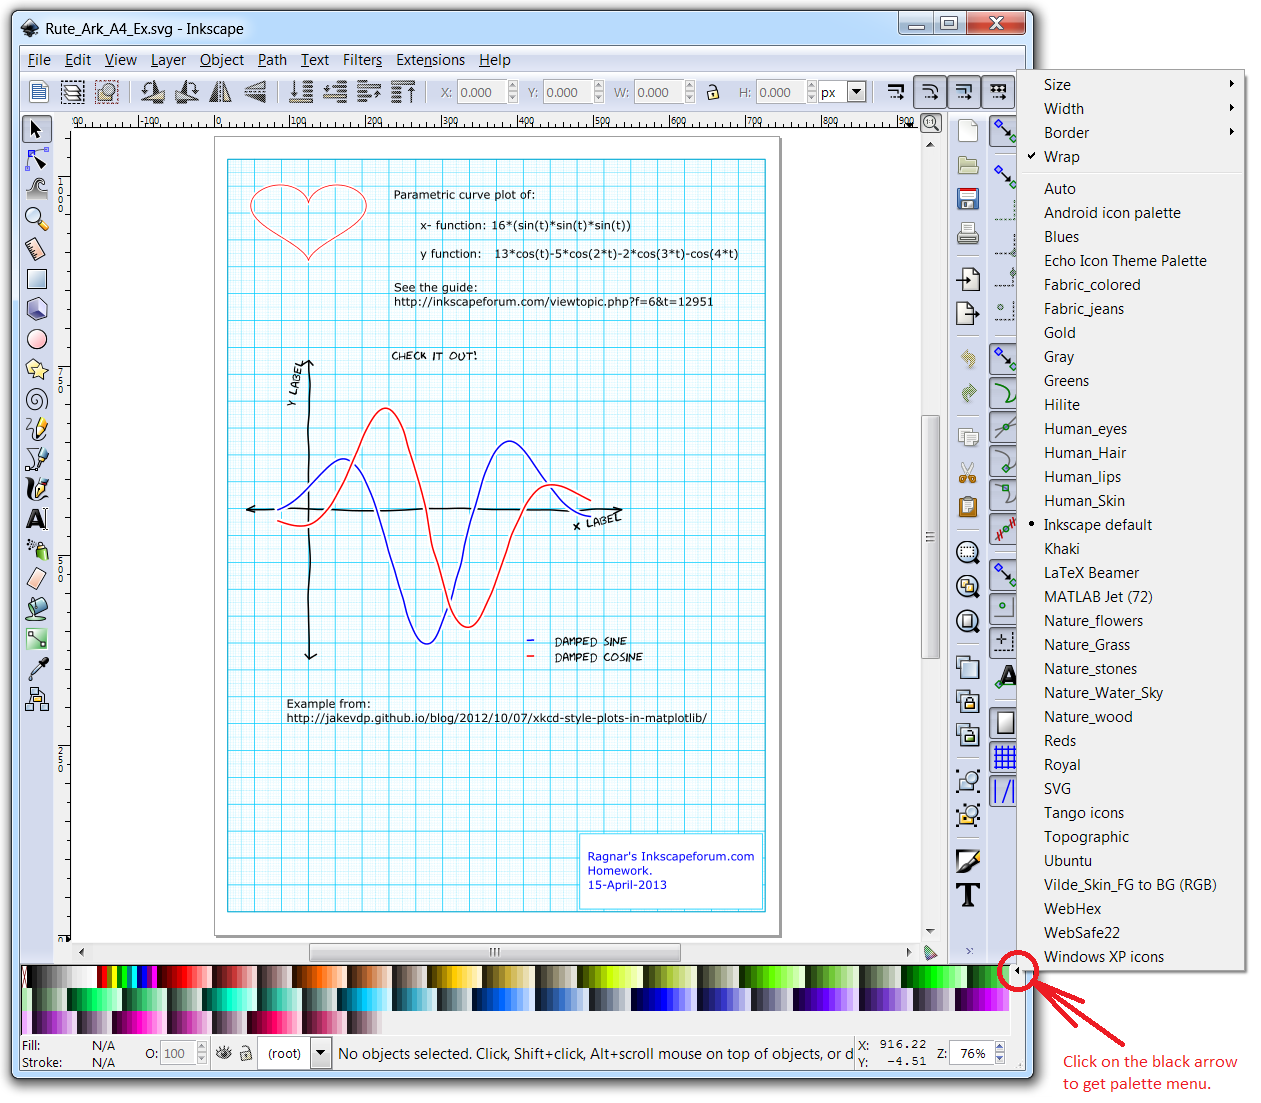
I managed to get my color palette to look like yours - 3 lines of colors instead of one - by playing with the Size, Width, Border and Wrap in the Color Palette Menu.
By the way - this must be the best hidden menu in Inkscape - took me a few months of use before I "discovered" it !!
Even the excellent book - Inkscape Guide to a Vector Drawing Program - by Tavmjong Bah fails to mention how to invoke the menu.
For those of you new to this - like Dee said; it's invoked by clicking on the tiny black triangle inside the red circle in the lower right corner of the screen-dump below.
( Don't worry if your palette menu is different from mine - I have made a few new palettes and copied some as well, after learning how! )
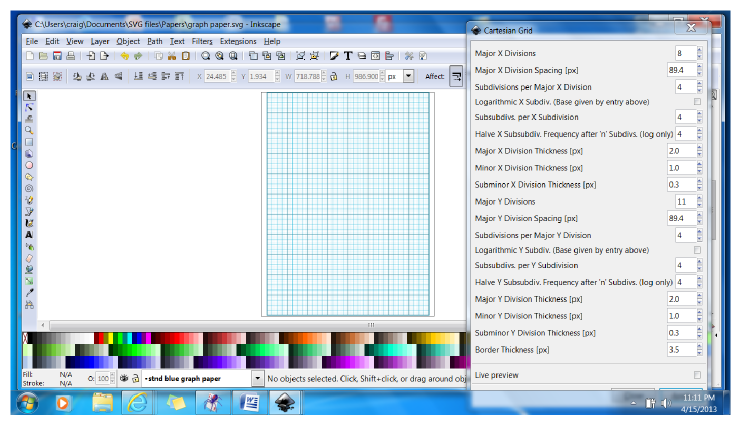
The grid menu is an extension - you can change it yourself!! File is in Inkscape/Share/Extensions/ . Files; grid_cartesian.inx and grid_cartesian.py
Let's have a race - start coding!
(Have you heard of the two silkworms that had a race? They both ended up in a tie!! )
)

Click image for larger version.
Good Luck coding!
RGDS
Ragnar
Dee;
Thanks for the tips, I have repeated below how to get the palette menu - hope you don't mind!
You are right, the standard imperial (US) size is 8.5 x 11 - so sorry...
Nothing to be sorry about - to err is human - to really mess things up you need a computer!
p.s. not sure what Inkscape screen color you are referring to,
it's just the standard colors that appear whenever I downloaded the program....
I managed to get my color palette to look like yours - 3 lines of colors instead of one - by playing with the Size, Width, Border and Wrap in the Color Palette Menu.
By the way - this must be the best hidden menu in Inkscape - took me a few months of use before I "discovered" it !!
Even the excellent book - Inkscape Guide to a Vector Drawing Program - by Tavmjong Bah fails to mention how to invoke the menu.
For those of you new to this - like Dee said; it's invoked by clicking on the tiny black triangle inside the red circle in the lower right corner of the screen-dump below.
( Don't worry if your palette menu is different from mine - I have made a few new palettes and copied some as well, after learning how! )
If I had a wish list for the grid maker menu it would be for the coders/developers
to add a stroke color box for each type of line!...
The grid menu is an extension - you can change it yourself!! File is in Inkscape/Share/Extensions/ . Files; grid_cartesian.inx and grid_cartesian.py
Let's have a race - start coding!
(Have you heard of the two silkworms that had a race? They both ended up in a tie!!
Click image for larger version.
Good Luck coding!
RGDS
Ragnar
Last edited by ragstian on Sat Apr 20, 2013 2:28 am, edited 1 time in total.
Good Luck!
( ͡° ͜ʖ ͡°)
RGDS
Ragnar
( ͡° ͜ʖ ͡°)
RGDS
Ragnar
Re: Creating a graph paper using Inkscape
8 x 10 is a popular size of actual photographic portraits, in the US, lol! That's in the world of portrait photography.
In the world of computer graphics the standard size document is A4, which is 8.27 x 11.69". Of course Inkscape offers many different document sizes. 8.5 x 11 is the standard letter size in the US. And in graphics, "portrait" simply refers to the orientation of the document 'taller than wide', which is opposed to "landscape" orientation, which is wider than tall.
In the world of computer graphics the standard size document is A4, which is 8.27 x 11.69". Of course Inkscape offers many different document sizes. 8.5 x 11 is the standard letter size in the US. And in graphics, "portrait" simply refers to the orientation of the document 'taller than wide', which is opposed to "landscape" orientation, which is wider than tall.
Basics - Help menu > Tutorials
Manual - Inkscape: Guide to a Vector Drawing Program
Inkscape Community - Inkscape FAQ - Gallery
Inkscape for Cutting Design
Manual - Inkscape: Guide to a Vector Drawing Program
Inkscape Community - Inkscape FAQ - Gallery
Inkscape for Cutting Design
-
flamingolady
- Posts: 687
- Joined: Wed Jun 10, 2009 1:40 pm
Re: Creating a graph paper using Inkscape
hmm, I wrote a whole post here, posted it, but now it's gone? dang.
Ragnar - I see the files to be changed (for adding the needed code for stroke color) - but you know I don't have a clue of what to do, how to code, don't even know how to open those files (at least I did find them, lol). If it's easy, could you point me in the right direction? If not quick/easy, then it's not worth it, and I won't waste your time.
Ragnar - I see the files to be changed (for adding the needed code for stroke color) - but you know I don't have a clue of what to do, how to code, don't even know how to open those files (at least I did find them, lol). If it's easy, could you point me in the right direction? If not quick/easy, then it's not worth it, and I won't waste your time.
Re: Creating a graph paper using Inkscape
You found it, that's a good starting point!
To go on, open it with a notepad -talking of grid_cartesian.py-.
You can use any kind of notepad; I use notepad++, it can make work easier.
You can download it here:
http://notepad-plus-plus.org/download/v6.3.2.html
After you open the .py, you will see this:
There are only two styles defined at the top. Colours are set by the "'#000000'"characters.
To change them, simply type in the hex code of the colour you want to use between the two "'"-s, and save the result as .py.
Here is a great site finding those hex codes: http://www.colorhexa.com/
But, with this method you cannot add more colours; you will have to define other stroke styles.
I'll have to dig deeper on how to even if it doesn't seem too complicated.
To go on, open it with a notepad -talking of grid_cartesian.py-.
You can use any kind of notepad; I use notepad++, it can make work easier.
You can download it here:
http://notepad-plus-plus.org/download/v6.3.2.html
After you open the .py, you will see this:
Code: Select all
#!/usr/bin/env python
'''
Copyright (C) 2007 John Beard john.j.beard@gmail.com

##This extension allows you to draw a Cartesian grid in Inkscape.
##There is a wide range of options including subdivision, subsubdivions
## and logarithmic scales. Custom line widths are also possible.
##All elements are grouped with similar elements (eg all x-subdivs)

This program is free software; you can redistribute it and/or modify
it under the terms of the GNU General Public License as published by
the Free Software Foundation; either version 2 of the License, or
(at your option) any later version.

This program is distributed in the hope that it will be useful,
but WITHOUT ANY WARRANTY; without even the implied warranty of
MERCHANTABILITY or FITNESS FOR A PARTICULAR PURPOSE.  See the
GNU General Public License for more details.

You should have received a copy of the GNU General Public License
along with this program; if not, write to the Free Software
Foundation, Inc., 59 Temple Place, Suite 330, Boston, MA  02111-1307  USA
'''

import inkex
import simplestyle, sys
from math import *

def draw_SVG_line(x1, y1, x2, y2, width, name, parent):
    style = { 'stroke': '#000000', 'stroke-width':str(width), 'fill': 'none' }
    line_attribs = {'style':simplestyle.formatStyle(style),
                    inkex.addNS('label','inkscape'):name,
                    'd':'M '+str(x1)+','+str(y1)+' L '+str(x2)+','+str(y2)}
    inkex.etree.SubElement(parent, inkex.addNS('path','svg'), line_attribs )

def draw_SVG_rect(x,y,w,h, width, fill, name, parent):
    style = { 'stroke': '#000000', 'stroke-width':str(width), 'fill':fill}
    rect_attribs = {'style':simplestyle.formatStyle(style),
                    inkex.addNS('label','inkscape'):name,
                    'x':str(x), 'y':str(y), 'width':str(w), 'height':str(h)}
    inkex.etree.SubElement(parent, inkex.addNS('rect','svg'), rect_attribs )

class Grid_Polar(inkex.Effect):
    def __init__(self):
        inkex.Effect.__init__(self)
        self.OptionParser.add_option("--x_divs",
                        action="store", type="int",
                        dest="x_divs", default=5,
                        help="Major X Divisions")
        self.OptionParser.add_option("--dx",
                        action="store", type="float",
                        dest="dx", default=100.0,
                        help="Major X divison Spacing")
        self.OptionParser.add_option("--x_subdivs",
                        action="store", type="int",
                        dest="x_subdivs", default=2,
                        help="Subdivisions per Major X division")
        self.OptionParser.add_option("--x_log",
                        action="store", type="inkbool",
                        dest="x_log", default=False,
                        help="Logarithmic x subdivisions if true")
        self.OptionParser.add_option("--x_subsubdivs",
                        action="store", type="int",
                        dest="x_subsubdivs", default=5,
                        help="Subsubdivisions per Minor X division")
        self.OptionParser.add_option("--x_half_freq",
                        action="store", type="int",
                        dest="x_half_freq", default=4,
                        help="Halve Subsubdiv. Frequency after 'n' Subdivs. (log only)")
        self.OptionParser.add_option("--x_divs_th",
                        action="store", type="float",
                        dest="x_divs_th", default=2,
                        help="Major X Division Line thickness")
        self.OptionParser.add_option("--x_subdivs_th",
                        action="store", type="float",
                        dest="x_subdivs_th", default=1,
                        help="Minor X Division Line thickness")
        self.OptionParser.add_option("--x_subsubdivs_th",
                        action="store", type="float",
                        dest="x_subsubdivs_th", default=1,
                        help="Subminor X Division Line thickness")
        self.OptionParser.add_option("--y_divs",
                        action="store", type="int",
                        dest="y_divs", default=6,
                        help="Major Y Divisions")
        self.OptionParser.add_option("--dy",
                        action="store", type="float",
                        dest="dy", default=100.0,
                        help="Major Gridline Increment")
        self.OptionParser.add_option("--y_subdivs",
                        action="store", type="int",
                        dest="y_subdivs", default=2,
                        help="Minor Divisions per Major Y division")
        self.OptionParser.add_option("--y_log",
                        action="store", type="inkbool",
                        dest="y_log", default=False,
                        help="Logarithmic y subdivisions if true")
        self.OptionParser.add_option("--y_subsubdivs",
                        action="store", type="int",
                        dest="y_subsubdivs", default=5,
                        help="Subsubdivisions per Minor Y division")
        self.OptionParser.add_option("--y_half_freq",
                        action="store", type="int",
                        dest="y_half_freq", default=4,
                        help="Halve Y Subsubdiv. Frequency after 'n' Subdivs. (log only)")
        self.OptionParser.add_option("--y_divs_th",
                        action="store", type="float",
                        dest="y_divs_th", default=2,
                        help="Major Y Division Line thickness")
        self.OptionParser.add_option("--y_subdivs_th",
                        action="store", type="float",
                        dest="y_subdivs_th", default=1,
                        help="Minor Y Division Line thickness")
        self.OptionParser.add_option("--y_subsubdivs_th",
                        action="store", type="float",
                        dest="y_subsubdivs_th", default=1,
                        help="Subminor Y Division Line thickness")
        self.OptionParser.add_option("--border_th",
                        action="store", type="float",
                        dest="border_th", default=3,
                        help="Border Line thickness")


    def effect(self):

        #find the pixel dimensions of the overall grid
        ymax = self.options.dy * self.options.y_divs
        xmax = self.options.dx * self.options.x_divs

        # Embed grid in group
        #Put in in the centre of the current view
        t = 'translate(' + str( self.view_center[0]- xmax/2.0) + ',' + \
                           str( self.view_center[1]- ymax/2.0) + ')'
        g_attribs = {inkex.addNS('label','inkscape'):'Grid_Polar:X' + \
                     str( self.options.x_divs )+':Y'+str( self.options.y_divs ),
                     'transform':t }
        grid = inkex.etree.SubElement(self.current_layer, 'g', g_attribs)

        #Group for major x gridlines
        g_attribs = {inkex.addNS('label','inkscape'):'MajorXGridlines'}
        majglx = inkex.etree.SubElement(grid, 'g', g_attribs)

        #Group for major y gridlines
        g_attribs = {inkex.addNS('label','inkscape'):'MajorYGridlines'}
        majgly = inkex.etree.SubElement(grid, 'g', g_attribs)

        #Group for minor x gridlines
        if self.options.x_subdivs > 1:#if there are any minor x gridlines
            g_attribs = {inkex.addNS('label','inkscape'):'MinorXGridlines'}
            minglx = inkex.etree.SubElement(grid, 'g', g_attribs)

        #Group for subminor x gridlines
        if self.options.x_subsubdivs > 1:#if there are any minor minor x gridlines
            g_attribs = {inkex.addNS('label','inkscape'):'SubMinorXGridlines'}
            mminglx = inkex.etree.SubElement(grid, 'g', g_attribs)

        #Group for minor y gridlines
        if self.options.y_subdivs > 1:#if there are any minor y gridlines
            g_attribs = {inkex.addNS('label','inkscape'):'MinorYGridlines'}
            mingly = inkex.etree.SubElement(grid, 'g', g_attribs)

        #Group for subminor y gridlines
        if self.options.y_subsubdivs > 1:#if there are any minor minor x gridlines
            g_attribs = {inkex.addNS('label','inkscape'):'SubMinorYGridlines'}
            mmingly = inkex.etree.SubElement(grid, 'g', g_attribs)


        draw_SVG_rect(0, 0, xmax, ymax, self.options.border_th,
                      'none', 'Border', grid) #border rectangle

        #DO THE X DIVISONS======================================
        sd  = self.options.x_subdivs #sub divs per div
        ssd = self.options.x_subsubdivs #subsubdivs per subdiv

        for i in range(0, self.options.x_divs): #Major x divisons
            if i>0: #dont draw first line (we made a proper border)
                draw_SVG_line(self.options.dx*i, 0,
                              self.options.dx*i,ymax,
                              self.options.x_divs_th,
                              'MajorXDiv'+str(i), majglx)

            if self.options.x_log: #log x subdivs
                for j in range (1, sd):
                    if j>1: #the first loop is only for subsubdivs
                        draw_SVG_line(self.options.dx*(i+log(j, sd)), 0,
                                      self.options.dx*(i+log(j, sd)), ymax,
                                      self.options.x_subdivs_th,
                                      'MinorXDiv'+str(i)+':'+str(j), minglx)

                    for k in range (1, ssd): #subsub divs
                        if (j <= self.options.x_half_freq) or (k%2 == 0):#only draw half the subsubdivs past the half-freq point
                            if (ssd%2 > 0) and (j > self.options.y_half_freq): #half frequency won't work with odd numbers of subsubdivs,
                                ssd2 = ssd+1 #make even
                            else:
                                ssd2 = ssd #no change
                            draw_SVG_line(self.options.dx*(i+log(j+k/float(ssd2),sd )), 0,
                                          self.options.dx*(i+log(j+k/float(ssd2),sd )), ymax,
                                          self.options.x_subsubdivs_th,'SubminorXDiv'+str(i)+':'+str(j)+':'+str(k), mminglx)

            else: #linear x subdivs
                for j in range (0, sd):
                    if j>0: #not for the first loop (this loop is for the subsubdivs before the first subdiv)
                        draw_SVG_line(self.options.dx*(i+j/float(sd)), 0,
                                      self.options.dx*(i+j/float(sd)), ymax,
                                      self.options.x_subdivs_th,
                                      'MinorXDiv'+str(i)+':'+str(j), minglx)

                    for k in range (1, ssd): #subsub divs
                        draw_SVG_line(self.options.dx*(i+(j*ssd+k)/((float(sd)*ssd))) , 0,
                                      self.options.dx*(i+(j*ssd+k)/((float(sd)*ssd))) , ymax,
                                      self.options.x_subsubdivs_th,
                                      'SubminorXDiv'+str(i)+':'+str(j)+':'+str(k), mminglx)

        #DO THE Y DIVISONS========================================
        sd  = self.options.y_subdivs    #sub divs per div
        ssd = self.options.y_subsubdivs #subsubdivs per subdiv

        for i in range(0, self.options.y_divs): #Major y divisons
            if i>0:#dont draw first line (we will make a border)
                draw_SVG_line(0, self.options.dy*i,
                              xmax, self.options.dy*i,
                              self.options.y_divs_th,
                              'MajorYDiv'+str(i), majgly)

            if self.options.y_log: #log y subdivs
                for j in range (1, sd):
                    if j>1: #the first loop is only for subsubdivs
                        draw_SVG_line(0,    self.options.dy*(i+1-log(j,sd)),
                                      xmax, self.options.dy*(i+1-log(j,sd)),
                                      self.options.y_subdivs_th,
                                      'MinorXDiv'+str(i)+':'+str(j), mingly)

                    for k in range (1, ssd): #subsub divs
                        if (j <= self.options.y_half_freq) or (k%2 == 0):#only draw half the subsubdivs past the half-freq point
                            if (ssd%2 > 0) and (j > self.options.y_half_freq): #half frequency won't work with odd numbers of subsubdivs,
                                ssd2 = ssd+1
                            else:
                                ssd2 = ssd #no change
                            draw_SVG_line(0,    self.options.dx*(i+1-log(j+k/float(ssd2),sd )),
                                          xmax, self.options.dx*(i+1-log(j+k/float(ssd2),sd )),
                                          self.options.y_subsubdivs_th,
                                          'SubminorXDiv'+str(i)+':'+str(j)+':'+str(k), mmingly)
            else: #linear y subdivs
                for j in range (0, self.options.y_subdivs):
                    if j>0:#not for the first loop (this loop is for the subsubdivs before the first subdiv)
                        draw_SVG_line(0,    self.options.dy*(i+j/float(sd)),
                                      xmax, self.options.dy*(i+j/float(sd)),
                                      self.options.y_subdivs_th,
                                      'MinorXYiv'+str(i)+':'+str(j), mingly)

                    for k in range (1, ssd): #subsub divs
                        draw_SVG_line(0,    self.options.dy*(i+(j*ssd+k)/((float(sd)*ssd))),
                                      xmax, self.options.dy*(i+(j*ssd+k)/((float(sd)*ssd))),
                                      self.options.y_subsubdivs_th,
                                      'SubminorXDiv'+str(i)+':'+str(j)+':'+str(k), mmingly)


if __name__ == '__main__':
    e = Grid_Polar()
    e.affect()


# vim: expandtab shiftwidth=4 tabstop=8 softtabstop=4 encoding=utf-8 textwidth=99
There are only two styles defined at the top. Colours are set by the "'#000000'"characters.
To change them, simply type in the hex code of the colour you want to use between the two "'"-s, and save the result as .py.
Here is a great site finding those hex codes: http://www.colorhexa.com/
But, with this method you cannot add more colours; you will have to define other stroke styles.
I'll have to dig deeper on how to even if it doesn't seem too complicated.
Re: Creating a graph paper using Inkscape
Hi
Lazur URH;
"Hardcoding" the color values in the python file is easy but will not get you the flexibility Dee wants.
I reckon shs'e dreaming of something like this;

Click image for larger version.
Happy Coding!
RGDS
Ragnar
Lazur URH;
But, with this method you cannot add more colours; you will have to define other stroke styles.
I'll have to dig deeper on how to even if it doesn't seem too complicated.
"Hardcoding" the color values in the python file is easy but will not get you the flexibility Dee wants.
I reckon shs'e dreaming of something like this;
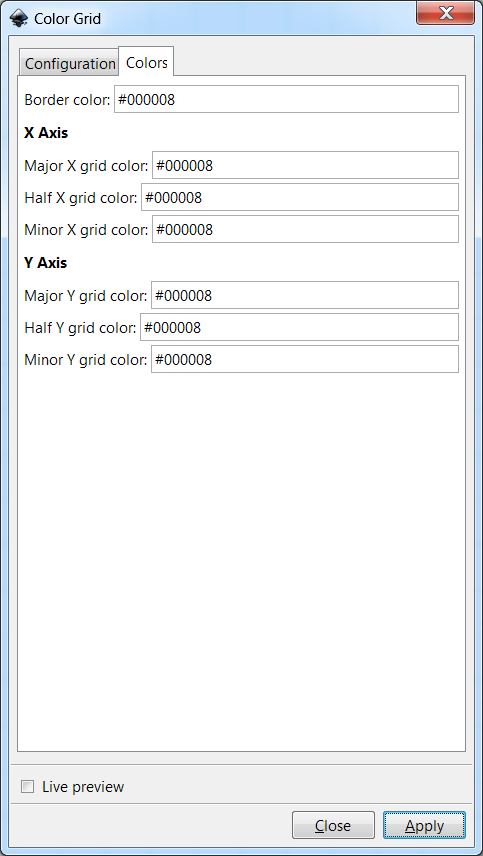
Click image for larger version.
Happy Coding!
RGDS
Ragnar
Good Luck!
( ͡° ͜ʖ ͡°)
RGDS
Ragnar
( ͡° ͜ʖ ͡°)
RGDS
Ragnar
-
flamingolady
- Posts: 687
- Joined: Wed Jun 10, 2009 1:40 pm
Re: Creating a graph paper using Inkscape
Lazur/Ragnar - it works! I am so excited! well, I only found 2 of the 3 places to change the HEX #, but hey, it worked, and I have an amazing pretty blue piece of graph paper!!!!
Ragnar - you are correct, my dream would be exactly what you are showing. I don't know how hard that would be to change though. At the moment, I am very excited to have learned this little ditty!
thanks so much, again, this forum rocks. (and I do hope in all of this that we have helped the original poster - if not, please come back and ask your questions - if these folks can handle my questions, they can handle anyone's!
dee
Re: Creating a graph paper using Inkscape
Hi.
flamingolady;
Another one "lost interest" or gave up? Strange!
Ganesh;
Joined: 15 Apr 2013 03:42
Last visited: 15 Apr 2013 04:03
Total posts: 1
Glad you got it working! I am working on the color version - not easy for my two braincells!
RGDS
Ragnar
flamingolady;
I do hope in all of this that we have helped the original poster - if not, please come back and ask your questions
Another one "lost interest" or gave up? Strange!
Ganesh;
Joined: 15 Apr 2013 03:42
Last visited: 15 Apr 2013 04:03
Total posts: 1
Glad you got it working! I am working on the color version - not easy for my two braincells!
RGDS
Ragnar
Good Luck!
( ͡° ͜ʖ ͡°)
RGDS
Ragnar
( ͡° ͜ʖ ͡°)
RGDS
Ragnar
Re: Creating a graph paper using Inkscape
Thought you were already at the finish line.
Re: Creating a graph paper using Inkscape
Hi
Lazur URH;
Not as easy as I would like - a few new things to learn on the way!
RGDS
Ragnar
Lazur URH;
Thought you were already at the finish line.
Not as easy as I would like - a few new things to learn on the way!
RGDS
Ragnar
Good Luck!
( ͡° ͜ʖ ͡°)
RGDS
Ragnar
( ͡° ͜ʖ ͡°)
RGDS
Ragnar
Re: Creating a graph paper using Inkscape
Hi.
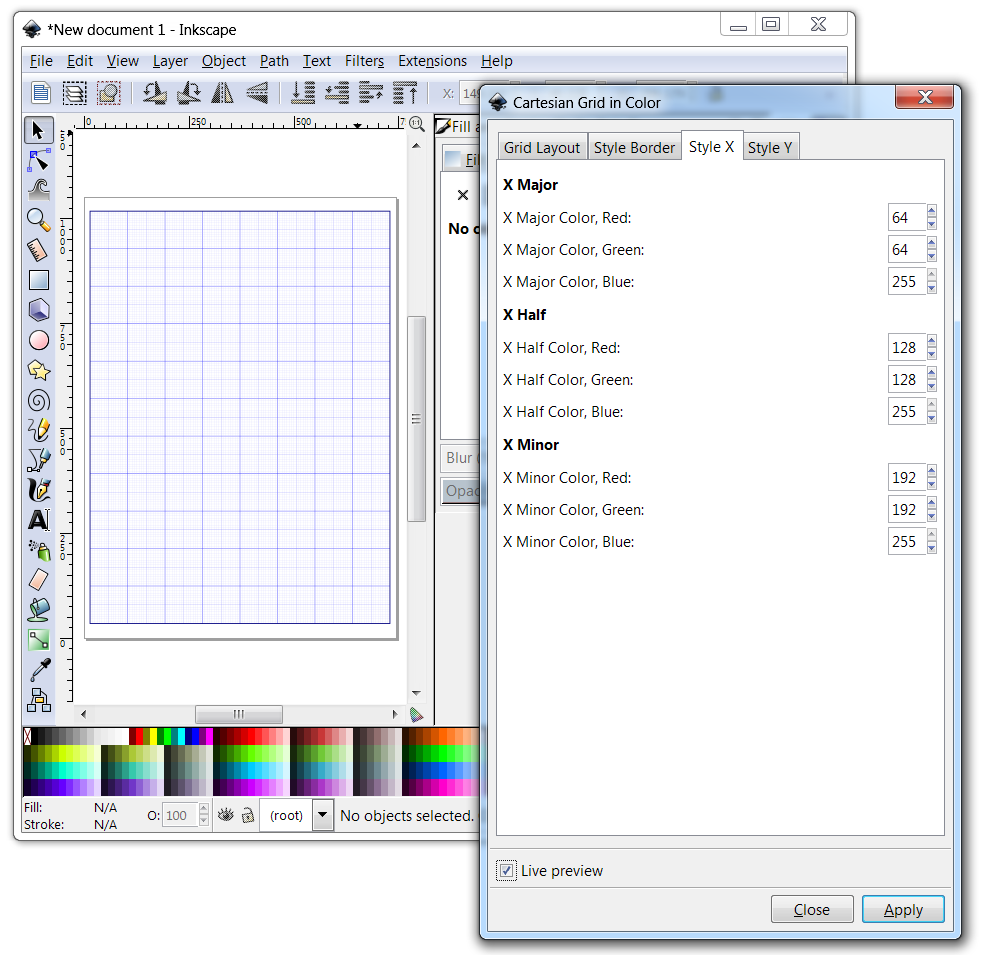
Got the "Cartesian Grid Color" extension version 0.1 ready.
See example;

Click image for larger version.
If interested - please test & report bugs or problems.
When the extension is polished I reckon it can permanently replace the original "Cartesian Grid" -
then I'll have figure out how to submit to the Extension repository or devs?
Unzip the attached file to installDir/Inkscape/share/extensions -
where installDir can be "C:\Program Files\" (Windows) or "/usr/share/inkscape" (Linux) - yours might be different.
After copy - restart Inkscape (Close & Open).
To use; go to ; Extensions - Render - Grid - Cartesian Grid Color
Files in ZIP format; See later post
Good Luck
RGDS
Ragnar
Got the "Cartesian Grid Color" extension version 0.1 ready.
See example;
Click image for larger version.
If interested - please test & report bugs or problems.
When the extension is polished I reckon it can permanently replace the original "Cartesian Grid" -
then I'll have figure out how to submit to the Extension repository or devs?
Unzip the attached file to installDir/Inkscape/share/extensions -
where installDir can be "C:\Program Files\" (Windows) or "/usr/share/inkscape" (Linux) - yours might be different.
After copy - restart Inkscape (Close & Open).
To use; go to ; Extensions - Render - Grid - Cartesian Grid Color
Files in ZIP format; See later post
Good Luck
RGDS
Ragnar
Last edited by ragstian on Thu Apr 25, 2013 12:29 am, edited 3 times in total.
Good Luck!
( ͡° ͜ʖ ͡°)
RGDS
Ragnar
( ͡° ͜ʖ ͡°)
RGDS
Ragnar
Re: Creating a graph paper using Inkscape
Congrats!
You won.
Now I can learn how you did this.
Works fine here on Inkscape 0.48.4 r9939, with win xp.
You won.
Now I can learn how you did this.
Works fine here on Inkscape 0.48.4 r9939, with win xp.
-
flamingolady
- Posts: 687
- Joined: Wed Jun 10, 2009 1:40 pm
Re: Creating a graph paper using Inkscape
And you know that I'm already excited to see this!!!
Ragnar,
ok, I must have done something wrong, it isn't working for me. (Edit) To be more specific, it's not giving me the same grid menu that you have posted above - I don't have the tabs for the style, color, etc.
I followed your instructions, and they were good, I extracted and unzipped the files, there were 2 of them, then I moved them into the extensions file - closed and re-started Inkscape, but, when I open the Cartesian grip to render, the regular menu pops up - so what am I doing wrong? am I supposed to delete any files, so that this can take it's place?
I'm using Win 7, the latest stable Inkscape version.
thx
dee
Re: Creating a graph paper using Inkscape
Hi
Might be my fault compressing the wrong files ( when editing the post.)
Sorry about that in case.
Try again with this file; EDIT - File deleted until bugs are sorted out.
No need to delete any files in your extension directory - these two "new" ones will overwrite the old files.
If you got the two files in the right place ( Installdir/Inkscape/share/extensions ) you should get this in your extensions dropdown list;

RGDS
Ragnar
Might be my fault compressing the wrong files ( when editing the post.)
Sorry about that in case.
Try again with this file; EDIT - File deleted until bugs are sorted out.
No need to delete any files in your extension directory - these two "new" ones will overwrite the old files.
If you got the two files in the right place ( Installdir/Inkscape/share/extensions ) you should get this in your extensions dropdown list;
RGDS
Ragnar
Last edited by ragstian on Mon Jun 03, 2013 7:41 am, edited 3 times in total.
Good Luck!
( ͡° ͜ʖ ͡°)
RGDS
Ragnar
( ͡° ͜ʖ ͡°)
RGDS
Ragnar
-
flamingolady
- Posts: 687
- Joined: Wed Jun 10, 2009 1:40 pm
Re: Creating a graph paper using Inkscape
ok, I was able to find it this time, sorry, I think it was me looking at the wrong title - there's a render 'Cartesian grid', 'grid' and there's also a 'grids', I was clicking in the wrong place.
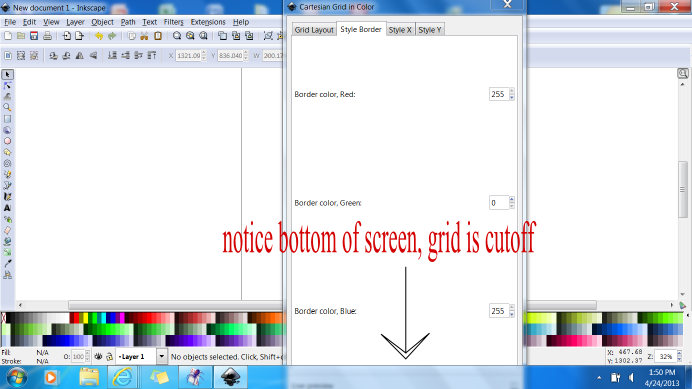
ok, progress. I've got the menu to come up - yay - this is going to be good, but have a few issues with Win 7 that won't allow me to make a grid. (I know it's Win 7 as I get this in another program I use a lot).
Issues: The menu is too long for the screen, and it doesn't re-size, therefore I can't scroll or move to the bottom of the page to click on the create grid button!! : ( It appears to be double spaced - is there a way to remove any excess space, that would help us Win 7 users.
The X tab seemed to let me enter in values ok, but the Y did not, it kept wiping out any entry of colors (I used general colors and ensured they were real values too). It just keep resetting back to your default.
I'm not sure what kinds of numbers go into the Style Border tab, color values get erased, I tried typing in all f's and it kept getting erased.
The default number '255' has me a little confused too, is that box for a value between 1 and 255 (alpha) or for a color? As with all things, I need to learn it, so somewhere in Tav's manual should be a guide as to what numbers get input there.
I'm wondering if maybe you could preset the values to be full black as a default- then at least if it doesn't work on all pc's, they still get a grid.... just a thought.
For me, if I see the color value already set as a default, then I pretty much know it's a color, but, if I see just a 0 in the box, that doesn't give me any clue as to what to input. Keep in mind that all these X and Y things are crossing my eyes to begin with, so any clues will help, lol.
I'm so excited, almost there to a beautifully colored grid, thanks much! (sorry I haven't figured it all out, am getting there slowly).
dee
- Attachments
-
- cartesian grid.png (86.73 KiB) Viewed 30154 times
Re: Creating a graph paper using Inkscape
Hi.
Dee - you are doing it right. I had the double spaced menu for a while as well.
Got rid of it somehow - will investigate and reply - just have some patience with me!
I found a "bug" in the last uploaded file as well - the "Y Half Grid" thickness and color does not work, I am sure it did in the original version.
Hm. Strange - this also happened to me but are gone now - might be my use of the INX file - will investigate
Will explain the 255 number in a while, all grid colors default to blue - might change that to black.
RGDS
Ragnar
Dee - you are doing it right. I had the double spaced menu for a while as well.
Got rid of it somehow - will investigate and reply - just have some patience with me!
I found a "bug" in the last uploaded file as well - the "Y Half Grid" thickness and color does not work, I am sure it did in the original version.
there's a render 'Cartesian grid', 'grid' and there's also a 'grids',
Hm. Strange - this also happened to me but are gone now - might be my use of the INX file - will investigate
Will explain the 255 number in a while, all grid colors default to blue - might change that to black.
RGDS
Ragnar
Good Luck!
( ͡° ͜ʖ ͡°)
RGDS
Ragnar
( ͡° ͜ʖ ͡°)
RGDS
Ragnar
Re: Creating a graph paper using Inkscape
Just
Last edited by druban on Wed May 29, 2013 7:45 pm, edited 1 time in total.
Your mind is what you think it is.
-
flamingolady
- Posts: 687
- Joined: Wed Jun 10, 2009 1:40 pm
Re: Creating a graph paper using Inkscape
Druban/Ragnar,
just an fyi - I'm on a regular sized laptop, so not using a wide screen. Also, when using the other program that is known to not work (which is a grocery store shopping program), it DOES have a scrollbar, and the scrollbar stops before getting to the bottom of the screen, which is really strange, so that's why I'm thinking it might be a Win 7 thing, not sure of course.
Ragnar - Maybe we should stick with the first version, as I said, I think I missed it. I was looking (originally) at your screenshot, funny, my setup is different, your menu shows Grids>then the Cartesian grid, reg grid, etc., mine shows Cartesian Grid with no submenu, then I had another choice of Grid or Grids. Not that this means anything with the xtml though.
Druban is correct, this is such a good addition, and you've spent so much time on it - thanks so much and kudos!
p.s. one thing I use custom graph paper for is making patterns and alphabets for my blind friend and her group to do plastic canvas. They can put the end result through their braille readers and get a pattern they can use to make something beautiful. so you really are helping a bunch of people! yeehaaaa! thx
dee
Re: Creating a graph paper using Inkscape
Hi.
Here we go again!
Got the extension working on my system (Win7).
druban;
and flamingolady;
I have now split the extension dialog into one with more tabs - which reduces the total height - I have tested on a screen with resolution of 800 x 600 (Lowest I can set my second monitor to! )
See screendump;

Click image for larger version
flamingolady;
Try deleting all Cartesian_Grid_Color files (with py - pyc and inx extension) from the "installdir/Inkscape/share/extensions" folder before unzipping the following file;
Edit; File removed - see newer post.
If the double spaced Dialog persists please chime back - I got rid of mine!
Sorry for all the troubles - from a newbie Inkscape user - and extension programmer!
Good Luck
RGDS
Ragnar
Here we go again!
Got the extension working on my system (Win7).
druban;
One of the frequent problems with extensions is that they appear to assume a standard screen ratio and the bottoms get cut off on wide screen monitors.
There are some extensions that I can't use because of that!
Can't you make scrollbars to avoid this? Or maybe you have another suggestion...
and flamingolady;
just an fyi - I'm on a regular sized laptop, so not using a wide screen.
I have now split the extension dialog into one with more tabs - which reduces the total height - I have tested on a screen with resolution of 800 x 600 (Lowest I can set my second monitor to!
See screendump;
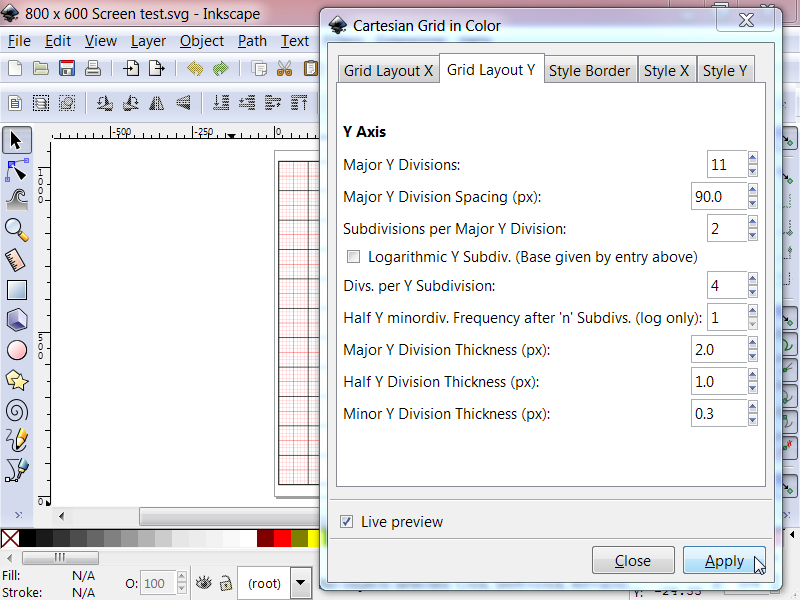
Click image for larger version
flamingolady;
mine shows Cartesian Grid with not submenu, then I had another choice of Grid or Grids.
Try deleting all Cartesian_Grid_Color files (with py - pyc and inx extension) from the "installdir/Inkscape/share/extensions" folder before unzipping the following file;
Edit; File removed - see newer post.
If the double spaced Dialog persists please chime back - I got rid of mine!
Sorry for all the troubles - from a newbie Inkscape user - and extension programmer!
Good Luck
RGDS
Ragnar
Last edited by ragstian on Sat Apr 27, 2013 3:22 am, edited 2 times in total.
Good Luck!
( ͡° ͜ʖ ͡°)
RGDS
Ragnar
( ͡° ͜ʖ ͡°)
RGDS
Ragnar