Hello,
I am trying to create a distressed looking font but creating lines and shapes and developing a grunge pattern. Once I put the pattern atop the font and change the color to the same as background color of course it looks great. After I export the image to a png to use on my Tshirt design, all the graffiti from my lines and shape are also placed on the shirt. Do you have any idea how I can create a distressed font and not keep all the extra lines that remain outside the letters?
Thanks!
Removing Lines

Re: Removing Lines
Before exporting to PNG (and you are using the file menu command, right?) you should make sure the background is opaque if you want your bits and pieces that are the same color as the white canvas to actually be invisible. You can do this in the document properties dialog near the top, there's a color swatch for document color make sure there is no checkered pattern showing.
A better and more versatile way would be to learn to use the clipping function. To begin with you will be able to print on any colored tshirt! You can read all about it in the excellent online Manual by Taumjong Bah.
A better and more versatile way would be to learn to use the clipping function. To begin with you will be able to print on any colored tshirt! You can read all about it in the excellent online Manual by Taumjong Bah.
Your mind is what you think it is.
Re: Removing Lines
druban wrote:Before exporting to PNG (and you are using the file menu command, right?) you should make sure the background is opaque if you want your bits and pieces that are the same color as the white canvas to actually be invisible. You can do this in the document properties dialog near the top, there's a color swatch for document color make sure there is no checkered pattern showing.
A better and more versatile way would be to learn to use the clipping function. To begin with you will be able to print on any colored tshirt! You can read all about it in the excellent online Manual by Taumjong Bah.
Well if I change the background to Opaque then When I use the image on a shirt ill have a big white block instead of just lettering, correct?
Re: Removing Lines

Welcome to InkscapeForum!
I'm not exactly clear what you're doing. It sounds like you've typed some text, then put something like a large rectangle filled with the pattern, over top of all the text. Or maybe you just drew a bunch of lines and scratches and dents and stuff over the text?? Where I'm getting lost, is where you change the color to the background color. Color of what and background of what?
It sounds like you'll want to use clipping. But it's hard to be sure. If that's the case, you would duplicate the text, then do Object to Path. Then select the text and the path, then do Object menu > Clip > Set. Then the pattern will only show inside the text. But there are so many variables, in my understanding of what you're doing, it's hard to say if clipping is the best idea. Maybe if you could give us more details about what you've done?
Basics - Help menu > Tutorials
Manual - Inkscape: Guide to a Vector Drawing Program
Inkscape Community - Inkscape FAQ - Gallery
Inkscape for Cutting Design
Manual - Inkscape: Guide to a Vector Drawing Program
Inkscape Community - Inkscape FAQ - Gallery
Inkscape for Cutting Design
Re: Removing Lines
auntee14 wrote:Well if I change the background to Opaque then When I use the image on a shirt ill have a big white block instead of just lettering, correct?
I guess. If the 'grunge' is white. If that's why it's not visible on your computer. If you are printing your tshirt by making a screen then the white parts might all be dropped out (for a one color screen). If. If.
Your mind is what you think it is.
Re: Removing Lines
brynn wrote:
Welcome to InkscapeForum!
I'm not exactly clear what you're doing. It sounds like you've typed some text, then put something like a large rectangle filled with the pattern, over top of all the text. Or maybe you just drew a bunch of lines and scratches and dents and stuff over the text?? Where I'm getting lost, is where you change the color to the background color. Color of what and background of what?
It sounds like you'll want to use clipping. But it's hard to be sure. If that's the case, you would duplicate the text, then do Object to Path. Then select the text and the path, then do Object menu > Clip > Set. Then the pattern will only show inside the text. But there are so many variables, in my understanding of what you're doing, it's hard to say if clipping is the best idea. Maybe if you could give us more details about what you've done?
Yes, What I have done is made a bunch of scratches and patterns on the font. I am using a transparent background, behind the font. So I can put it on my Shirt designs. I have done the same before using Photoshop and I was able to use the magic wand and delete all the debris. It does sound like I want to use clipping but apparently I am clipping illiterate. I tried to read the tutorial and still cant figure it out.
Ive attached a picture but it shows up with a white background on here so you aren't able to see all the debris. I need all the debris around the lettering removed so that I can place the letters on my clothing for screenprinting! If there is an easier way to distress fonts or pictures, Id love to know how!
Thanks
- Attachments
-
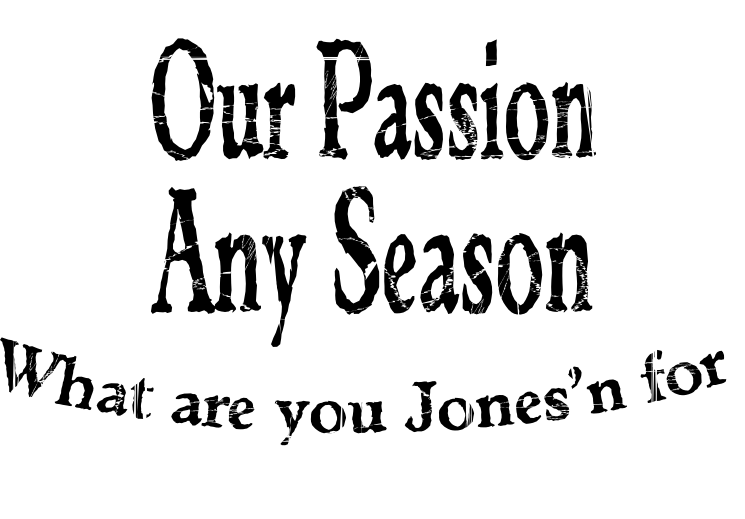
- Slogandistressed.png (130.8 KiB) Viewed 2826 times
Re: Removing Lines
druban wrote:auntee14 wrote:Well if I change the background to Opaque then When I use the image on a shirt ill have a big white block instead of just lettering, correct?
I guess. If the 'grunge' is white. If that's why it's not visible on your computer. If you are printing your tshirt by making a screen then the white parts might all be dropped out (for a one color screen). If. If.You can see how it might be hard to work out a problem without having any idea of what it looks like. Try posting a picture or the file and the quality of help you get here will be much better.
I only said something about changing the background color because the previous commenter said to change it, But I dont want a background color. I want everything transparent behind the lettering.
Re: Removing Lines
This may be one solution:
Having your text converted to path -by pressing Shift+Ctrl+C when selected-,
ungrouped the letters -by pressing Shift+Ctrl+G-,
merged them together -by either combining them with pressing Ctrl+K or added them togeter with pressing Ctrl++ when all selected-
subtract the white grunge pattern from it by pressing Ctrl+- when both selected -after the grunge pattern is converted to path.
If the white grunge pattern is a raster image, vectorise it by pressing Shift+Alt+B when selected, set for a two colour output on the panel and execute, then ungroup the result to have a grunge pattern as a path.
If it was a group of paths, then do as was mentioned before with the letters.
Re: Removing Lines
Lazur URH wrote:This may be one solution:
Having your text converted to path -by pressing Shift+Ctrl+C when selected-,
ungrouped the letters -by pressing Shift+Ctrl+G-,
merged them together -by either combining them with pressing Ctrl+K or added them togeter with pressing Ctrl++ when all selected-
subtract the white grunge pattern from it by pressing Ctrl+- when both selected -after the grunge pattern is converted to path.
If the white grunge pattern is a raster image, vectorise it by pressing Shift+Alt+B when selected, set for a two colour output on the panel and execute, then ungroup the result to have a grunge pattern as a path.
If it was a group of paths, then do as was mentioned before with the letters.
Thanks for the reply, But I am completely clueless. I've tried converting text to path, Ive tried combining. I feel like I have tried everything but I just have no idea how to do what everyone says is so easy. I am a complete novice to graphics. No matter what I do, I cannot get the grunge to stay in the letters!
Re: Removing Lines
Here are the possible solutions described in the svg.
Would suggest the first method if its for a one text job, but if you want to change the letters later on, then you better go with the masking/clipping.
https://dl.dropbox.com/s/omi07id7hn9jxr5/hlp21.svg
Would suggest the first method if its for a one text job, but if you want to change the letters later on, then you better go with the masking/clipping.
https://dl.dropbox.com/s/omi07id7hn9jxr5/hlp21.svg
Last edited by Lazur URH on Mon Jul 29, 2013 5:04 am, edited 3 times in total.
Re: Removing Lines
As I said a pic is very helpful!
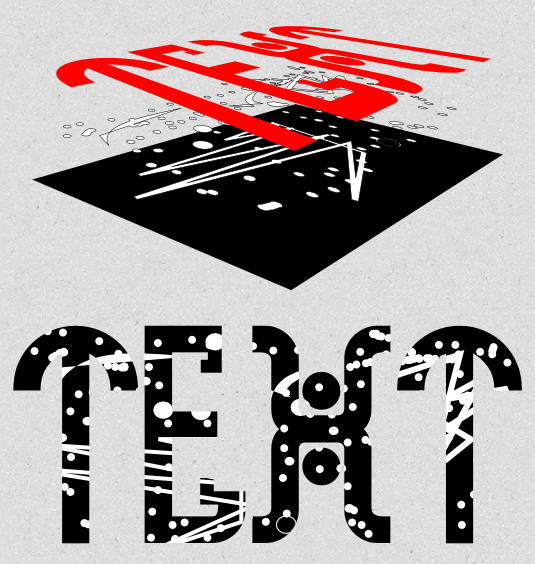
You have some Black letters. Above the letters you have some white texture. You wish to confine this to the boundaries of the letters.
To do this, Make the text red (for visibilty only - the color's not going to matter anyway) and raise it to the top. Draw a '"large-enough-to-contain-everything-exact-size-not-important" black rectangle and lower it to the bottom (use the selector tool's control bar icons or the object menu commands to do the lowering and raising).
Now you should have a grunge sandwich: text on top, then grunge, then a black rectangle.
Select all and in the object menu do clip>set. No conversion of text to paths grouping or booleans is necessary! It is the z-order (stacking) that's important. Also, when you use clip you can use the nodetool to edit all the paths afterwards and make fine adjustments simply by moving a node or two, no redrawing or undo necessary.
Here's an illustration - not an actual screenshot, but a conceptual representation of the stacking, and the result after clipping.
P.s. You may have to specify in your preferences that the topmost object is to be used for the clip.
You have some Black letters. Above the letters you have some white texture. You wish to confine this to the boundaries of the letters.
To do this, Make the text red (for visibilty only - the color's not going to matter anyway) and raise it to the top. Draw a '"large-enough-to-contain-everything-exact-size-not-important" black rectangle and lower it to the bottom (use the selector tool's control bar icons or the object menu commands to do the lowering and raising).
Now you should have a grunge sandwich: text on top, then grunge, then a black rectangle.
Select all and in the object menu do clip>set. No conversion of text to paths
Here's an illustration - not an actual screenshot, but a conceptual representation of the stacking, and the result after clipping.
- image6829.png (64.48 KiB) Viewed 2729 times
P.s. You may have to specify in your preferences that the topmost object is to be used for the clip.
Last edited by druban on Mon Apr 08, 2013 12:04 pm, edited 1 time in total.
Your mind is what you think it is.
Re: Removing Lines
Who knows? If the grunge was to be transparent -one colour screen printing-, one simple clipping with the letters on a grunge pattern drawn that way wouldn't do the job.
Only if the grunge pattern was subtracted from the black rectangle.
Or if it was black, the rectangle was white, they were grouped together, and used on another black rectangle as a masking object -as again two clipping wouldn't work.
Only if the grunge pattern was subtracted from the black rectangle.
Or if it was black, the rectangle was white, they were grouped together, and used on another black rectangle as a masking object -as again two clipping wouldn't work.
Re: Removing Lines
auntee14 wrote:brynn wrote:
Welcome to InkscapeForum!
I'm not exactly clear what you're doing. It sounds like you've typed some text, then put something like a large rectangle filled with the pattern, over top of all the text. Or maybe you just drew a bunch of lines and scratches and dents and stuff over the text?? Where I'm getting lost, is where you change the color to the background color. Color of what and background of what?
It sounds like you'll want to use clipping. But it's hard to be sure. If that's the case, you would duplicate the text, then do Object to Path. Then select the text and the path, then do Object menu > Clip > Set. Then the pattern will only show inside the text. But there are so many variables, in my understanding of what you're doing, it's hard to say if clipping is the best idea. Maybe if you could give us more details about what you've done?
Yes, What I have done is made a bunch of scratches and patterns on the font. I am using a transparent background, behind the font. So I can put it on my Shirt designs. I have done the same before using Photoshop and I was able to use the magic wand and delete all the debris. It does sound like I want to use clipping but apparently I am clipping illiterate. I tried to read the tutorial and still cant figure it out.
Ive attached a picture but it shows up with a white background on here so you aren't able to see all the debris. I need all the debris around the lettering removed so that I can place the letters on my clothing for screenprinting! If there is an easier way to distress fonts or pictures, Id love to know how!
Thanks
Awesome, now we can have a better idea about what's happening on your canvas. I do still have a question though. The way you described it, you have a bunch of white scratch lines and blobs and stuff, on top of the black text. So when this goes on the t-shirt, let's say a red t-shirt, will the black text have white scratch lines and blobs and what-not on top of it? Or will the white scratch lines and blobs and what-not actually be transparent areas, so that we see the red shirt through the scratches on the text.
Here's what to do, to keep the white lines and stuff on top of the text. But if those areas actually need to be transparent, there will be another couple of steps. Also, this is essentially the same thing druban suggested, except with a slightly different approach (and a few added details). I can't think of any situation where 1 would be better than the other, but conceivably there could be. Let us know if you run into problems.
First, you need to make all the scratch lines and blobs and stuff into a compound path. This means that you might need to revise some of the objects that comprise the pattern. If any of those objects are shapes (maybe like deformed stars) you'll need to select them and do Path menu > Object to Path. You can do it all at once, by making a multiple selection. If any of the objects are not closed paths, but simple lines or open paths, you'll need to select them and do Path menu > Stroke to Path. That will change the lines into closed, filled paths. Now just select them all and do Path menu > Combine.
1 - Make sure the new compound path is on top of the text.
2 - Select the text and duplicate.
3 - Hold Shift key and click the compound path which is your grunge pattern. (Now they are both selected together.)
4 - Object menu > Clip > Set
5 - Drag a selection box around both text and clipped compound path, and Group. That's just to keep them together if you need to move it around.
Now you should have the white pattern on top of the text only. Let us know if you need the pattern transparent and we can give you the extra couple of steps.
Edit
PS - One more comment. Since Photoshop is a raster graphics editor, it works very differently from Inkscape.
Basics - Help menu > Tutorials
Manual - Inkscape: Guide to a Vector Drawing Program
Inkscape Community - Inkscape FAQ - Gallery
Inkscape for Cutting Design
Manual - Inkscape: Guide to a Vector Drawing Program
Inkscape Community - Inkscape FAQ - Gallery
Inkscape for Cutting Design
Re: Removing Lines
brynn wrote:...I can't think of any situation where 1 would be better than the other, but conceivably there could be...
Druban's method is better for creating white grunge textures over the black lettering, as with yours you have two objects aligned on top of each with one edge on other,
which may cause problems with anti-aliasing.
While the other method uses only one cutting edge for each, avoiding any problem of anti-aliasing.
For the transparent grunge version there are five different ways described in my svg, hope the link works.
There may be some other methods not mentioned though.
Re: Removing Lines
Lazur URH wrote:brynn wrote:...I can't think of any situation where 1 would be better than the other, but conceivably there could be...
Druban's method is better for creating white grunge textures over the black lettering, as with yours you have two objects aligned on top of each with one edge on other,
which may cause problems with anti-aliasing.
While the other method uses only one cutting edge for each, avoiding any problem of anti-aliasing.
For the transparent grunge version there are five different ways described in my svg, hope the link works.
There may be some other methods not mentioned though.
I wouldn't think anti-aliasing would be an issue for transferring to fabric. And especially if grunge is the goal, even if it did create some visible issue, it wouldn't matter. But even on e.g. high quality printing, I think you'd have to zoom way in to see any issues.
Edit
The 1st dropbox link tells me I don't belong there
Basics - Help menu > Tutorials
Manual - Inkscape: Guide to a Vector Drawing Program
Inkscape Community - Inkscape FAQ - Gallery
Inkscape for Cutting Design
Manual - Inkscape: Guide to a Vector Drawing Program
Inkscape Community - Inkscape FAQ - Gallery
Inkscape for Cutting Design
Re: Removing Lines
Thank's for the info! A few more times and I will definitely know how to post files through dropbox.
Re: Removing Lines
If you want to to have transparent grunge instead of white, you need to do these additional steps, starting with where i left off in the above post.
First the clipped black text with white grunge needs to be inverted to white text with black grunge. Or you could just do it that way in the previous step, i.e. make black grunge and put a white rectangle underneath before clipping!
In either case you now put another rectangle filled with black (or whatever color you want your final text to be) underneath the (clipped, black-marks-on-white) text and do object menu>mask>set. Inkscape will allow groups and clipped objects in masks.
Now you should have what looks exactly the same as what you had after the clip, but that's only if you are looking at it on a white background. Slide something under it and you will see that the grunge has been knocked out and the text is black and transparent areas only.
Perhaps i should have used a darker background. Oh well.
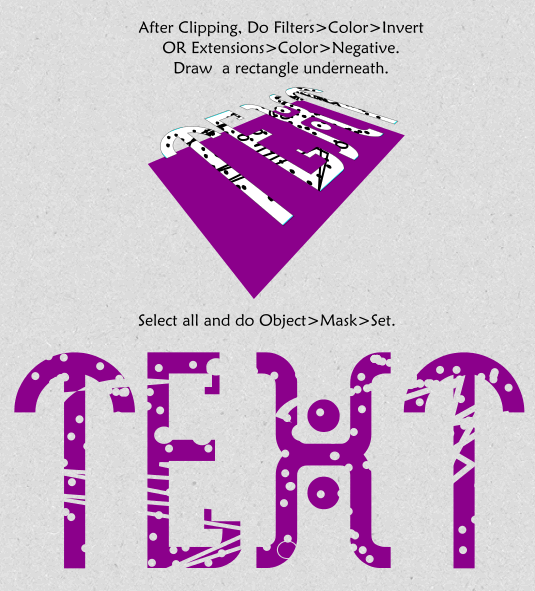
- image6756.png (73.32 KiB) Viewed 2642 times
Your mind is what you think it is.
Re: Removing Lines
Thanks everyone for all your help!
I will get to working on this and hope I can figure it out.
Appreciate everyones suggestions.
I will get to working on this and hope I can figure it out.
Appreciate everyones suggestions.