Meander
- Espermaschine
- Posts: 892
- Joined: Thu Jun 05, 2014 9:10 pm
Meander
here is a little tutorial i wrote for creating a meander pattern
http://gimp-science-labs.blogspot.de/20 ... orial.html

Re: Meander
Hi.
Very nice!
Well done.
Slight variation of yours - where the pattern is made of arcs instead of straight lines;
(Click Image for larger version.)
SVG file;
To get 'sharp' corners change the stroke style in the stroke and fill dialog.(Shift CTRL F)
RGDS
Ragnar
Very nice!
Well done.
Slight variation of yours - where the pattern is made of arcs instead of straight lines;
(Click Image for larger version.)
SVG file;
To get 'sharp' corners change the stroke style in the stroke and fill dialog.(Shift CTRL F)
RGDS
Ragnar
Good Luck!
( ͡° ͜ʖ ͡°)
RGDS
Ragnar
( ͡° ͜ʖ ͡°)
RGDS
Ragnar
- Espermaschine
- Posts: 892
- Joined: Thu Jun 05, 2014 9:10 pm
Re: Meander
hi ragnar,
thanks for the compliment and the svg file !
will study what you did at once, im always eager to learn
thanks for the compliment and the svg file !
will study what you did at once, im always eager to learn
Re: Meander
Hi.
Want a tutorial?
One 'trick' which makes this sort of work easy is to do the calculations in the numerical dialog boxes.
I set the page size to 700 x 700 pixels (as that was the size of your posted image).
Next I made two circles centered on the page to match your layout. Figured the stroke size by 'trial & errror'. Ended up with 9 pixels.
As your design had 22 repetitions of the pattern around the circle I drew open arcs with length 360/22 - 9/2, (where the 9 is the stroke width).
The numbers go straight into the arc numerical dialog, no need to calculate these.
When I had the 'design' done I joined the end nodes of the individual paths.
Then I set the 'center of rotation' of the 'design' to the center of the page,
duplicated the design (Ctrl D),
applied a rotation transform (where again I plugged in 360/22 directly in the dialog).
Repeated the last step until the circle was complete and joined the 'loose' end nodes.
(Can add figures if necessary.)
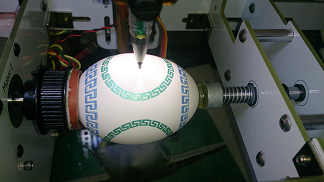
Have fun. I have - the meander is now going on an egg - will post image later.
RGDS
Ragnar
Good Luck!
( ͡° ͜ʖ ͡°)
RGDS
Ragnar
( ͡° ͜ʖ ͡°)
RGDS
Ragnar
- Espermaschine
- Posts: 892
- Joined: Thu Jun 05, 2014 9:10 pm
Re: Meander
phew ragnar, i do get the calculations and stuff, but im unable to reproduce your technique
so if you could post some images, that would be really cool !
Re: Meander
Hi.
First version of egg turned out OK but needs some 'tweaking'.
(Click image for larger version.)
Stay tuned for step-by-step howto. (Chores first!)
RGDS
Ragnar
First version of egg turned out OK but needs some 'tweaking'.
(Click image for larger version.)
Stay tuned for step-by-step howto. (Chores first!)
RGDS
Ragnar
Good Luck!
( ͡° ͜ʖ ͡°)
RGDS
Ragnar
( ͡° ͜ʖ ͡°)
RGDS
Ragnar
- Espermaschine
- Posts: 892
- Joined: Thu Jun 05, 2014 9:10 pm
Re: Meander
Off topic:
Ragnar, when you draw something on an egg using EggBot, does the egg stay still while the pen moves? Or does the pen stay still while the egg is moved? ....Or it must be a little of both, for designs that go all the way around??Basics - Help menu > Tutorials
Manual - Inkscape: Guide to a Vector Drawing Program
Inkscape Community - Inkscape FAQ - Gallery
Inkscape for Cutting Design
Manual - Inkscape: Guide to a Vector Drawing Program
Inkscape Community - Inkscape FAQ - Gallery
Inkscape for Cutting Design
Re: Meander
Hi.
For the eggbot there are two motors involved - one driving the egg around the 'long' axis and one moving the pen.
In addition one model airplane 'servo' lifts and lower the pen, All run by an Inkscape extension.
Here are a link to a few videos showing the eggbot in operation;
http://www.youtube.com/watch?v=w4cdbV2oaEc
http://www.youtube.com/watch?v=gCm7XwfJE34
A link to mine making 'music';
https://dl.dropboxusercontent.com/s/vc6 ... _Music.mp4
Link to mad evil scientist's forum thread;
http://forum.evilmadscientist.com/discussion/361/eggbot-music
RGDS
Ragnar
Good Luck!
( ͡° ͜ʖ ͡°)
RGDS
Ragnar
( ͡° ͜ʖ ͡°)
RGDS
Ragnar
Re: Meander
Hi Lazur
quote;
As a beginner I have problems with your instructions,
Make a simple grid with the transformation panel - a grid of what? What spacing?
Trace the pattern I can manage but then again I have problems with the 'spiro-path lpe'
What does it do - to what objects?
Duplicate what?
Sorry - but I am lost! ( Some of us are beginners - don't expect all to be at your level!)
RGDS
Ragnar
quote;
Made a simple grid with the transformation panel, then with the snapping enabled, traced one single pattern,
applied a spiro-path lpe, then duplicated and combined them together.
24 repeats fitted it better.
As a beginner I have problems with your instructions,
Make a simple grid with the transformation panel - a grid of what? What spacing?
Trace the pattern I can manage but then again I have problems with the 'spiro-path lpe'
What does it do - to what objects?
Duplicate what?
Sorry - but I am lost! ( Some of us are beginners - don't expect all to be at your level!)
RGDS
Ragnar
Good Luck!
( ͡° ͜ʖ ͡°)
RGDS
Ragnar
( ͡° ͜ʖ ͡°)
RGDS
Ragnar
Re: Meander
Hi Ragnar,
I have this terrible feeling of déjà vu.
Pardon me I didn't mean it for a total beginner guide.
Here is a version with a bit more explanation, though parts of the basic useage -like the align and distribute panel's for correct spacing, and maybe some more- is not split to step by step.
Hope it can get things clearer:
meander svg
Re: Meander
Hi Lazur.
Quote;
Did not mean to be disrespectful!
Wow! That's really good! I could follow that easily. Smart way of doing it!
I was making my own tutorial for the circular meander - reckon I can skip finishing it after seeing yours!
Thanks a lot for the great effort!
RGDS
Ragnar
Quote;
I have this terrible feeling of déjà vu.
Did not mean to be disrespectful!
Wow! That's really good! I could follow that easily. Smart way of doing it!
I was making my own tutorial for the circular meander - reckon I can skip finishing it after seeing yours!
Thanks a lot for the great effort!
RGDS
Ragnar
Good Luck!
( ͡° ͜ʖ ͡°)
RGDS
Ragnar
( ͡° ͜ʖ ͡°)
RGDS
Ragnar
Re: Meander
ragstian wrote:...
Quote;I have this terrible feeling of déjà vu.
Did not mean to be disrespectful!
...
Hi Ragnar.
I know, it was just my flashback from this and that topics.
ragstian wrote:...
Wow! That's really good! I could follow that easily. Smart way of doing it!
I was making my own tutorial for the circular meander - reckon I can skip finishing it after seeing yours!
Thanks a lot for the great effort!
...
It was the easiest way of doing it in an accurate way, though the result svg would look nicer if the arches had only 2 nodes, but couldn't come up with such quick solution for that.
I'm glad it was clear, I have always problems representing what's in my head.
Making a nice hatching of such a meander for eggbot is another challenge.
I had faced a similar problem days ago, will see if it could work this time.
-It was the problem of giving a consistent fill pattern with about a 45° hatching of even thick lines along a circle. They ended up actually not even Archimedean spirals.-
Hmm just giving another look for that spiral shape topic it is related to pen filling too.
Re: Meander
Hi
A tip for hatching used on the eggbot;
I never use the straight line hatching for eggbot figures as it involved a lot of pen up - pen down operations which takes time.
I normally use the shape object, duplicate it and then inset the duplicate two pixels, then I apply the 'hatches rough' live path effect' (LPE) to the inset figure.
The reason for the outline and inset is to have the pen follow a line along the edge to get straight lines.
The eggbot extension has a 'preset for hatches' extension which will smooth the hatches.
I then adjust the direction of the hatching to avoid rapid movement of the pen which will cause 'resonance' and overshoot in the eggbot figures. (Rapid movement of the egg is OK.)
See example;
To fill in 'small' or narrow objects I sometimes just use the inset several times,
the width of the pen will overlap and do a 'fill - in', see image earlier in this thread,
the meander rings was done that way.
RGDS
Ragnar
Good Luck!
( ͡° ͜ʖ ͡°)
RGDS
Ragnar
( ͡° ͜ʖ ͡°)
RGDS
Ragnar
- Espermaschine
- Posts: 892
- Joined: Thu Jun 05, 2014 9:10 pm
Re: Meander
Lazur URH wrote:Here is a version with a bit more explanation, though parts of the basic useage -like the align and distribute panel's for correct spacing, and maybe some more- is not split to step by step.
Hope it can get things clearer:
meander svg
thats the most beautiful tutorial i've seen in a while, Lazur UHR !
how long did that take for you to make ?
Re: Meander
Thank's!
About 2-3 times more than doing the real thing.
Other than that I cannot tell, didn't look at the clock.
About 2-3 times more than doing the real thing.
Other than that I cannot tell, didn't look at the clock.
Re: Meander
Hi.
I agree - very well done tutorial - might be a new way of doing things.
Curious about your microugly quote in your signature - if we follow that one to the letter there will be no need for this forum!?
RGDS
Ragnar
I agree - very well done tutorial - might be a new way of doing things.
Curious about your microugly quote in your signature - if we follow that one to the letter there will be no need for this forum!?
RGDS
Ragnar
Good Luck!
( ͡° ͜ʖ ͡°)
RGDS
Ragnar
( ͡° ͜ʖ ͡°)
RGDS
Ragnar
Re: Meander
ragstian wrote:Hi.
I agree - very well done tutorial - might be a new way of doing things.
Curious about your microugly quote in your signature - if we follow that one to the letter there will be no need for this forum!?
RGDS
Ragnar
Thank's again for the kind words!
Maybe that's inappropriate for the help section.
But it would call for more attention to the show it off topics?
A reason why I use that quote I wrote here.
- Espermaschine
- Posts: 892
- Joined: Thu Jun 05, 2014 9:10 pm
Re: Meander
ragstian wrote:Want a tutorial?
im still hoping for a tutorial with a few images, because i cant replicate what you did
Re: Meander
There has just GOT to be a reason no one is using LPE pattern/path to do this, but I can't figure it out... so here's my suggestion - as a screenshot, because there's no real trick or complication to it, except for the pattern itself (enlarged size and actual size shown- a six wide by seven high proportion is classic, although seven by seven is possible it's just not....). Note the open ends which are necessary to use the fuse nearby ends feature in LPE's P/P. If the pattern is not the right size, hit the edit on screen button in the LPE dialog and the node editor can select all and scale it down evenly and then it will fit. The pattern will not fill properly if you don't set the fuse to be greater than zero.
Post back if this method is not working for you.
Hi Lazur...haven't you posted that video link here before?
Hi Ragnar. This is obviously not meant to be a replacement for the high precision methods used by you guys, just a low end alternative.
Post back if this method is not working for you.
Hi Lazur...haven't you posted that video link here before?
Hi Ragnar. This is obviously not meant to be a replacement for the high precision methods used by you guys, just a low end alternative.
Your mind is what you think it is.
- Espermaschine
- Posts: 892
- Joined: Thu Jun 05, 2014 9:10 pm
Re: Meander
druban wrote:Hi Ragnar. This is obviously not meant to be a replacement for the high precision methods used by you guys, just a low end alternative.
thank you for the tutorial !
i was able to replicate the effect with no problems
Re: Meander
Hi Druban, had to look back, at least I posted it at once in january.
Is this more related, for hijacking the topic?
The reason why I didn't use the pattern along path is because I wanted to give a more geometrical solution.
Didn't check if the lpe could cover it exactly, but I guess so.
BUT the real reason is the distortion the lpe has when the path's radius gets closer to the pattern's shape.
By manual constructing one can keep in mind to avoid such corners.
(On your example image I would have used a basket-handle curve intstead of the ellipse, so the distortion would be more even.)
Re: Meander
Off topic:
T was making a silly joke about the video - ...posted before? Deja vu? Hmm...not funny at all.Your mind is what you think it is.
off topic
Off topic:
Think I will need to go to the brain specialist.