Hi,
I've been trying to draw an outline for a knife slot in a silverware tray I'm making. The knives have very think handles so they need to be stacked top to bottom with the blades facing the same direction.
I took a picture of a knife, traced around it and then made a copy that I flipped around and laid on top of the original I need to make it into a single outline and eliminate all inside lines. They're all drawn with bezier curves and I can't figure out how to delete just the inside lines and leave the outside lines intact. It seems like a series of bezier curves create an inter-related line. If you delete one section the two outside nodes just join together. It also throws off the curve.
I think I need to convert all the bezier curves to freehand lines that can be manipulated independently but I haven't been able to figure out how to do it. It's probably something simple that I'm missing. Can anyone point me in the right direction?
Thanks!
P.S. I was going to attach the file so you could see what I'm talking about but I guess I'm too new and it wouldn't let me.It didn't tell me it wouldn't let me. It just adds a link to the "Forum Rules" when I click on the upload file button.
How do you convert bezier into freehand lines?
Re: How do you convert bezier into freehand lines?
Hi.
You can upload the file to dropbox and post a link here, for some reason the forum does not accept SVG files.
If you just rename the file extension from SVG to ZIP you can post it directly.
A little difficult to understand your explanation, if you used the Line/Bezier tool to trace manually you should not end up with two nodes side by side.
When using this tool for tracing make sure the tool setting is set to: Create Regular Bezier Path and the Shape is set to None.
Hand-tracing is fun and rather quick once you get the hand of it.
This was traced in less than a minute, it's not perfect but with a little tweaking of nodes it could be "good enough".
(Top image was "borrowed" from http://www.silversuperstore.com)


Rightclick on the bottom imag to save as a svg file to your machine.
Good Luck
RGDS
Ragnar
You can upload the file to dropbox and post a link here, for some reason the forum does not accept SVG files.
If you just rename the file extension from SVG to ZIP you can post it directly.
A little difficult to understand your explanation, if you used the Line/Bezier tool
to trace manually you should not end up with two nodes side by side.When using this tool for tracing make sure the tool setting is set to: Create Regular Bezier Path and the Shape is set to None.
Hand-tracing is fun and rather quick once you get the hand of it.
This was traced in less than a minute, it's not perfect but with a little tweaking of nodes it could be "good enough".
(Top image was "borrowed" from http://www.silversuperstore.com)
Rightclick on the bottom imag to save as a svg file to your machine.
Good Luck
RGDS
Ragnar
Good Luck!
( ͡° ͜ʖ ͡°)
RGDS
Ragnar
( ͡° ͜ʖ ͡°)
RGDS
Ragnar
-
tylerdurden
- Posts: 2344
- Joined: Sun Apr 14, 2013 12:04 pm
- Location: Michigan, USA
Re: How do you convert bezier into freehand lines?
I will borrow Ragnar's file outline...
- Tray1.jpg (75.53 KiB) Viewed 4034 times
Have a nice day.
I'm using Inkscape 0.92.2 (5c3e80d, 2017-08-06), 64 bit win8.1
The Inkscape manual has lots of helpful info! http://tavmjong.free.fr/INKSCAPE/MANUAL/html/
I'm using Inkscape 0.92.2 (5c3e80d, 2017-08-06), 64 bit win8.1
The Inkscape manual has lots of helpful info! http://tavmjong.free.fr/INKSCAPE/MANUAL/html/
Re: How do you convert bezier into freehand lines?
Hi.
Tylerdurden; That made me feel stupid!!

Glad you "got it"! Must be a language thing (or lack of IQ!)
RGDS
Ragnar
Tylerdurden; That made me feel stupid!!
Glad you "got it"! Must be a language thing (or lack of IQ!)
RGDS
Ragnar
Good Luck!
( ͡° ͜ʖ ͡°)
RGDS
Ragnar
( ͡° ͜ʖ ͡°)
RGDS
Ragnar
-
tylerdurden
- Posts: 2344
- Joined: Sun Apr 14, 2013 12:04 pm
- Location: Michigan, USA
Re: How do you convert bezier into freehand lines?
Let's consider it teamwork. 
Have a nice day.
I'm using Inkscape 0.92.2 (5c3e80d, 2017-08-06), 64 bit win8.1
The Inkscape manual has lots of helpful info! http://tavmjong.free.fr/INKSCAPE/MANUAL/html/
I'm using Inkscape 0.92.2 (5c3e80d, 2017-08-06), 64 bit win8.1
The Inkscape manual has lots of helpful info! http://tavmjong.free.fr/INKSCAPE/MANUAL/html/
Re: How do you convert bezier into freehand lines?
You should be able to attach a file in this board (but not all boards in the forum allow attachments). I've never heard of attaching a file, but being redirected to a topic instead. I'm thinking either you hit a wrong button, or something's broken on the forum.
I'll test.
Edit
But if the file was too large, you might get an error message.
I'll test.

- no problems here
- celtknot43.png (2.99 KiB) Viewed 3985 times
Edit
But if the file was too large, you might get an error message.
Basics - Help menu > Tutorials
Manual - Inkscape: Guide to a Vector Drawing Program
Inkscape Community - Inkscape FAQ - Gallery
Inkscape for Cutting Design
Manual - Inkscape: Guide to a Vector Drawing Program
Inkscape Community - Inkscape FAQ - Gallery
Inkscape for Cutting Design
Re: How do you convert bezier into freehand lines?
Hi.
What about a SVG file?
RGDS
Ragnar
What about a SVG file?
RGDS
Ragnar
Good Luck!
( ͡° ͜ʖ ͡°)
RGDS
Ragnar
( ͡° ͜ʖ ͡°)
RGDS
Ragnar
Re: How do you convert bezier into freehand lines?
SVG should work.
Basics - Help menu > Tutorials
Manual - Inkscape: Guide to a Vector Drawing Program
Inkscape Community - Inkscape FAQ - Gallery
Inkscape for Cutting Design
Manual - Inkscape: Guide to a Vector Drawing Program
Inkscape Community - Inkscape FAQ - Gallery
Inkscape for Cutting Design
Re: How do you convert bezier into freehand lines?
Hi.
Testing.
Edit - You're right (again!! )
)
RGDS
Ragnar
Testing.
Edit - You're right (again!!
RGDS
Ragnar
Good Luck!
( ͡° ͜ʖ ͡°)
RGDS
Ragnar
( ͡° ͜ʖ ͡°)
RGDS
Ragnar
Wow! Thanks for all of the reponses. I was thinking I'd get an email so I thought no one was answering. Now I'm embarrassed for not replying sooner.
My explanation wasn't good but tylerdurden mostly figured it out. Here's the example; https://dl.dropboxusercontent.com/u/30933732/KnivesExample.svg.
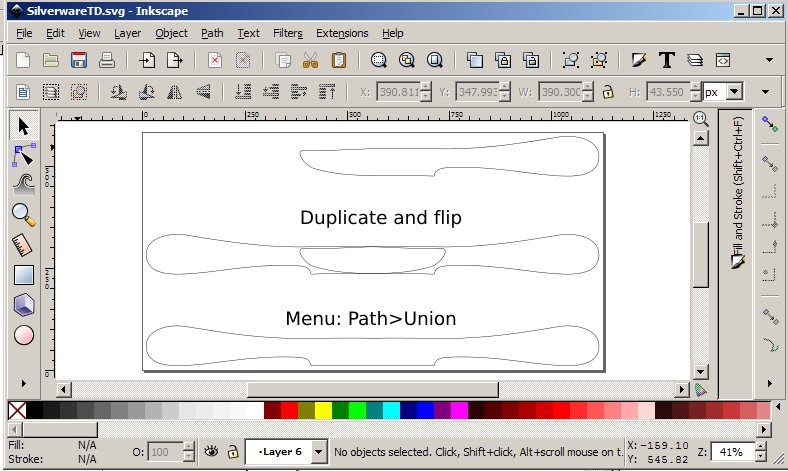
The knife outline was flipped, then stacked together. I just needed to remove all the interior lines. Path->Union!!! Holy %$#* that was easy!
Thank you ragstian for taking the time to do your own trace. I had already done it but it took me considerably longer and the result doesn't look as tidy as yours. Thank you tylerdurden for showing me the Pan->Union command. That did exactly what I was trying to do. I'm not sure how "remove all inside lines" gets translated to "path union" but then I'm 'merican and this looks like a British board. Maybe it's a language difference.
Also thanks for the suggestion to use Dropbox and a link. I didn't think of that.
Now if I can just figure out how to convert my tracings into an actual 3d model, I'll actually have something to show for my efforts.
My explanation wasn't good but tylerdurden mostly figured it out. Here's the example; https://dl.dropboxusercontent.com/u/30933732/KnivesExample.svg.
The knife outline was flipped, then stacked together. I just needed to remove all the interior lines. Path->Union!!! Holy %$#* that was easy!
Thank you ragstian for taking the time to do your own trace. I had already done it but it took me considerably longer and the result doesn't look as tidy as yours. Thank you tylerdurden for showing me the Pan->Union command. That did exactly what I was trying to do. I'm not sure how "remove all inside lines" gets translated to "path union" but then I'm 'merican and this looks like a British board. Maybe it's a language difference.
Also thanks for the suggestion to use Dropbox and a link. I didn't think of that.
Now if I can just figure out how to convert my tracings into an actual 3d model, I'll actually have something to show for my efforts.
Re:
jgold1957 wrote:Now if I can just figure out how to convert my tracings into an actual 3d model, I'll actually have something to show for my efforts.
For example, you can do that by using blender.
It has a native svg import function, can set beveling and extrude it by a few clicks.
-
tylerdurden
- Posts: 2344
- Joined: Sun Apr 14, 2013 12:04 pm
- Location: Michigan, USA
Re: How do you convert bezier into freehand lines?
If the goal is to make a real object, it could be as simple as printing the drawing, adhering that to a slab of wood and cutting with a scroll-saw.
viewtopic.php?f=5&t=18269
If the goal is to mass-produce a holder, the above "real object" could be used as a positive for thermoforming.
viewtopic.php?f=5&t=18269
If the goal is to mass-produce a holder, the above "real object" could be used as a positive for thermoforming.
Have a nice day.
I'm using Inkscape 0.92.2 (5c3e80d, 2017-08-06), 64 bit win8.1
The Inkscape manual has lots of helpful info! http://tavmjong.free.fr/INKSCAPE/MANUAL/html/
I'm using Inkscape 0.92.2 (5c3e80d, 2017-08-06), 64 bit win8.1
The Inkscape manual has lots of helpful info! http://tavmjong.free.fr/INKSCAPE/MANUAL/html/
Re: How do you convert bezier into freehand lines?
Hi.
Like this?
(Click thumbnails for larger images)
Trace an object by drawing along the outline by an "analog" pencil

Tidy up the sketch in Inkscape:

"adhering that to a slab of wood and cutting with a band-saw"

Discard the "unwanted" wood, apply some woodworking tools, some different grades of sandpaper and a lot of "elbow grease" to the "3d object":

Final result:

Sorry about the picture quality!
RGDS
Ragnar
tylerdurden wrote:If the goal is to make a real object, it could be as simple as printing the drawing, adhering that to a slab of wood and cutting with a scroll-saw.
Like this?
(Click thumbnails for larger images)
Trace an object by drawing along the outline by an "analog" pencil

Tidy up the sketch in Inkscape:

"adhering that to a slab of wood and cutting with a band-saw"

Discard the "unwanted" wood, apply some woodworking tools, some different grades of sandpaper and a lot of "elbow grease" to the "3d object":

Final result:

Sorry about the picture quality!
RGDS
Ragnar
Good Luck!
( ͡° ͜ʖ ͡°)
RGDS
Ragnar
( ͡° ͜ʖ ͡°)
RGDS
Ragnar
Re: How do you convert bezier into freehand lines?
Alright tylerdurden and ragstian, you guys are smart Asini.
The point of this project is to learn 3d printing. I've been looking for a project that would be useful but also fairly simple to get started. I custom plastic silverware tray seemed like the perfect thing. For the past week I've been trying, off and on, to build a model that I could send to Shapeways.com. This is probably something very simple if you already know how to do everything. For me, it's been one roadblock after another.
I first tried Blender. It looks like a very capable program but it's the most counter-intuitive program I've ever used. I've watched videos where people zip and click and very quickly make an elaborate model and I've had to struggle to create a square block with the correct dimensions in mm.
I gave up on Blender and tried using Sketchup. To me, it's simpler and more intuitive and I've played around with it before. It has what I consider a major flaw. When I tried to trace around my picture, it's "inference" system insisted on snapping the points to a grid. This made it impossible to do an accurate trace. I tried changing the grid dimensions and other things to minimize the problem but it just wasn't working for me.
The next step was to try and do the tracing with Inkscape and import it into the 3d modeling program. That's where you guys came in. Thanks to your help, I now have at least a correctly sized trace of each silverware piece.
I went back and tried Sketchup again but I it doesn't directly import SVG files and from what I can tell, the plug in that allows it is a big complex thing that breaks other parts of Sketchup.
Back to Blender. After more struggles, I was finally able to create the correct size block. I couldn't figure out how to get my tracings merged with it. Did I mention that it's not intuitive? At least not to me. After much internal screaming, I gave up on that and decided to take yet another approach.
Autocad has a free 3d modeler called 123D that they say is simple. Ok, I'll try that. It took several tries to download the program but I got it working. I discovered that like every other 3d program I've tried, this one also doesn't seem to want to do what I want it to do. I created a cube and then tried to resize it. It wants to know relatively how much you want to change the size. I want to change it to a specific size not some proportion of the size it is now. Time to start over. I select the cube and hit the delete key. Nothing happens. Why not? This is the delete key. Every windows program ever made understands that the delete key deletes the selected item. Not this. You have to hit Control-delete. That was a Google search I shouldn't have had to make.
Now the killer. When I import my trace, it's way too big. My dimensions in 123D are mm, the image in Inkscape is in mm. The size in Inkscape is correct. Why doesn't 123D understand the dimensions?
I understand that importing a different file format can be difficult. I don't know if the dimension type is stored in the SVG file. I assume it is because Inkscape shows it correctly. I guess the 123D import program doesn't look at the specific dimensions.
Since I can't get the import to handle the dimensions correctly, I'll just have to resize it after the import. See the resizing problem above. It's difficult to even figure out what size it is. If you import the drawing as a "sketch" the measuring tool doesn't work. If you import it as a model, it has a measure thing but it's difficult to figure out how it works. This wouldn't be a issue if I could just tell the program to resize it to xxx dimensions but remember, it's "transformation" function wants to know how much bigger or smaller you want to make it. I can't find an option to just make it xxx size.
Given all that, the scroll saw idea actually sounds pretty good! Figuring out the correct size is as simple as putting the spoon on the block. The whole thing would probably be quicker and cheaper and I'd have a stronger tray. It just defeats the main purpose which was to learn how to 3d print. I've learned a lot. Mostly I've learned it's a PITA.
-
tylerdurden
- Posts: 2344
- Joined: Sun Apr 14, 2013 12:04 pm
- Location: Michigan, USA
Re: How do you convert bezier into freehand lines?
Inkscape can also output DXF files which are much more cad friendly, but you may need to tinker with settings and units depending on the cad software you use.
Maybe you are lucky enough to have a "makerspace" or "hackerspace" near you that offers 3D printing classes/machines... even public libraries in some towns have printers to use. There may also be hobby clubs for 3D-printer/CNC/robotics in your area open to new members.
Shapeways is not the cheapest and large items may be a costly learning experience. Similarly, a local makerspace may not be free, but you can usually enjoy mistakes on your own time, hopefully with small objects so you don't spend a lot of $$ on plastic. The shop I use charges ~$0.20/gram.
For a US national chain example of makerspaces there is TechShop, but there are many MakerFaire/Make-magazine inspired independent spaces sprouting up globally. The indie shop I am happy to be near is called Maker-Works.
My first venture into 3D printing was to make scale furniture and equipment for architectural visualization.
Nice spoons, Ragnar!
Have a nice day.
I'm using Inkscape 0.92.2 (5c3e80d, 2017-08-06), 64 bit win8.1
The Inkscape manual has lots of helpful info! http://tavmjong.free.fr/INKSCAPE/MANUAL/html/
I'm using Inkscape 0.92.2 (5c3e80d, 2017-08-06), 64 bit win8.1
The Inkscape manual has lots of helpful info! http://tavmjong.free.fr/INKSCAPE/MANUAL/html/
Re: How do you convert bezier into freehand lines?
Those spoons look great!
Maybe it seems simple at first, but modeling a functional shape would need a basic knowledge on topology.
3D models are represented by faces in blender.
Autocad may offer solid modelling but it's hardly a relyable function as far as I could see it.
Probably rhino 3D has a better sence on intersecting surfaces.
For a simple 3D model, I would suggest to start with a solid of revolution instead. So much easier topology, more fun on the modeling.
You can import a profile in svg, convert it to a mesh, and spin it.
Can take less then five minutes with all the subdividing/adding subdivision surface modifier.
Will break it down to steps if you like.
That may be something like inkscape's node tool and object select tool difference. If you have selected the node tool, you cannot delete the object.
Same in blender, in edit mode you cannot delete it, just in object mode.
jgold1957 wrote:The point of this project is to learn 3d printing. I've been looking for a project that would be useful but also fairly simple to get started. I custom plastic silverware tray seemed like the perfect thing.
Maybe it seems simple at first, but modeling a functional shape would need a basic knowledge on topology.
3D models are represented by faces in blender.
Autocad may offer solid modelling but it's hardly a relyable function as far as I could see it.
Probably rhino 3D has a better sence on intersecting surfaces.
For a simple 3D model, I would suggest to start with a solid of revolution instead. So much easier topology, more fun on the modeling.
You can import a profile in svg, convert it to a mesh, and spin it.
Can take less then five minutes with all the subdividing/adding subdivision surface modifier.
Will break it down to steps if you like.
jgold1957 wrote: Why not? This is the delete key.
That may be something like inkscape's node tool and object select tool difference. If you have selected the node tool, you cannot delete the object.
Same in blender, in edit mode you cannot delete it, just in object mode.
Re: How do you convert bezier into freehand lines?
The DXF file suggestion fixed my scaling problem. Thanks tylerdurden!
I checked into 3d printing clubs in my area. They're mostly in other cities close by but I did find a get together this weekend that's fairly close. I'll try to check it out.
I made a lot of progress on the tray. I ended up sketching the entire top surface in Inkscape, exporting that to a dxf file and then importing it into Sketchup. I un-grouped everything and tried to use their push/pull tool to push in the silverware indents. They wouldn't move. I discovered that they don't have any face on them. All you have to do is trace over a little part of the outline and it adds the face letting you manipulate it.
Now I've finally got a 3d model that looks like it's the correct size and shape. None of the walls have any thickness. My last step is going to be figuring out how to add the thickness to the walls but only to the underside of the model. I don't want to change any of the dimensions on the top. I've seen this done in one of the Blender videos so I'm thinking that it might not be too hard. I'll be working on that this weekend.
Lazur, I agree that this probably wasn't the best beginner project. It would probably have been easier to start with something that didn't have to be a specific size. On the other hand, it's main purpose is a learning project. In that respect, it's been better. I'm surprise that it's been this difficult but I guess if it was really easy, everyone would already be doing it.
This thread has wandered out of the Inkscape area. Sorry about that. Future posts will probably have to move over to the Blender, 123D, Sketchup forums.
I appreciate everyone's help.
P.S. Those spoons do look great.