Hello all. I'm newish to inkscape and computer graphics in general, so I probably don't even have all the terminology down to begin with, but here goes.
I've been using Inkscape to assist in drawing up heraldry for the SCA (Society for Creative Anachronisms). Having vector objects to work with makes it a lot easier to size and rotate the things I need, but there are a lot of things out there that haven't been rendered into an svg format for me to be able to use. I am not an artist by any stretch, so drawing them from scratch is a bit beyond my abilities.
What I've been trying to do is take black and white image files and convert them using the Trace Bitmap tool. What I am getting is a path outline, and a transparent interior. What I want to do with this is create a two colour object, one colour for the line, and one colour for the rest of the internal space, but I can not figure out a way to do it without individually selecting every internal space with the paintbucket tool, which ranges from tedious to downright frustrating, depending on the internal detailing I'm working with.
I've gone through the transparency tutorial in the FAQ, and a couple of the Trace bitmap tutorial videos I've found on Youtube, and I'm not sure what I'm missing. There's probably a word to describe exactly what I'm trying to do, but I have no idea what it might be.
For reference, here is a sample image that I've been trying to import with lots of fiddly internal bits, A thunderbolt.
[solved] creating two colour object after trace bitmap
-
Danielthebroc
- Posts: 9
- Joined: Mon Jul 07, 2014 6:59 am
[solved] creating two colour object after trace bitmap
- Attachments
-
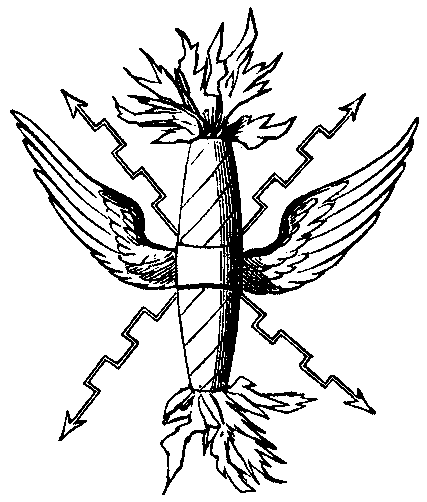
- thunderbolt.gif (10.86 KiB) Viewed 991 times
Re: creating two colour object after trace bitmap
Welcome aboard!
If one fill colour could fit the needs then once you have that black path with the auto-trace,
duplicate it (Ctrl+D),
remove from group (Shift+Ctrl+G),
break apart the path (Shift+Ctrl+K),
remove largest path from the selection by Shift+Clicking,
delete unnecessary objects -all is selected- (Delete),
then select the remaining black part on top,
move it to the bottom (End),
add a fill colour to it and a thin black outline at the fill and stroke panel (Shift+Ctrl+F).
That thin outline can hide the fact the fill has the exact shape as the black path on top, which could produce rendering issues.
Another workaround would be to preform insetting or dynamic offsetting the fill path instead.
-
Danielthebroc
- Posts: 9
- Joined: Mon Jul 07, 2014 6:59 am
Re: creating two colour object after trace bitmap
That is awesome, that does what I need it to with a bit of manipulation
Thanks a lot Lazur URH
Thanks a lot Lazur URH