Hi,
This is a really exciting program, but I am new to it (and am not used to graphical work at all). I was curious about this feature/problem, which I encountered while working on my first 'project'.
I am running Ikscape 0.48.3.1 r9886 on Ubuntu.
I am drawing lines and using the 'fill and stroke' menu to edit the blur and opacity of the lines. I have rescaled some of the lines (not using the nodes etc. that I suppose are a key feature of the vector graphics editors), and I see that this rescaling, i.e. enlarging or shrinking the object, affects the opacity. Ideally, shouldn't the opacity always stay the same?
The problem is that, when I made one new line (freehand), and changed all the data in 'fill and stroke' so that it would look exactly like my other lines, it actually looks completely different. Or, to be more precise, the opacity is wrong. Perhaps this is just something that one has to get used to, but I felt that something may be wrong here...
You can see in the screenshots, which I have attached, that the opacity needs to be reduced to around 60% so that the bottom line looks the same as the others (which have opacity over 70). I don't think that I even rescaled the 'line for comparison' (see attachments).
You are welcome to let me know if I am just misuderstanding Inkscape, or if there is a solution available.
I will file it as a bug if you like...
Opacity of stroke affected by rescaling?
Opacity of stroke affected by rescaling?
- Attachments
-

- Screen6.png (192.26 KiB) Viewed 967 times
-
- This shows the oapcity of the other line for comparison. As a matter of fact, I did not even rescale this one I think. So there is something fishy?
- Screen5.png (191.47 KiB) Viewed 967 times
-

- Screen4.png (190.14 KiB) Viewed 967 times
Re: Opacity of stroke affected by rescaling?

Welcome to InkscapeForum!
I'm not entirely clear what the problem is. The title of your message refers to scaling, but the object that you are comparing, in the 1st and 3rd screenshots, does not appear to have been scaled. But I think I may have an idea what's happening.
Opacity doesn't change, no matter what size the object is or was. But the blur does appear differently. Applying the same blur value to a larger object that you already have on a smaller object will cause the larger object to appear much more blurred. I can't say for sure, without having the SVG file to look at, but I think that's what you're seeing. The blur value of 2.3 that you have set for the longer lines will not blur a shorter line as much. When you have either very small, or narrow objects like your lines, it is conceivable that you could adjust the opacity to compensate for the difference in blur.
If my guess is correct, you'll probably want to leave the opacity the same, and adjust the blur. OR, another idea for that kind of situation, is to group all the red dashed lines, and apply blur and opacity to the whole group at once.
Also, this is off topic, but I don't know if you want those gaps between the color fill and the black strokes? If not, there is a way to correct that. Just lmk. Also let me know if I haven't solved your original problem
Basics - Help menu > Tutorials
Manual - Inkscape: Guide to a Vector Drawing Program
Inkscape Community - Inkscape FAQ - Gallery
Inkscape for Cutting Design
Manual - Inkscape: Guide to a Vector Drawing Program
Inkscape Community - Inkscape FAQ - Gallery
Inkscape for Cutting Design
Re: Opacity of stroke affected by rescaling?
Thanks for your reply brynn.
I was not very clear about what the problem is, because I got a little confused about what I had done or not done. I only started to figure out that rescaling might not have taken place when I finished my post
Ok I think that the problem is pretty much solved. I just didn't know that blur appears differently depending on the size of the object/line. Now I can adjust the blur to get the obejcts to look the same...
I also tried grouping the different lines and adjusting blur and opacity for the entire group, but the results of this were mixed: there was some improvement with the blur, but there is still a difference between the lines (I think). I've posted an svg where I tried playing with some dashed line combinations - you can see what's happening there.
The gaps between the color fill and the black strokes? Yes, I've been wondering about that, but I don't know how it's done. If you know how to do this it would be super to learn.
- Attachments
-
- blurryblur.svg
- Dashed lines
- (138.23 KiB) Downloaded 132 times
Re: Opacity of stroke affected by rescaling?
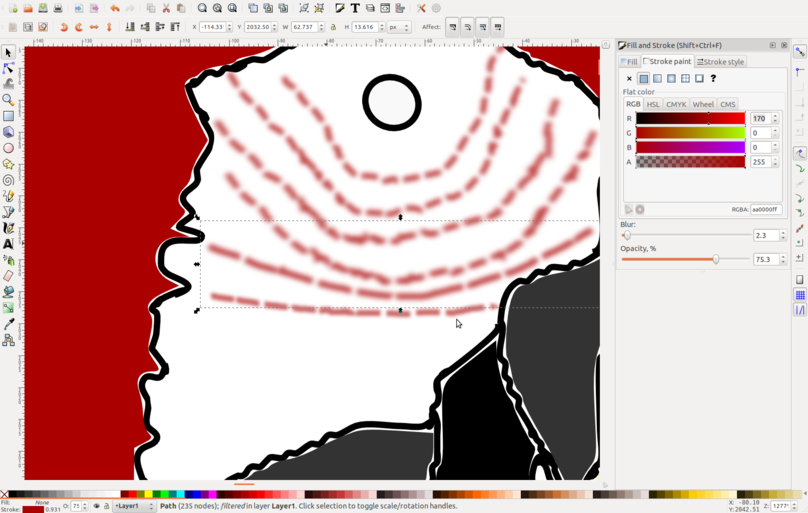
Aah, ok, I see what I think might be tripping you up. Here's a screenshot where I've drawn a blue line and a green line around 2 of your examples:

First the one circled in blue. They are indeed grouped. After ungrouping, and selecting each dashed line individually, you can see that they each have exactly the same blur and the same opacity. Because they are very different lengths, the identical blur value results in different amounts of blur. This is a perfect example of what I explained in my first reply. I think what's confusing you is that you can apply blur to individual objects AND/OR a group of objects. In this case, grouping the 3 dashed lines and then blurring them, can't even it all out, because they all already have some blur applied to them. Try the same thing on 3 different lengths of lines that have no blur. Then you will see the blur is evenly distributed.
And....ok nevermind about the green circle. I thought I was going to use it to explain something. But I don't need it after all.
In the example below the green one, with the higher blur -- it looks like the amount of observed blur is more equal, because after a certain point, our eyes can no longer distinguish the difference (because blur incorporates transparency).
The gaps between the black strokes and color fill can be somewhat eliminated with a setting on the control bar, when Paint Bucket tool is engaged. Look for Grow/Shrink. I find that a value of 0.5 is about right if the stroke is 1 px width, to fill the gaps, without extending out beyond the stroke. However, because your lines are so wiggly, you might still need to do some tweaking here and there. An easy way to do that tweaking is to use Snapping. Set up the snap control bar like this: 1st button ('Enable snapping'), 'Snap node or handles', and 'Snap to paths'. (Use tool tips to identify the buttons.) So 3 buttons engaged, and all the others not. Now using the Node tool, you should be able to drag nodes from the color fill, and drag towards black path. The nodes will jump over to the paths when you get close enough (snap). If they don't snap, you may need to adjust the snapping strength in Document Properties. We can help with that, if you need it. Snapping can be a bit confusing, until you understand it clearly.
Let us know if you need further explanations about any of this
Basics - Help menu > Tutorials
Manual - Inkscape: Guide to a Vector Drawing Program
Inkscape Community - Inkscape FAQ - Gallery
Inkscape for Cutting Design
Manual - Inkscape: Guide to a Vector Drawing Program
Inkscape Community - Inkscape FAQ - Gallery
Inkscape for Cutting Design