Hello everyone!
I am a beginner at Inkscape, and I have recently decided to try my hand at designing a wax seal stamp that I will send off to have routed/engraved. The requirements for that are to use a vector image with a minimum stroke weight of 0.5 pt (0.176389 mm).
I have the design pretty much done, path-wise, and filled in, it looks great! However, I am aware that the engraving/routing drill will not pass through the areas without paths, and the fill that I see on the screen will not be hollowed out. My question is, how do I use Gcodetools to fill in the space evenly, efficiently, and properly?
I have looked at many tutorials on how to fill in shapes for CNC and routing, and most of them demonstrate the process using Gcodetools. I found one where the instructor made duplicates of the object instead of using Gcodetools, and instead just inset the duplicates multiple times. This doesn't work for me since it distorts the pathing too much (the stamp size is only 40 mm in diameter!). The best method that I have found is under Extensions > Gcodetools > Area after setting up a tool and orientation points will do the trick.
However, this is where my problem starts. There are many settings that I do not understand, and as such, I am only able to do this via trial and error. I would like to understand these settings to be able to work more efficiently and effectively. I will list the settings and/or fields below:
1. When making a tool, what unit is the diameter parameter in?
I have been assuming that it was in mm, but does it change along with the document designated setting? (i.e. is it still in mm if my document is set to pt?)
2. Relating to the question 1, is the depth step in the same units as the diameter?
3. What is Area width under the Area option?
One tutorial I watched said that it is the distance from one end of the object to the other, but from trial and error, it seems like it is the distance between the outermost path to the innermost outline. I am not really sure if this is the case though.
It says that outlines start form "1/2 D" up to "Area width" total, with "D" steps where D is taken from the nearest tool definition ("Tool diameter" value). However, this either doesn't seem to be happening or I am missing something. While it is true that the first outline from the outer path is half as spaced as the rest of the outlines from each other, they are not "1/2 D". In my case, I set D to be 0.176389 mm (0.5 pt) in the tool diameter parameter, but when measured, the distances between the outline paths do not line up. The steps are all consistent, but they are not the same distance as the diameter specified in the tool. In fact, they are much different depending on what file I am testing on! On my actual stamp file, if I set the diameter to 1 mm, the actual distance between lines would be 0.2 mm. However, in a test file with a rectangle, the same diameter of 1 gives spacing of 3.55 mm! If I set the diameter to be 0.176389 mm in my stamp file, the lines are so close together I can't even zoom in enough to get a good look (0.01 pt). This is the area that I most need help with!
If there are any better tutorials out there showing how to use Gcodetools, please let me know. I am in this situation because I can't find the documentation for it or any in-depth tutorials. However, it would be great if all my problems were answered here, as I can ask for clarification. Thank you in advance for reading my long list of problems!
I have included the file in question if any of you should want to take a look at it. I haven't created the orientation points/tools in this file though.
How to use Gcodetools to fill in an area for routing?
-
blademagic
- Posts: 4
- Joined: Thu Mar 01, 2018 7:46 am
How to use Gcodetools to fill in an area for routing?
- Attachments
-
- Sample Template.svg
- (134.05 KiB) Downloaded 249 times
-
tylerdurden
- Posts: 2344
- Joined: Sun Apr 14, 2013 12:04 pm
- Location: Michigan, USA
Re: How to use Gcodetools to fill in an area for routing?
I'd check with the stamp engraving service provider, and have them inspect the artwork. Most places I work with will simply take the vector image file and engrave away everything that isn't black.
Ensure that they will flip the image so your stamp isn't reading backwards.
TD
Ensure that they will flip the image so your stamp isn't reading backwards.
TD
Have a nice day.
I'm using Inkscape 0.92.2 (5c3e80d, 2017-08-06), 64 bit win8.1
The Inkscape manual has lots of helpful info! http://tavmjong.free.fr/INKSCAPE/MANUAL/html/
I'm using Inkscape 0.92.2 (5c3e80d, 2017-08-06), 64 bit win8.1
The Inkscape manual has lots of helpful info! http://tavmjong.free.fr/INKSCAPE/MANUAL/html/
Re: How to use Gcodetools to fill in an area for routing?
As far as I know, gcodetools are supposed to use the current document unit. But the version currently contained in Inkscape has a bug with the units, at least when creating orientation points and setting the tool.
Here's a tutorial I wrote some time ago, that worked with Inkscape 0.91. Its purpose was *not* engraving, but drawing nice shapes, so it might not be the perfect match.
viewtopic.php?f=6&t=28230
Find an updated gcodetools extension file for Inkscape 0.92.x here:
https://gitlab.com/inkscape/inkscape/ra ... detools.py
As for the rest, the gcodetools author made a tutorial, which is available here, for example:
https://www.inkscapecuttingdesign.com/s ... ttach=2932
Something doesn't work? - Keeping an eye on the status bar can save you a lot of time!
Inkscape FAQ - Learning Resources - Website with tutorials (German and English)
Inkscape FAQ - Learning Resources - Website with tutorials (German and English)
-
blademagic
- Posts: 4
- Joined: Thu Mar 01, 2018 7:46 am
Re: How to use Gcodetools to fill in an area for routing?
Thanks for the advice and information, Tyler! I will definitely check with the stamp maker, but I still want to learn how to use this extension properly just for my own sake. Do you, or anyone else, know where I can get more in-depth information or who I can ask regarding the questions mentioned?
-
blademagic
- Posts: 4
- Joined: Thu Mar 01, 2018 7:46 am
Re: How to use Gcodetools to fill in an area for routing?
Moini wrote:As far as I know, gcodetools are supposed to use the current document unit. But the version currently contained in Inkscape has a bug with the units, at least when creating orientation points and setting the tool.
Here's a tutorial I wrote some time ago, that worked with Inkscape 0.91. Its purpose was *not* engraving, but drawing nice shapes, so it might not be the perfect match.
viewtopic.php?f=6&t=28230
Find an updated gcodetools extension file for Inkscape 0.92.x here:
https://gitlab.com/inkscape/inkscape/ra ... detools.py
As for the rest, the gcodetools author made a tutorial, which is available here, for example:
https://www.inkscapecuttingdesign.com/s ... ttach=2932
Moini, this was incredibly helpful. Thank you. I will try to look through each of those tutorials and download the Gcodetools extension as well. I will update the post if my questions have been solved!
Edit: typo
Re: How to use Gcodetools to fill in an area for routing?
Based on some testing I did with gcodetools a little while back, I have the impression that the inset paths are needed, if you want to etch out an enclosed area. Typically you make them slightly narrower than the engraving tool is wide. It just tells the tool where to cut. But when I did it, the gcode tools created the inset paths. Yes, in Inkscape, often the offset commands introduce distortion. But when I let gcodetools make them, they looked pretty darn good.
Unfortunately, the creators of Inkscape's gcodetools are no longer available to provide support. (Thats' why I was learning about it myself, trying to help someone else.) But fortunately, a lot of the maker spaces and fab labs where people often go to do this, have some great internal support - users helping users.
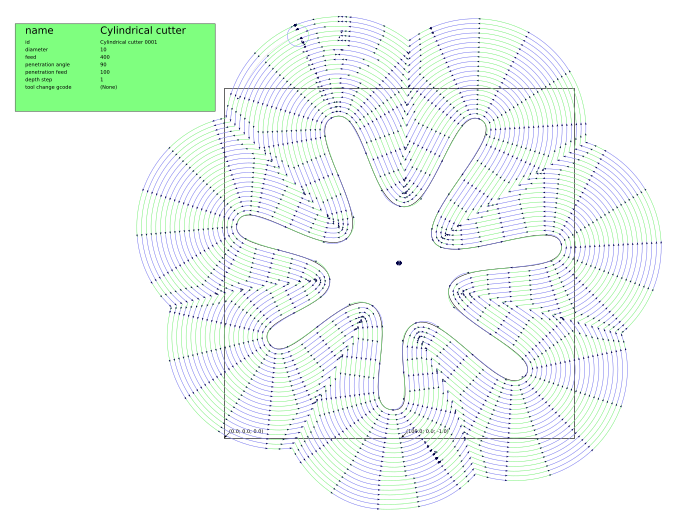
Here's a screenshot attached. Although note that I have it etching outside the enclosed space, instead of inside. So you can see those green and blue lines are created by the gcodetools extensions.
Edit
I did find the tutorial provided by the gcodetools author confusing though.
Unfortunately, the creators of Inkscape's gcodetools are no longer available to provide support. (Thats' why I was learning about it myself, trying to help someone else.) But fortunately, a lot of the maker spaces and fab labs where people often go to do this, have some great internal support - users helping users.
Here's a screenshot attached. Although note that I have it etching outside the enclosed space, instead of inside. So you can see those green and blue lines are created by the gcodetools extensions.
Edit
I did find the tutorial provided by the gcodetools author confusing though.
- Attachments
-
- gcodetest2.png (193.72 KiB) Viewed 5124 times
Basics - Help menu > Tutorials
Manual - Inkscape: Guide to a Vector Drawing Program
Inkscape Community - Inkscape FAQ - Gallery
Inkscape for Cutting Design
Manual - Inkscape: Guide to a Vector Drawing Program
Inkscape Community - Inkscape FAQ - Gallery
Inkscape for Cutting Design
-
blademagic
- Posts: 4
- Joined: Thu Mar 01, 2018 7:46 am
Re: How to use Gcodetools to fill in an area for routing?
Hi Brynn, I appreciate your insight on this issue! What you are doing is exactly what I'm trying to do. Do you by any chance know the details with how the parameters work for the Area function? I read the author's tutorial as well, and it is helpful but does not go into detail about the parameters.
For the Area width, I believe that the number entered is in fact the of multiples of the tool diameter set in the tools, D. So 5.6 would be equal to 5.6 x D, and so on. Please correct me if I am wrong. However, when I try to fill the area of an object that was imported compared to a drawn object, the spacing is completely different, with the imported object's outlines being much closer together. Could this be because the imported object was scaled down without being turned into a path? Thanks again!
For the Area width, I believe that the number entered is in fact the of multiples of the tool diameter set in the tools, D. So 5.6 would be equal to 5.6 x D, and so on. Please correct me if I am wrong. However, when I try to fill the area of an object that was imported compared to a drawn object, the spacing is completely different, with the imported object's outlines being much closer together. Could this be because the imported object was scaled down without being turned into a path? Thanks again!
Re: How to use Gcodetools to fill in an area for routing?
For engraving the inner area, I believe the Area Width is the width of the object.
It's been a few months since I really dove into this. But in the Area extension and Area tab, there is some text right in the middle of the dialog, and under the 3 settings. It's a little hard to understand. But the way I read it, it seems to mean the Area Width is the width of the area to be cut or engraved.
It's been a few months since I really dove into this. But in the Area extension and Area tab, there is some text right in the middle of the dialog, and under the 3 settings. It's a little hard to understand. But the way I read it, it seems to mean the Area Width is the width of the area to be cut or engraved.
Basics - Help menu > Tutorials
Manual - Inkscape: Guide to a Vector Drawing Program
Inkscape Community - Inkscape FAQ - Gallery
Inkscape for Cutting Design
Manual - Inkscape: Guide to a Vector Drawing Program
Inkscape Community - Inkscape FAQ - Gallery
Inkscape for Cutting Design