Can I swap colors where objects overlap?

Post questions on how to use or achieve an effect in Inkscape.
crobar
Posts: 3
Joined: Tue Feb 18, 2014 7:27 pm

Can I swap colors where objects overlap?

Postby crobar » Tue Feb 18, 2014 7:35 pm

Hi All,

I'm a relative newbie to inkscape. I would like to create a path with a given background colour, and some text. I would then like to place another shape on top of this, and where the shape overlap with the text, swap the color of the shape and text. The image below demonstrates the effect I would like to achieve. However, in real life I want partial overlap of letters to be possible with the same effect (i.e. I don't want to just change the font colour where it overlaps like I did here.)

Is this possible in inkscape, and if so how would I go about it?

Image

Thanks!

Lazur
Posts: 4717
Joined: Tue Jun 14, 2016 10:38 am

Re: Can I swap colors where objects overlap?

Postby Lazur » Tue Feb 18, 2014 8:24 pm

Hi.

If you go to the manual at the fill and stroke section it is described how the even-odd fill rule is looking -exactly as what you want to achieve.
Thus, technically you would need one compound path containing the background shape and all the characters; a simple combination of those two.

crobar
Posts: 3
Joined: Tue Feb 18, 2014 7:27 pm

Re: Can I swap colors where objects overlap?

Postby crobar » Tue Feb 18, 2014 9:05 pm

Thanks, I have actually seen this section, and I tried changing the fill rule setting, but it didn't seem to have any effect. It's also not clear from the description how this is applied to two paths? The description seems to be for one path which overlaps itself, not one path on top of another, but I could just be misunderstanding.

It would be great to see an actual example of how one path overlapping another can change the color where they overlap.

EDIT:

Actually I see you say I need to make a compund path first, I'll give it a go.

Lazur
Posts: 4717
Joined: Tue Jun 14, 2016 10:38 am

Re: Can I swap colors where objects overlap?

Postby Lazur » Tue Feb 18, 2014 10:14 pm

Tried to give you a hint with the combination.
There is an option of combining paths in the path menu, different from the union.
http://tavmjong.free.fr/INKSCAPE/MANUAL/html/Paths-Combining.html

crobar
Posts: 3
Joined: Tue Feb 18, 2014 7:27 pm

Re: Can I swap colors where objects overlap?

Postby crobar » Wed Feb 19, 2014 2:08 am

Thanks again for the tips.

User avatar
Xav
Posts: 1209
Joined: Fri May 08, 2009 1:18 am
Location: UK
Contact:

Re: Can I swap colors where objects overlap?

Postby Xav » Sat Feb 22, 2014 8:03 pm

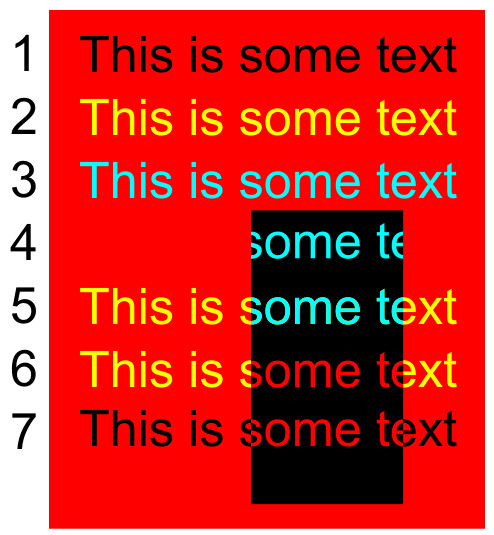
Here's a different approach that's a little bit tricky, but has the advantage of leaving both the text and the black path editable and live. It uses cloning and clipping, so if you're not familiar with those techniques you might want to read up a bit before trying this. The notes below correspond to the numbered lines on the image which show the effect of each step.

1) Create your text on your coloured background. Set the fill to "Unset" (right click on the Fill swatch in the bottom corner of the window and select "Unset Fill"). This will make it appear black, because that's the default appearance for unset colours in SVG.

2) Clone the text (select it then press ALT-D). Change the fill to whatever colour you want. If you just want it black you could use the original text with the unset fill instead. This will be the main part of the text that appears on either side of the "punched out" area.

3) Create a second clone and give it a contrasting colour. We'll ultimately use this for the punch-out part of the text.

4) Draw the punch-out shape (the black rectangle in this case), and clone it. Make sure the cloned shape is on top of the cloned text from (3). Select both the cloned shape and the cloned text, then Object > Clip > Set. You should see something like (4) as a result.

5) Put the clipped text from step (4) into place on top of the clone from step (2). Make sure the z-order has the clone from (2) at the bottom, then the punch-out shape, then the clipped text on top.

6) Set the colour of the clipped text from (4) to be the same as the background colour.

7) This shows the result when the cloned text from (2) is set to black, and the clipped text from (4) is set to the background colour.


Notes:

* You can change the punch-out shape and the clipped text will be adjusted accordingly (because it's clipped using a clone of that shape).
* If you need to edit the text, you'll have to do so on the text object from step (1) - all the other text objects are clones. You can get back to this original object easily by selecting any of the clones and pressing Shift-D.
* You can move the original text object off screen, or hide it behind the background, so you don't have an extra text object visible.
* This approach doesn't actually punch-out the black object it just fakes the appearance, so although it works with flat coloured backgrounds it would be much harder to get it to work if your background is more complex. Blame the SVG working group for not giving us an "inverse clip" option...
Attachments
punch_out_text.jpg
punch_out_text.jpg (85.87 KiB) Viewed 3752 times
Co-creator of The Greys and Monsters, Inked - Inkscape drawn webcomics
Web SiteFacebookTwitter


Return to “Help with using Inkscape”