hatch, crosshatch, rendering challenge

Vote or enter in Inkscapeforum.com competitions.
Lazur
Posts: 4717
Joined: Tue Jun 14, 2016 10:38 am

hatch, crosshatch, rendering challenge

Postby Lazur » Wed Dec 24, 2014 6:31 am

Idea came from this topic.

Let's try rendering shades in monochrome shapes.
Wether it's in the style of a pencil crosshatch, or an engraved print, or something pointillistic, anything goes.

For example:
Image


Admittedly in the mentioned topic a solution was requested, it's more of a personal try-and-error and personal taste related, so decided to start this topic here, and not at the tips and tricks section, so others can join in.

Lazur
Posts: 4717
Joined: Tue Jun 14, 2016 10:38 am

Re: hatch, crosshatch, rendering challenge

Postby Lazur » Wed Dec 24, 2014 6:58 am

A general idea about the implementation*:

It is the light background that can represent the lightest tone,
and a solid fill of the used material (ink, charcoal, graphite...) is representing the darkest tone.
Each shade in between is represented by both the background and the "strokes".
The human eye -and also computer rendering- averages the black and white amount in each ideally small area.

Thus, there are two thing necessary:
breaking down the image to tone levels and
creating different methods of separate tones.


*(by captain obvious)


To get the tone levels right, reducing the saturation of a reference image/making it greyscale is a good start.
There are alot of ways of doing the etching, as for the tones seen can be represented in countless ways.

Which can also have automated solutions.
For example, these look pretty good:

using blender's shaders to generate hatching
Image
http://alshonours.blogspot.hu/2012/11/another-cross-hatching-test.html

opengl hatching shader
http://www.yaldex.com/open-gl/ch18lev1sec1.html


While, on the other hand, manual work and practicing can have that extraordinary look:
http://keithwitmer.com/styles/pen-and-ink-crosshatch-illustrations/

User avatar
ragstian
Posts: 1181
Joined: Thu Oct 11, 2012 2:44 am
Location: Stavanger-Norway

Re: hatch, crosshatch, rendering challenge

Postby ragstian » Wed Dec 24, 2014 7:50 am

Hi Lazur.

Quote;
Idea came from this topic.
Will try to finetune the technic a bit and share the details sometime.


Have been watching the "original" topic - eagerly waiting for a description on how to do this,
"sometime" has come. :D
PLEASE share!!

RGDS
Ragnar
Good Luck!
( ͡° ͜ʖ ͡°)
RGDS
Ragnar

Lazur
Posts: 4717
Joined: Tue Jun 14, 2016 10:38 am

Re: hatch, crosshatch, rendering challenge

Postby Lazur » Wed Dec 24, 2014 10:32 am

ragstian wrote:"sometime" has come. :D


To start it off, I will use this image:

Image

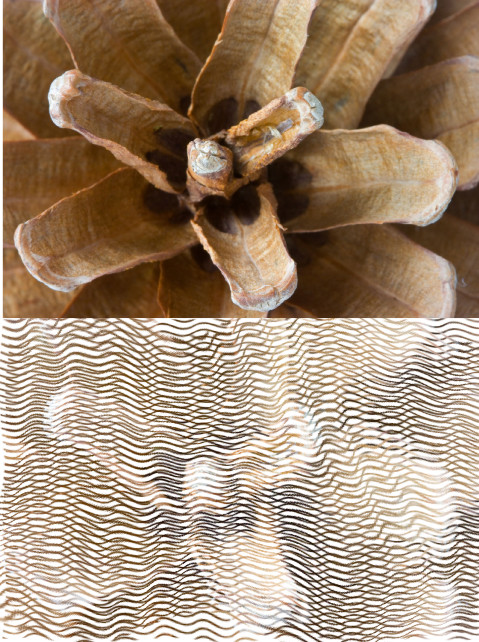
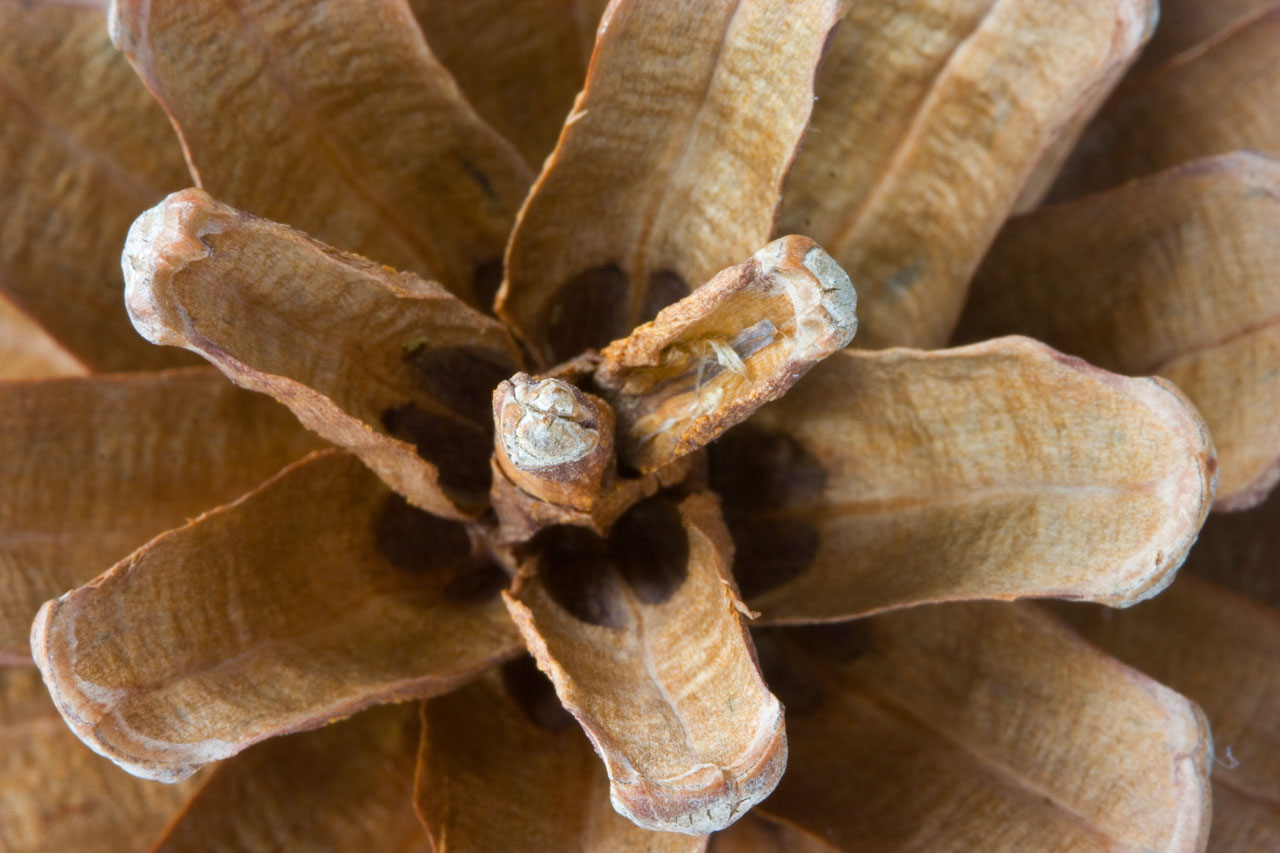
http://www.publicdomainpictures.net/view-image.php?image=382&picture=borovi-cone&large=1


The strokes will be all parallel ones (as much as possible), and their width will vary.

Thicker strokes --->dark shades;
thinner strokes --->highlights.

The limitation is, that by no means there will be infinite number of different stroke widths as this process is just semi-automated.
To "fine tune" the image in the last stage, I will use the auto-trace function -which will make smoother transitions out of any too obvious jaggedness.
That means, to make distances between the strokes at least about 15 pixels.


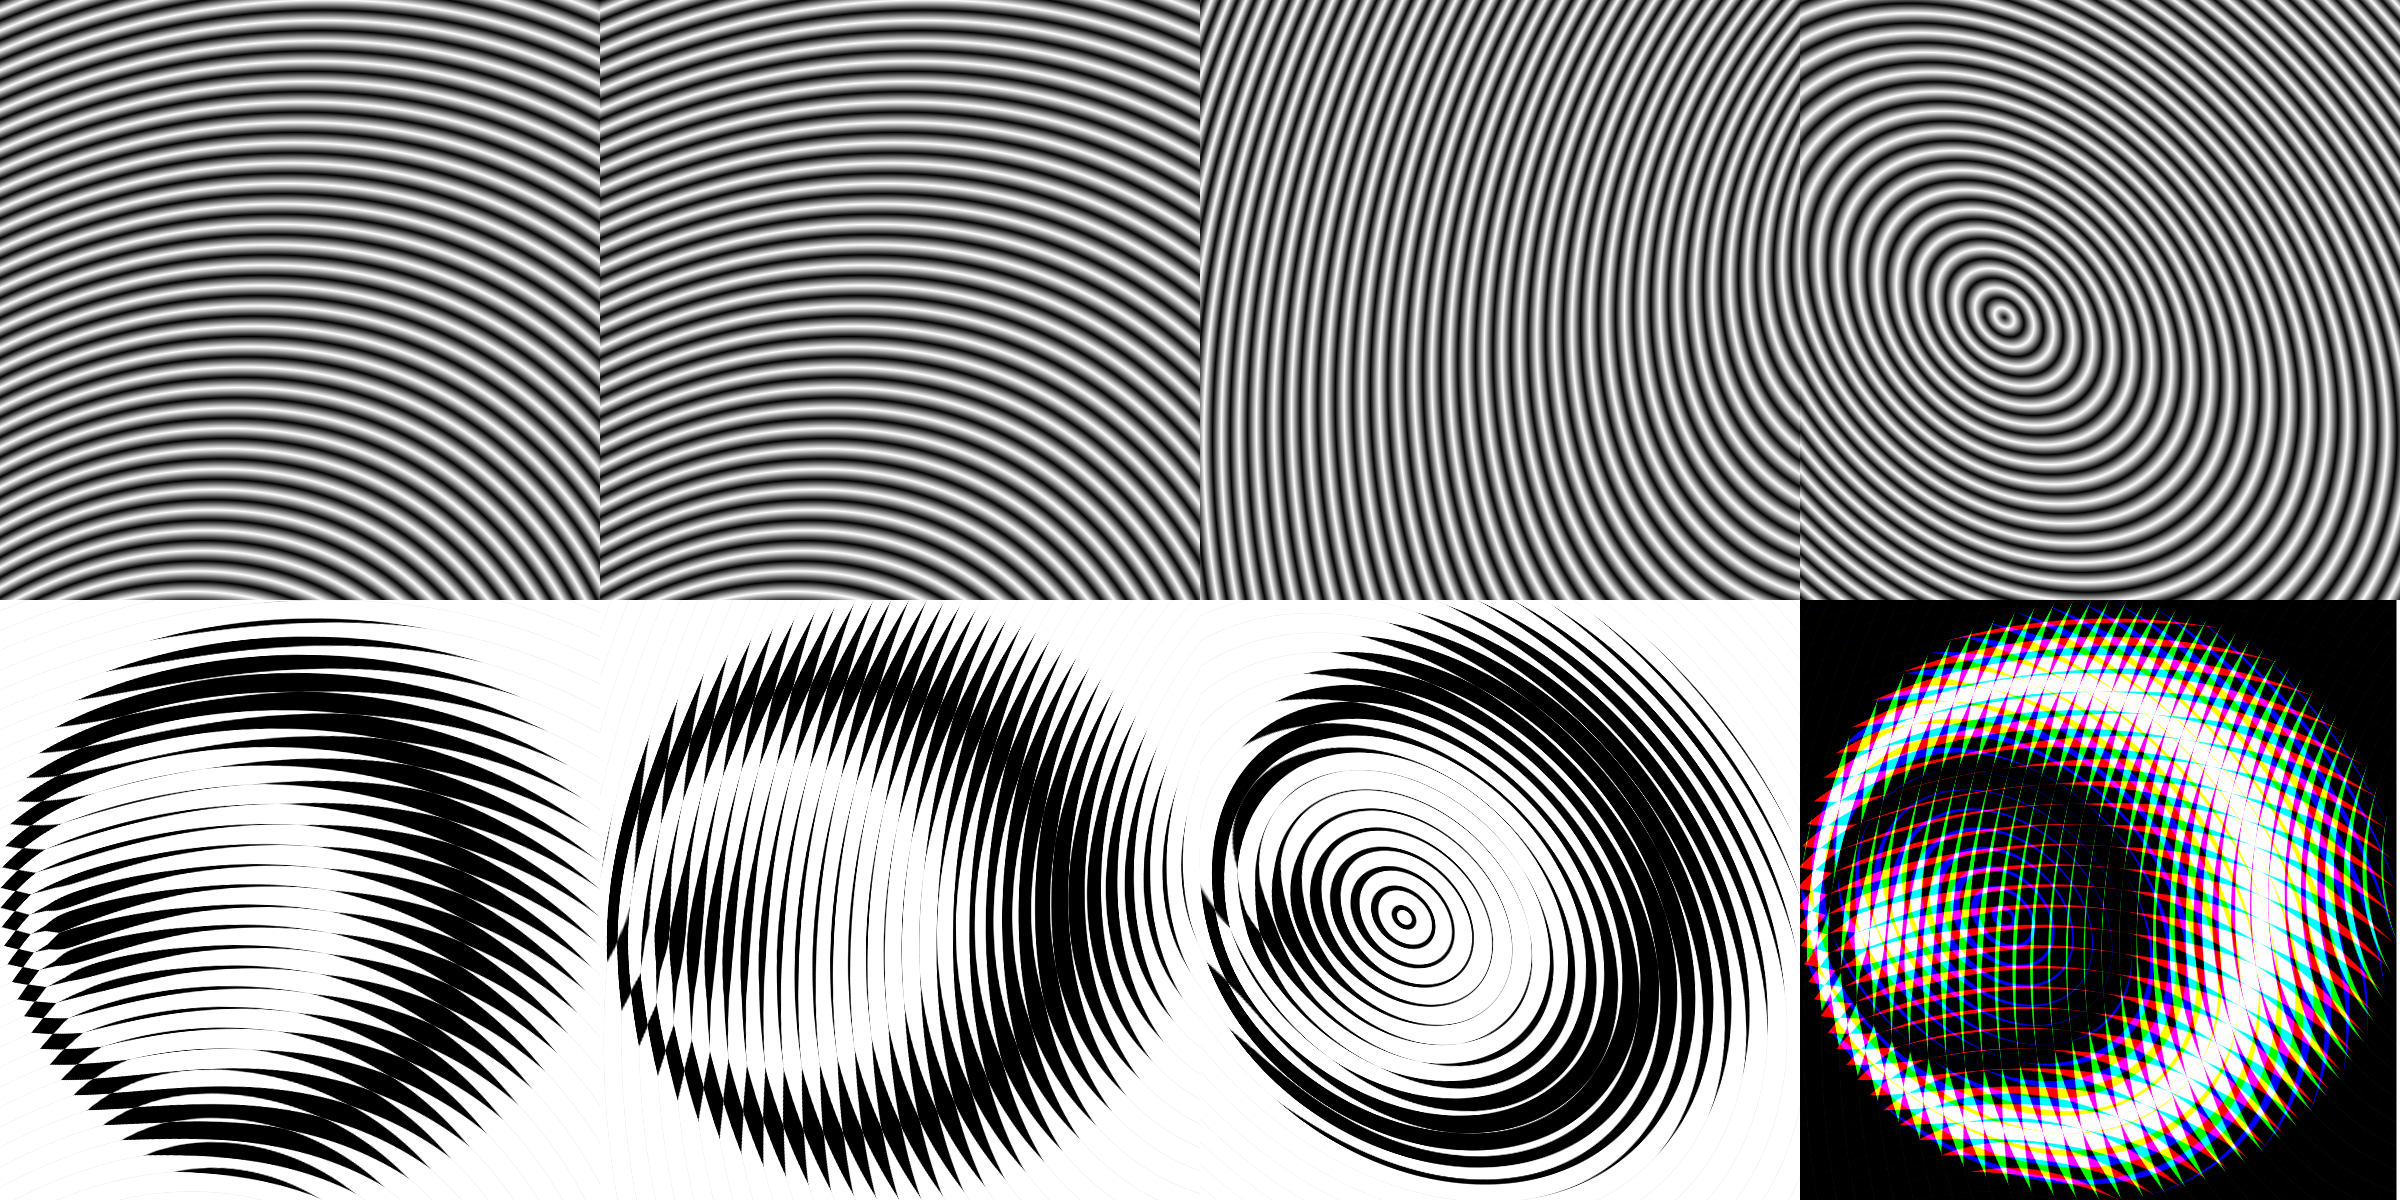
To generate something close to parallel lines that can cover the whole raster image, I'm using the stitch subpaths live path effect, and adjusting the number of subpaths in the lpe tab so that with a 20 px stroke width it will result in an almost solid fill.
Other solution can be to use a hatching live path effect, but that cannot provide a solid fill (there are parts more dense than others).


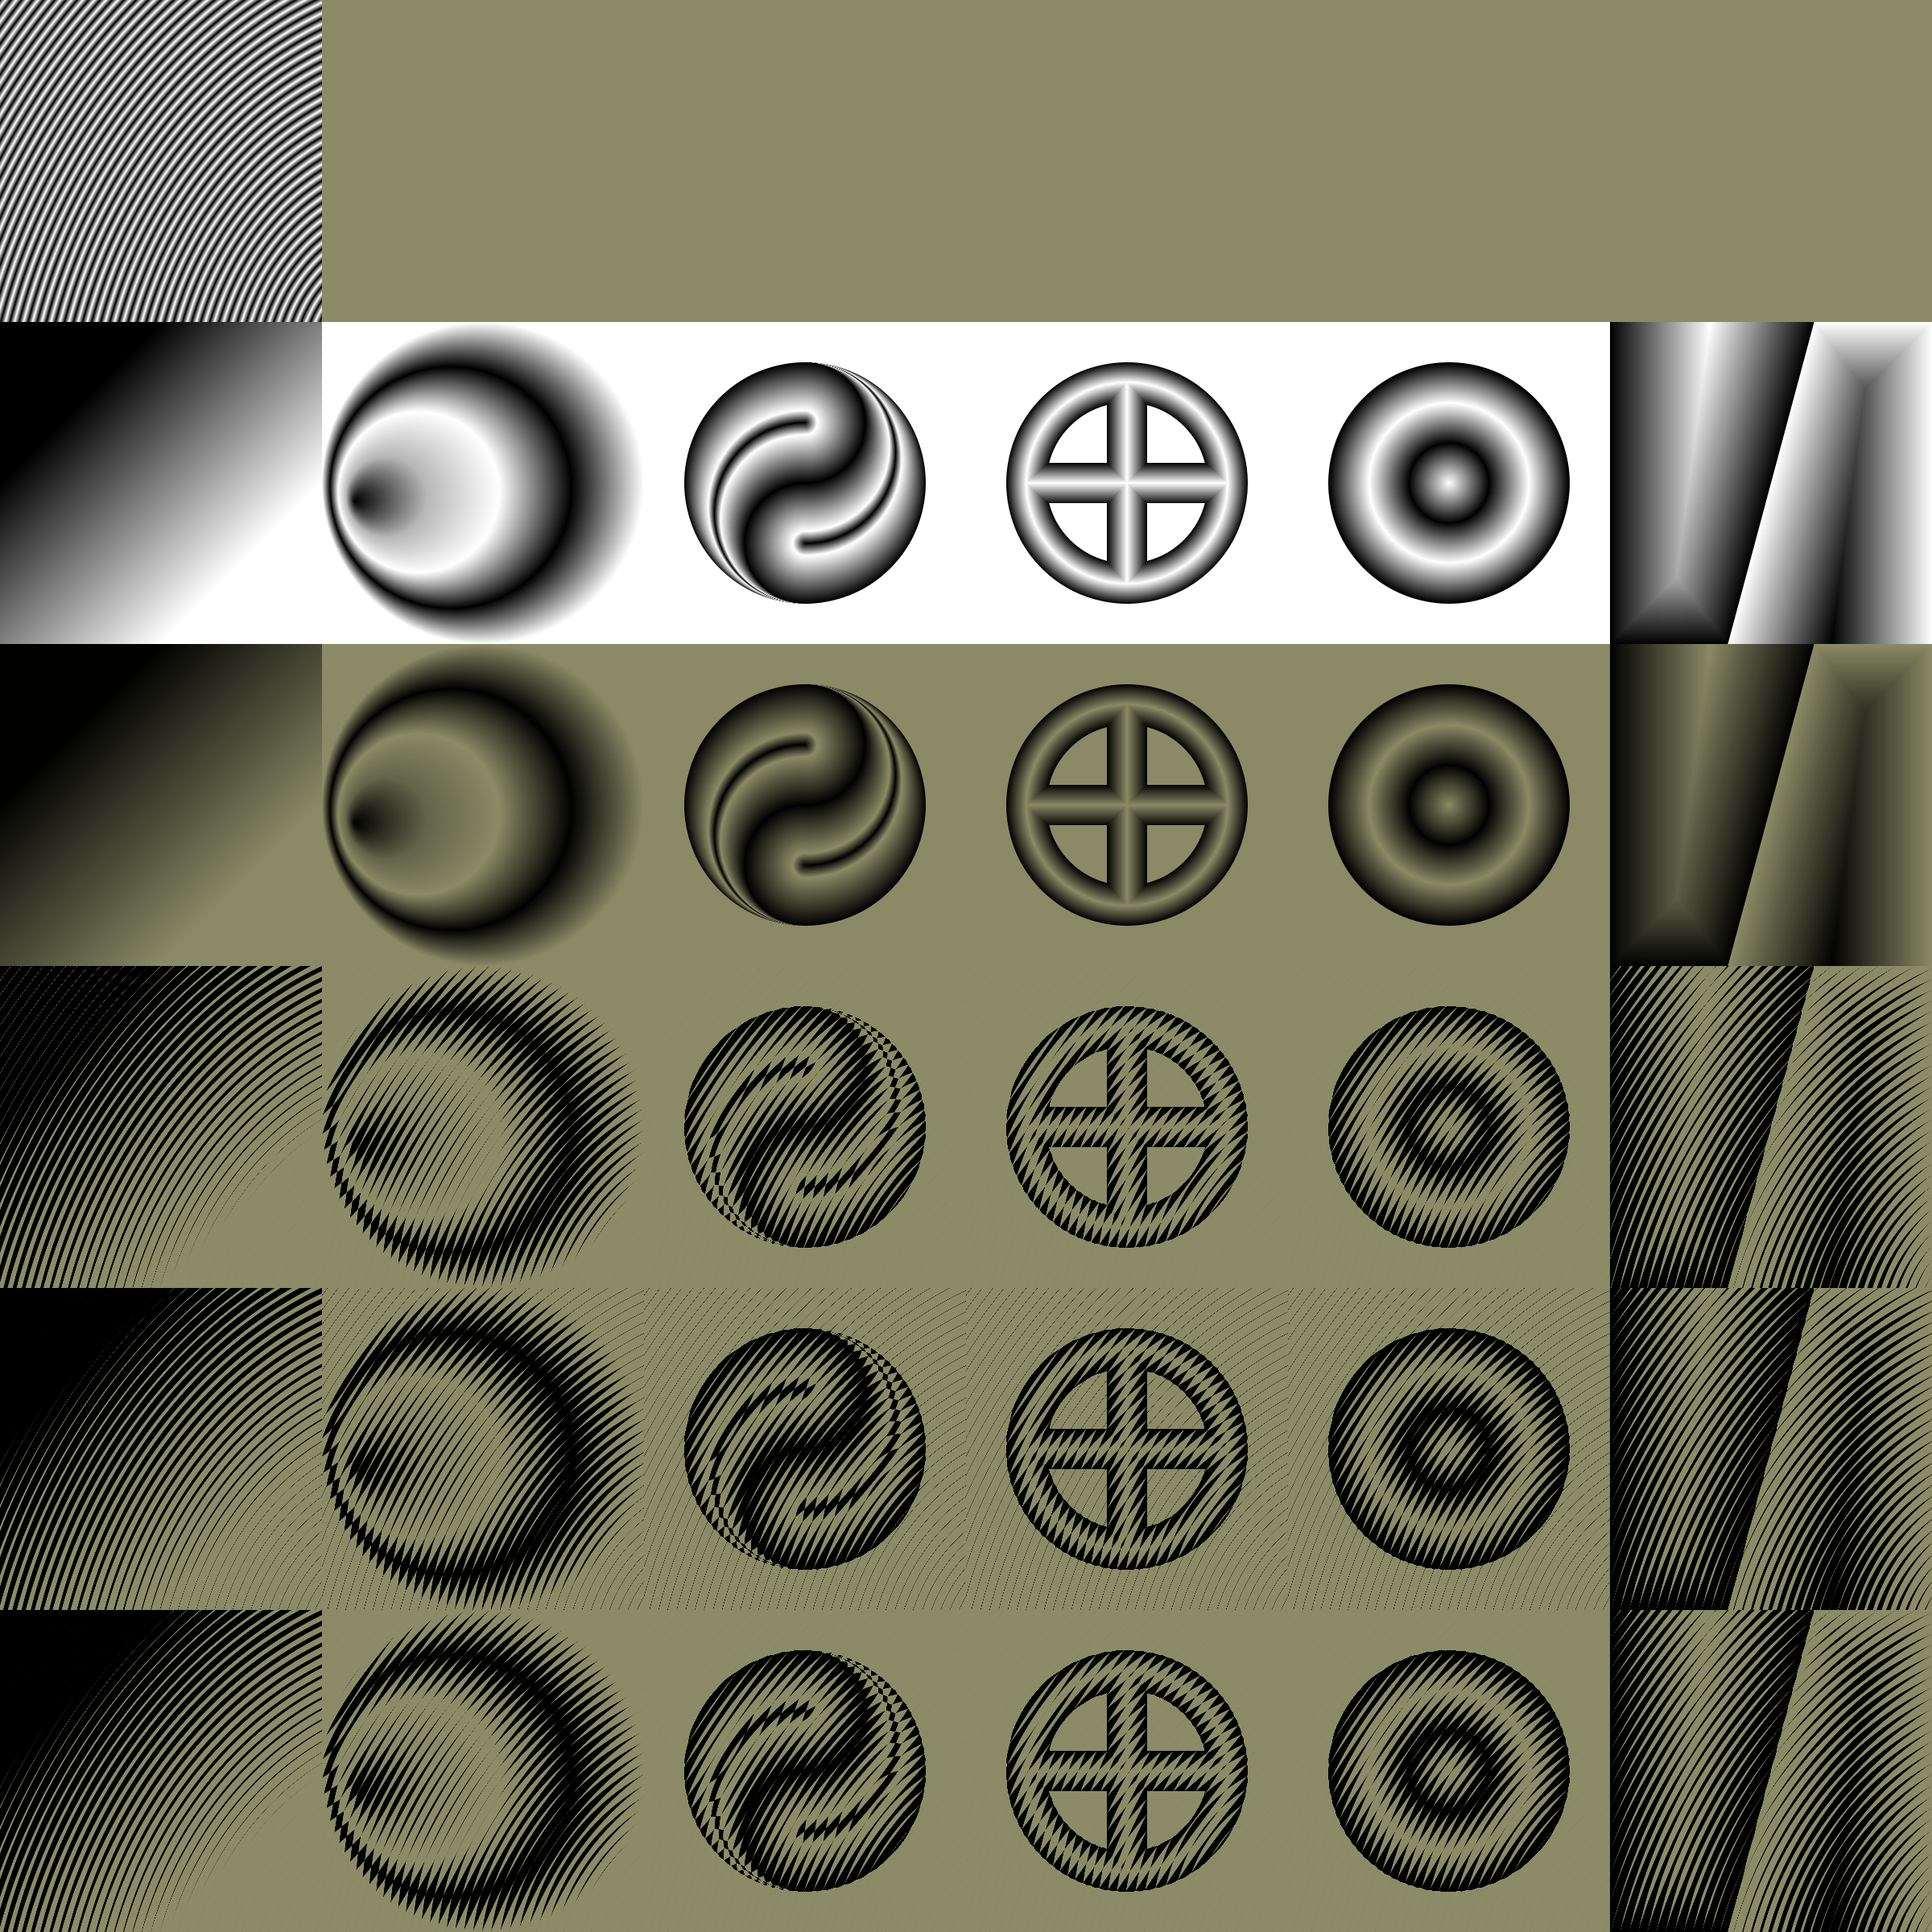
For the example, five shades will be used --->five duplicants of the (preferably clipped) path to make, with stroke widths of 20 px, 15 px, 10 px, 5 px and 1 px.
More shades could make it smoother, but at some point it wouldn't show up when auto-tracing the result.

Then, these will be stacked upon eachother later on.
Which means, unnecessary parts will need to be either masked or clipped out.

In this example there are five duplicans of the result of the autotrace, and paths are recolourised to have one shade white and the rest black.
After that, they are applied as masks over the right tones drawn previously.
Which needs a bit more attention, or you will end up with inverted colours.


Then the rest is aligning all five masked paths above eachother, adding a solid white filled rectangle to the bottom,
maybe adjusting -surely needs some, the stroke widths could have been better chosen to match the actual tones of the raster image- the stroke widths a bit.
Grouping objects together, creating a bitmap copy and auto-tracing with one scan.


Here is the svg result, with all the stages kept inside:

Image

https://openclipart.org/detail/210881/semi-automatic-hatching-by-lazur-urh-210881

Hope it does make sense.
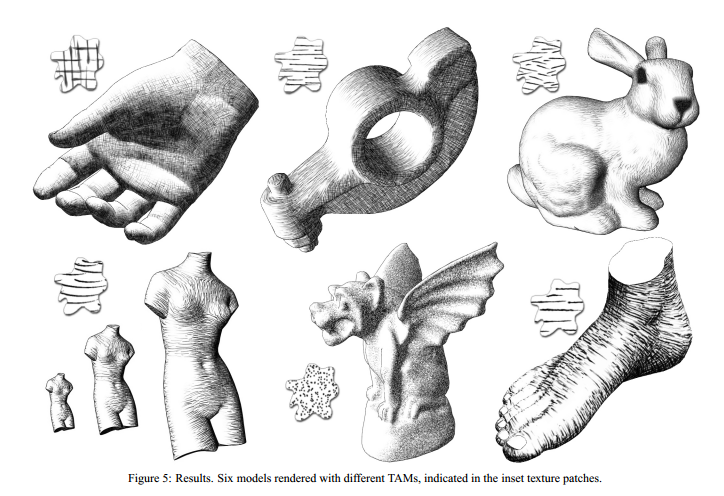
User avatar
ragstian
Posts: 1181
Joined: Thu Oct 11, 2012 2:44 am
Location: Stavanger-Norway

Re: hatch, crosshatch, rendering challenge

Postby ragstian » Wed Dec 24, 2014 11:05 am

Hi.

Wow, easy and complicated at the same time!
Have to try this asap!

Thanks a lot, really appreciated!
Merry Christmas to you and all of "Inkscapers!"

RGDS
Ragnar
Good Luck!
( ͡° ͜ʖ ͡°)
RGDS
Ragnar

Lazur
Posts: 4717
Joined: Tue Jun 14, 2016 10:38 am

Re: hatch, crosshatch, rendering challenge

Postby Lazur » Wed Dec 24, 2014 11:09 am

Merry Christmas!

User avatar
Espermaschine
Posts: 892
Joined: Thu Jun 05, 2014 9:10 pm

Re: hatch, crosshatch, rendering challenge

Postby Espermaschine » Wed Dec 24, 2014 2:01 pm

i tried it
its quite fiddly to clip five different hatches with five stacks of the trace
i ended up using five layers

took me a second round to realize its best to start with one basic hatch, and then duplicate and thicken the stroke-width increasingly

Image

User avatar
brynn
Posts: 10309
Joined: Wed Sep 26, 2007 4:34 pm
Location: western USA
Contact:

Re: hatch, crosshatch, rendering challenge

Postby brynn » Wed Dec 24, 2014 2:22 pm

Thanks Lazur!

Already downloaded, digging in, and trying to understand.

It looks like the short version is that the 5 paths from the autotrace are used to clip/mask the Stitch Sub-paths paths. But when I release the masks, it seems like a group was used to mask, and I don't know how that can happen. I thought only 1 path could be used to clip or mask. Or is it the other way around? Could the sub-paths path be used to clip the auto-traced group? That doesn't seem right either, though.

Oh wow -- you CAN use a group as a mask!

But why? Why not just clip 1 set of subpaths with 1 autotrace path? And do that with each of the 5 traces? Why use a group and mask?

Thanks :D

User avatar
Espermaschine
Posts: 892
Joined: Thu Jun 05, 2014 9:10 pm

Re: hatch, crosshatch, rendering challenge

Postby Espermaschine » Wed Dec 24, 2014 2:53 pm

Image

v1nce
Posts: 696
Joined: Wed Jan 13, 2010 4:36 am

Re: hatch, crosshatch, rendering challenge

Postby v1nce » Wed Dec 24, 2014 8:59 pm

Should we discard the image at the very end or not = should it be vector only ?

If not here's my contribution (using filter only, no trace or extension)

Image

Why can't we upload image to this thread ? (I had to hijack the initial thread to host my file)
This is weird for a show it off thread

EDIT: oops. Didn't see the monochromatic limitation. Will upload another verion

User avatar
brynn
Posts: 10309
Joined: Wed Sep 26, 2007 4:34 pm
Location: western USA
Contact:

Re: hatch, crosshatch, rendering challenge

Postby brynn » Thu Dec 25, 2014 8:40 am

As I've posted many, many times, over the years, only a few boards on this site allow attachments. I guess Lazur did call this a challenge, but like other drawing challenges/contests that we've posted (in this board called "Competitions" even though they aren't really competitions) you have to embed the image into your message (i.e. find your own host).

Lazur
Posts: 4717
Joined: Tue Jun 14, 2016 10:38 am

Re: hatch, crosshatch, rendering challenge

Postby Lazur » Thu Dec 25, 2014 9:00 am

brynn wrote:Thanks Lazur!

Already downloaded, digging in, and trying to understand.

It looks like the short version is that the 5 paths from the autotrace are used to clip/mask the Stitch Sub-paths paths. But when I release the masks, it seems like a group was used to mask, and I don't know how that can happen. I thought only 1 path could be used to clip or mask. Or is it the other way around? Could the sub-paths path be used to clip the auto-traced group? That doesn't seem right either, though.

Oh wow -- you CAN use a group as a mask!

But why? Why not just clip 1 set of subpaths with 1 autotrace path? And do that with each of the 5 traces? Why use a group and mask?

Thanks :D


The autotrace stacks each colour scan above eachother by default, thus it would take some combining to produce paths to be used for clipping.
Maybe there is an option I slipped over; thus it seemed the fastest solution.
Namely to use those group of paths for masking, after setting black and white fill colours inside.

Almost anything can be used for masking.
My previous workaround was to use the autotrace only at the final step.

That was something like using a raster extension to remove saturation of the raster image,
and grouping it with a rectangle atop covering it.
The rectangle had either a solid white or black fill, and the object's opacity was lowered in duplicants of the group to create tone variants of the original image.
Which all were used for masking the pre-drawn "texture" objects, just as with the previous method.
This way, when the masked objects are stacked upon eachother, the alpha values adds together, and the final auto-trace can make it look right.

Espermaschine wrote:i tried it
its quite fiddly to clip five different hatches with five stacks of the trace

That previous example image I made had 21 different stroke widths; yes, it can be repetitive and needs way too much resource to provide the effect this way.

For the general look, probably a steady hand, a tablet and the calligraphy tool with tracing the background option set is the best.

Espermaschine wrote:Image


Looks good! The only thing that I found a bit distracting is the moire pattern inside the wavy lines.


v1nce wrote:Should we discard the image at the very end or not = should it be vector only ?

If not here's my contribution (using filter only, no trace or extension)

Image

Why can't we upload image to this thread ? (I had to hijack the initial thread to host my file)
This is weird for a show it off thread

EDIT: oops. Didn't see the monochromatic limitation. Will upload another verion


It's not a vector only problem;
for that matter, with parallel lines, gimp can provide a good representation with it's distort newspaper filter on a greyscale image, with angles set to the same value for the channels.


Can't help the attachment setting though, but felt it was more appropriate to post it here.

No worry about attaching to the other topic where it emerged from, will put link in there for future times.

User avatar
Espermaschine
Posts: 892
Joined: Thu Jun 05, 2014 9:10 pm

Re: hatch, crosshatch, rendering challenge

Postby Espermaschine » Thu Dec 25, 2014 11:22 am

here is some inspiration from Drum & bass legend Goldie

Image


more:
http://www.goldie.co.uk/art/lostribes

Lazur
Posts: 4717
Joined: Tue Jun 14, 2016 10:38 am

Re: hatch, crosshatch, rendering challenge

Postby Lazur » Fri Dec 26, 2014 8:20 pm

Made this from 21 shades over that core svg (manual traced):

Image

https://openclipart.org/detail/210985/hatching-core-by-lazur-urh-210985


Image

https://openclipart.org/detail/211000/


It does have more contrast as the lightest shade of the photo is represented by "white" and the darkest colour by "black".
Probably it would take less time and effort if instead of auto-tracing, filters would be used on the raster image to generate the mask objects.

hulf2012
Posts: 716
Joined: Sat Nov 24, 2012 12:37 pm

Re: hatch, crosshatch, rendering challenge

Postby hulf2012 » Tue Dec 30, 2014 3:20 am

Hello

My drawing


I will try to attach the svg, but it very big i don know why. But it will be later

Greetings
If you have problems:
1.- Post a sample (or samples) of your file please.
2.- Please check here:
http://tavmjong.free.fr/INKSCAPE/MANUAL/html/index.html
3.- If you manage to solve your problem, please post here your solution.

Lazur
Posts: 4717
Joined: Tue Jun 14, 2016 10:38 am

Re: hatch, crosshatch, rendering challenge

Postby Lazur » Fri Jan 23, 2015 5:53 pm

Found this.

Lazur
Posts: 4717
Joined: Tue Jun 14, 2016 10:38 am

Re: hatch, crosshatch, rendering challenge

Postby Lazur » Sun Apr 24, 2016 11:39 am

Image

Made with this filter.
Info and updates here.

Lazur
Posts: 4717
Joined: Tue Jun 14, 2016 10:38 am

Re: hatch, crosshatch, rendering challenge

Postby Lazur » Sun Apr 24, 2016 10:57 pm

With another filter:

Image

This one uses image filter primitive and is applied on a raster image to produce look thus it's a no-go at ocal.


Also there are 6 tones generated upon that 1 image filter primitive, so it's a bit hard adjusting their tones every once the source for that is changed (using a rectangle with a hatch lpe).

Probably it is easier using separate image filter primitives for each tone level.

Lazur
Posts: 4717
Joined: Tue Jun 14, 2016 10:38 am

Re: hatch, crosshatch, rendering challenge

Postby Lazur » Wed Apr 27, 2016 1:53 am

Another hatch filter made from scratch:

Image

With ten image filter primitive this should be easy to use...

User avatar
Espermaschine
Posts: 892
Joined: Thu Jun 05, 2014 9:10 pm

Re: hatch, crosshatch, rendering challenge

Postby Espermaschine » Wed Apr 27, 2016 9:38 am

Lazur URH wrote:Another hatch filter made from scratch

When i open the file in IS, it looks very pixelated.

Lazur
Posts: 4717
Joined: Tue Jun 14, 2016 10:38 am

Re: hatch, crosshatch, rendering challenge

Postby Lazur » Wed Apr 27, 2016 10:47 am

Was sort of intetional. Could be fiddled with the bottom blur and component transfer settings but for practical use -printing- it doesn't really matter.

User avatar
Espermaschine
Posts: 892
Joined: Thu Jun 05, 2014 9:10 pm

Re: hatch, crosshatch, rendering challenge

Postby Espermaschine » Wed Apr 27, 2016 11:13 am

Im afraid i do not get what this is all about.

I noticed you posted some interesting "tones" (whatever that means) on openclipart.
https://openclipart.org/detail/247526/tones-2
https://openclipart.org/detail/247527/tones-3

Can you post them with some notes or explanations, please ?!

Lazur
Posts: 4717
Joined: Tue Jun 14, 2016 10:38 am

Re: hatch, crosshatch, rendering challenge

Postby Lazur » Wed Apr 27, 2016 9:02 pm

Espermaschine wrote:Im afraid i do not get what this is all about.


This is all about reproducing this method with filters.

That way you don't need bitmap tracing for every single tone at least -generating mask/clip objects.
If turbulence is used to generate parallel lines as in that example it takes even less work.


I noticed you posted some interesting "tones" (whatever that means) on openclipart.
Can you post them with some notes or explanations, please ?!


The idea of tone comes of a percent coverage in an area.
If a smooth fade is broken down to small steps, each area is having a flat fill with a coverage percent related to the distance between the start-end points of the gradient.
To cover these small steps, using an even height rectangle, just as if it was filled up with pen strokes.

In the original image these strokes were in even distance to eachother.
Smooth as it could be yet for practical reasons it doesn't work: the white rectangles would need to be lined up so you could use one stroke to go over alot of steps not just one.

The second image you linked does that. Each of the steps has another "stroke" added, yet "banding" is present. On a vertical scale it looks ok, if you scale it down vertically and repeat it one above it looks smother, but in a diagonal direction tones look "stepped" of fewer steps.

The third one was made with the align and distribute's panel random option, then aligned the strokes on the left edge and in right distances to each.

I would prefer a positioned dither effect not that totally random pattern.
Didn't come up with one working solution yet.

Lazur
Posts: 4717
Joined: Tue Jun 14, 2016 10:38 am

Re: hatch, crosshatch, rendering challenge

Postby Lazur » Tue Dec 06, 2016 4:21 am

Another, more streamlined filter:

Image

example in use
Image

Lazur
Posts: 4717
Joined: Tue Jun 14, 2016 10:38 am

Re: hatch, crosshatch, rendering challenge

Postby Lazur » Tue Dec 06, 2016 6:48 am

Concept could be extended to newspaper halftone effects.

Image


Return to “Competitions”