Attached is a vector diagram of a tree which I am trying to simplify by removing some of the branches. It originates as a photograph and cut out in GIMP and exported as an SVG file. I am having partial success by applying "Break path at selected nodes", "Join selected nodes" and "Delete segments between two non-endpoint nodes" and removing and re-applying the fill. The problem comes when I try to refill and strange, straight-edged shapes appear or areas which should be open also suddenly fill in.
I have tried Path, break apart" and "Combine" and have also looked at the manual, the archives and searched the web, but I cannot find any clear guidance on how to do this. I will consequently be extremely grateful for any advice on this problem please.
enzed
REMOVING PARTS OF A VECTOR DIAGRAM
REMOVING PARTS OF A VECTOR DIAGRAM
- Attachments
-
- Dead tree2 problem.svg
- (87.13 KiB) Downloaded 179 times
Re: REMOVING PARTS OF A VECTOR DIAGRAM
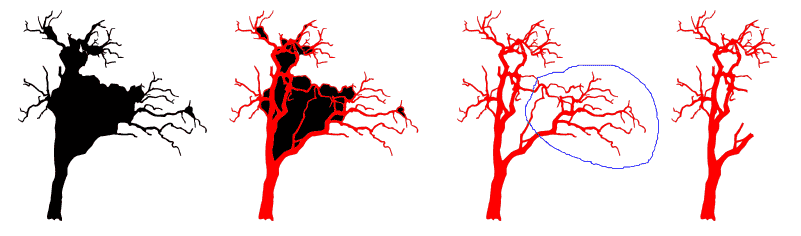
Maybe this quick and rough description helps a little...
1) Select the tree
2) Break it apart (Shift+Ctrl+K). You will get several objects
3) Hold Shift and click on the trunk (by this you will have selected everything except the trunk)
4) Combine this rest (Ctrl+K) (which is actually the air inbetween the branches)
5) While holding the Shift-Key select additionally the trunk again
6) Menubar | Path | Difference
Now you have only the tree as path (without the air inbetween)
7) Use the node tool (F2) and select the tree
8) Select the nodes of the branches you want to delete and press the Delete-Key
9) if you get some "strange" shapes between two remaining nodes, select them and "Make selected segment lines"
edit:
if branches have interconnects between themselves (kind of a loop) the simple deletion of nodes might result in new unwanted connections (probably that's what you are experiencing)
So probably, the simpler method to delete branches is
10) with freehand tool (F6) draw a closed line including the branches you want to delete (here in blue)
11) select this line and the tree
12) Menubar | Path | Difference
- DeadTree2.png (12.49 KiB) Viewed 2087 times
Win7/64, Inkscape 0.92.2
Re: REMOVING PARTS OF A VECTOR DIAGRAM
Hi theozh,
Thank you very much for your guidance, it is greatly appreciated. Quickly reading through the processes, it is very clear to me that these are very different steps to what I've been trying and I am consequently confident that I will be successful. And I guess that I can follow the same procedures to remove a much smaller part of the tree - one or two branches for example, and not a big part of it as you did in your demonstration?
Best wishes,
enzed
Re: REMOVING PARTS OF A VECTOR DIAGRAM
For my preference, it would be node editing all the way.
Click on a path segment between 2 nodes, to select them both
Do the same thing on the opposite side of the branch.
Click "Delete segment between 2 non-end nodes".
Path menu > Break Apart (will make the branch that you're removing into a separate object, so you can select and delete)
Delete the branch.
Repeat for all the branches you want to remove.
(Note: Instead of "Delete segment between 2 non-endnodes" you could also just select 1 node and use "Break path at selected nodes" button. It's just my habit to use the first way, because I can see for sure that I have the path broken where I want it. For me, it's tricky to deal with the 2 nodes which are staked on top of each other, on precisely the same spot, after the path is broken at one node. Of course, it works that way for me, because I usually work with stroked and unfilled paths. With filled paths, I don't see a benefit either way. But that's just me.)
Basics - Help menu > Tutorials
Manual - Inkscape: Guide to a Vector Drawing Program
Inkscape Community - Inkscape FAQ - Gallery
Inkscape for Cutting Design
Manual - Inkscape: Guide to a Vector Drawing Program
Inkscape Community - Inkscape FAQ - Gallery
Inkscape for Cutting Design
Re: REMOVING PARTS OF A VECTOR DIAGRAM
Thank you very much brynn, much appreciated. Your way is more familiar to me - what I've been trying to do, except that I have now realised that I was using the "Break apart" function incorrectly.
But I guess that theozh's method may be more appropriate under slightly different circumstances. I will try both ways and see which works best, but it is in any case good to have different tools to do the same job and under different situations.
Best wishes,
enzed
But I guess that theozh's method may be more appropriate under slightly different circumstances. I will try both ways and see which works best, but it is in any case good to have different tools to do the same job and under different situations.
Best wishes,
enzed
Re: REMOVING PARTS OF A VECTOR DIAGRAM
Either way works. In Inkscape, we often find that there are more than one way to reach a particular goal. In some cases, many ways. Most of the time it comes down to personal preference, as to which way you do something. If other people replied, you would see more ways!
Actually, I only just now read through all of theozh's steps. As far as I can tell, the first 6 steps can be boiled down to clicking this button in the Fill and Stroke dialog. Or even more simply, just remove the fill. It can be removed temporarily, and added back in the end. If it's still filling the "air between the branches" at that time, use that button I mentioned, and the air will return.
I much prefer to work on paths which have a stroke and no fill. That may be simplistic on my part, because it's like drawing with a pen or pencil. But it also avoids the fill rule issues which caused the air in your branches to be filled. The last thing I do when I'm drawing with Inkscape, is to add the color.
But as I said, everyone has their own favorite techniques and processes.
Actually, I only just now read through all of theozh's steps. As far as I can tell, the first 6 steps can be boiled down to clicking this button
in the Fill and Stroke dialog. Or even more simply, just remove the fill. It can be removed temporarily, and added back in the end. If it's still filling the "air between the branches" at that time, use that button I mentioned, and the air will return. I much prefer to work on paths which have a stroke and no fill. That may be simplistic on my part, because it's like drawing with a pen or pencil. But it also avoids the fill rule issues which caused the air in your branches to be filled. The last thing I do when I'm drawing with Inkscape, is to add the color.
But as I said, everyone has their own favorite techniques and processes.
Basics - Help menu > Tutorials
Manual - Inkscape: Guide to a Vector Drawing Program
Inkscape Community - Inkscape FAQ - Gallery
Inkscape for Cutting Design
Manual - Inkscape: Guide to a Vector Drawing Program
Inkscape Community - Inkscape FAQ - Gallery
Inkscape for Cutting Design
Re: REMOVING PARTS OF A VECTOR DIAGRAM
brynn wrote:... As far as I can tell, the first 6 steps can be boiled down to clicking this button
yes, much easier!
Win7/64, Inkscape 0.92.2
Re: REMOVING PARTS OF A VECTOR DIAGRAM
Thanks again theozh and brynn; your advice has been really useful. enzed