Hi,
I made an Etch-A-Sketch CNC and I want to try to draw some complicated images. Now all of you know how the etch-a-sketch works, there is no way to lift the spindle... so at the end the drawing has lots of lines, all the same width. So for a solution, I was thinking to make multiple runs on the edges. How do I do that? Where/how do I specify that the edges need to be redone, maybe with a line next to the prev. line?
Also, let's say I have an area where it needs to be blacked out, so I will need the "spindle" to fill in by making multiple lines (like engraving?)... how do I do that?
Thanks.
Multiple edge runs; Edit: and staying inside area
Multiple edge runs; Edit: and staying inside area
Last edited by ioan on Fri Mar 04, 2016 10:37 am, edited 1 time in total.
Re: Multiple edge runs
So your CNC basically can only draw along a single, long, self-intersecting, self-overwriting path, right?
You can connect all paths you have in your drawing.
Make them run along each other back and forth as often as you need (you can duplicate the paths, then connect them all in the correct order, to get identical 'traces' each time).
For creating the 'spindle', I would take a look into the hatching LPE (Path -> Path effects), and after creation, convert it to path, then connect with the rest.
(So in short: you will probably need to draw all lines your machine is supposed to trace, be it once, or more times, and connect them in the correct order using the node tool)
Something doesn't work? - Keeping an eye on the status bar can save you a lot of time!
Inkscape FAQ - Learning Resources - Website with tutorials (German and English)
Inkscape FAQ - Learning Resources - Website with tutorials (German and English)
Re: Multiple edge runs
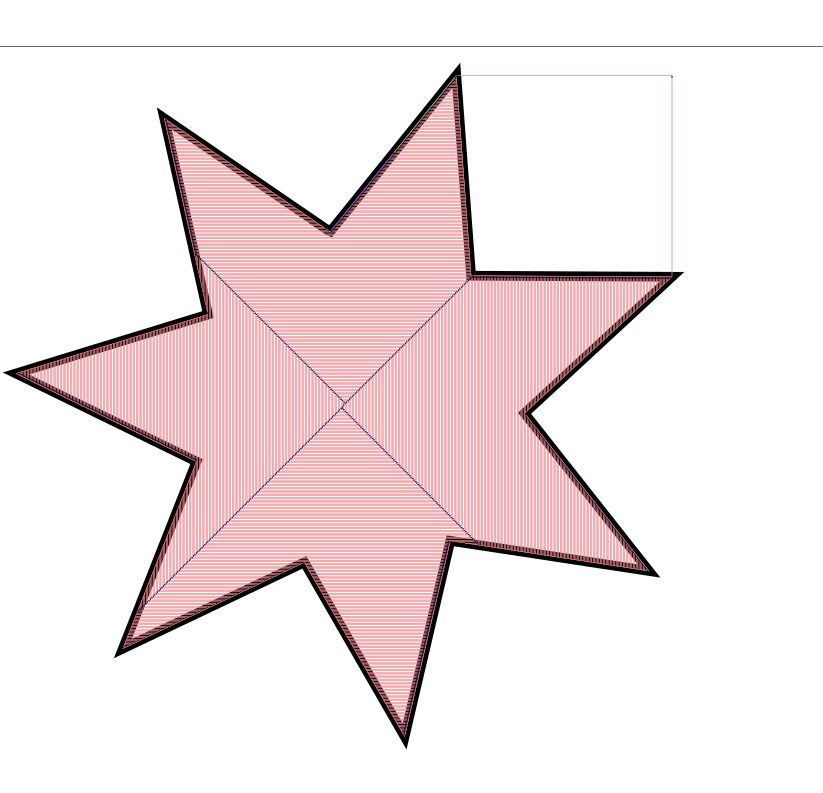
Thanks Moini. I have another question, can I force the the spindle to stay inside an area? For example if I have a star that needs to be "filled" with paths, I don't want the cutting head to move from star arm to star arm on the outside of the star... (I don't know the terminology very well, I hope I was clear enough).
Here is an example:
This is how I want it to look like:
and this is how it actually looks like (because the etch-a-sketch shows all the movements):
Here is an example:
This is how I want it to look like:
- Clipboard01.jpg (55.62 KiB) Viewed 5411 times
and this is how it actually looks like (because the etch-a-sketch shows all the movements):
- Clipboard02.jpg (101.4 KiB) Viewed 5411 times
Re: Multiple edge runs; Edit: and staying inside area
You could try something like this, maybe (never did any CNC stuff, so please treat this as just an idea):
If you use the hatching LPE for this, you'd have to create the star from several (8?) objects that each have the effect applied. Later, connect the hatches to each other.
Not sure if the last outline turn I drew is needed - just an idea, as I said.

- Bildschirmfoto_2016-03-04_01-53-11.png (75.13 KiB) Viewed 5400 times
If you use the hatching LPE for this, you'd have to create the star from several (8?) objects that each have the effect applied. Later, connect the hatches to each other.
Not sure if the last outline turn I drew is needed - just an idea, as I said.
Something doesn't work? - Keeping an eye on the status bar can save you a lot of time!
Inkscape FAQ - Learning Resources - Website with tutorials (German and English)
Inkscape FAQ - Learning Resources - Website with tutorials (German and English)
Re: Multiple edge runs; Edit: and staying inside area
Another idea:

Re: Multiple edge runs; Edit: and staying inside area
I don't quite understand the issues. ioan, do you mean that you built your own CNC machine, and then you configured it to cut like the old Etch-a-Sketch would "draw"? Or do you mean that you want to draw an image in Inkscape, that looks like it was made with an Etch-a-Sketch, and then cut it using a regular CNC machine?
Basics - Help menu > Tutorials
Manual - Inkscape: Guide to a Vector Drawing Program
Inkscape Community - Inkscape FAQ - Gallery
Inkscape for Cutting Design
Manual - Inkscape: Guide to a Vector Drawing Program
Inkscape Community - Inkscape FAQ - Gallery
Inkscape for Cutting Design
Re: Multiple edge runs; Edit: and staying inside area
I built my own Etch-A-Sketch CNC: https://youtu.be/XtWJJ5csk-8
Re: Multiple edge runs; Edit: and staying inside area
Oh wow, that's awesome!!
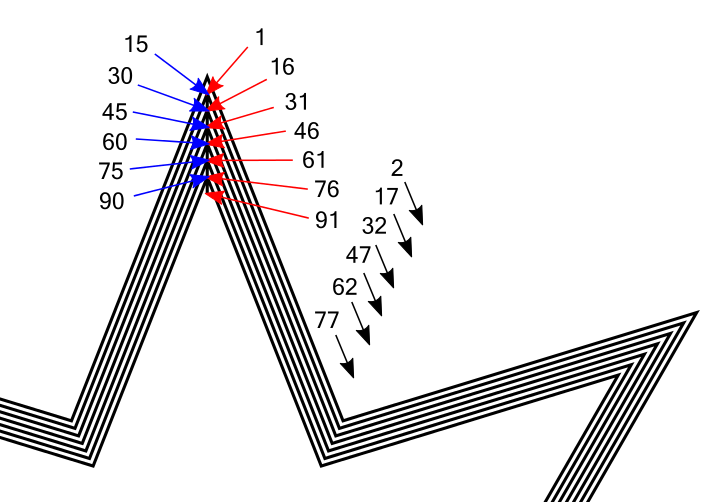
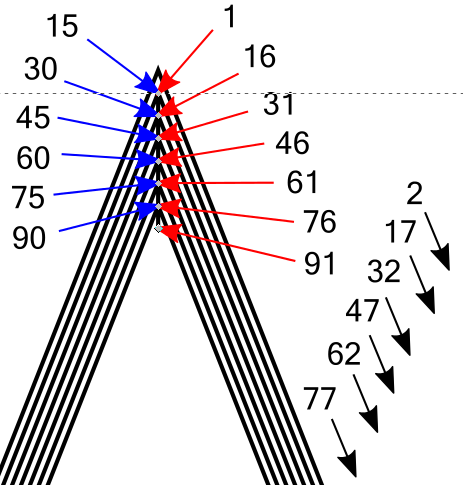
Ok, what about this kind of routine? It's a little hard to display in a screenshot. But I tried with this 7 corner star. The numbers indicate the nodes. I didn't number the nodes all the way around the star, in the screenshot, so you have to more or less imagine it.
start relatively off topic
Or if you've ever lived in a house with a yard, where you had to mow the grass every week in the summer? Or maybe as a teenager, you've had a job mowing grass in the summer. There are 2 general ways to go about mowing the grass:
1 - Start in 1 corner, and mow over to one of the next corners. Turn around, move over by the width of the mower, and go back in the opposite direction. Then keep going back and forth until you get to the other side of the yard. (This is similar to Moini's suggestion, except you don't do the whole star at once -- only 1 point or spike at a time.)
2 - Start in 1 corner and mow to one of the next corners. Which corner you go to depends on which side of the mower the clippings are thrown from. So you make sure that the clippings are thrown towards the middle of the yard, and you mow all the way around the perimeter. When you get back where you started, move the mower inward by the width of the mower, and go around again. With every pass around the yard, the clippings that were thrown out from the last pass are chopped up smaller and smaller. I guess the theory is that the clippings are eventually chopped into tiny enough pieces, which makes it easier for them to decompose. (Another benefit is that the decomposing clippings sort of self-fertilizes the grass.) The larger clippings which come from the first pass (if you threw the clippings outward) can lay in heavy clumps on the grasss, and kill out patches of grass.
So the 2nd mowing pattern is what I suggest for the Etch-a-Sketch. Around and around.
end relatively off topic

 OH! I think this may be what Lazur suggested. At first I saw those tiny curves, and I thought, well the Etch-a-Sketch can't draw curves very well. (Although with the CNC control, maybe it's not as hard as is it with your fingers..)
But I think the curves might sort of be representing directional arrows. I apologize if I've duplicated yours, Lazur.
Or duh! Could this be what you meant by "edge runs"??
In the video, you have some way of drawing on an image of the EaS with your mouse. Where does Inkscape come in? Can you just connect Inkscape to the CNC in the same way you connected the EaS/mouse image?
Ok, what about this kind of routine? It's a little hard to display in a screenshot. But I tried with this 7 corner star. The numbers indicate the nodes. I didn't number the nodes all the way around the star, in the screenshot, so you have to more or less imagine it.
- etcha1.png (70.34 KiB) Viewed 5348 times
- etcha2.png (56.25 KiB) Viewed 5348 times
start relatively off topic
Or if you've ever lived in a house with a yard, where you had to mow the grass every week in the summer? Or maybe as a teenager, you've had a job mowing grass in the summer. There are 2 general ways to go about mowing the grass:
1 - Start in 1 corner, and mow over to one of the next corners. Turn around, move over by the width of the mower, and go back in the opposite direction. Then keep going back and forth until you get to the other side of the yard. (This is similar to Moini's suggestion, except you don't do the whole star at once -- only 1 point or spike at a time.)
2 - Start in 1 corner and mow to one of the next corners. Which corner you go to depends on which side of the mower the clippings are thrown from. So you make sure that the clippings are thrown towards the middle of the yard, and you mow all the way around the perimeter. When you get back where you started, move the mower inward by the width of the mower, and go around again. With every pass around the yard, the clippings that were thrown out from the last pass are chopped up smaller and smaller. I guess the theory is that the clippings are eventually chopped into tiny enough pieces, which makes it easier for them to decompose. (Another benefit is that the decomposing clippings sort of self-fertilizes the grass.) The larger clippings which come from the first pass (if you threw the clippings outward) can lay in heavy clumps on the grasss, and kill out patches of grass.
So the 2nd mowing pattern is what I suggest for the Etch-a-Sketch. Around and around.
end relatively off topic
OH! I think this may be what Lazur suggested. At first I saw those tiny curves, and I thought, well the Etch-a-Sketch can't draw curves very well. (Although with the CNC control, maybe it's not as hard as is it with your fingers..)But I think the curves might sort of be representing directional arrows. I apologize if I've duplicated yours, Lazur.
Or duh! Could this be what you meant by "edge runs"??
In the video, you have some way of drawing on an image of the EaS with your mouse. Where does Inkscape come in? Can you just connect Inkscape to the CNC in the same way you connected the EaS/mouse image?
Basics - Help menu > Tutorials
Manual - Inkscape: Guide to a Vector Drawing Program
Inkscape Community - Inkscape FAQ - Gallery
Inkscape for Cutting Design
Manual - Inkscape: Guide to a Vector Drawing Program
Inkscape Community - Inkscape FAQ - Gallery
Inkscape for Cutting Design
Re: Multiple edge runs; Edit: and staying inside area
Hi brynn,
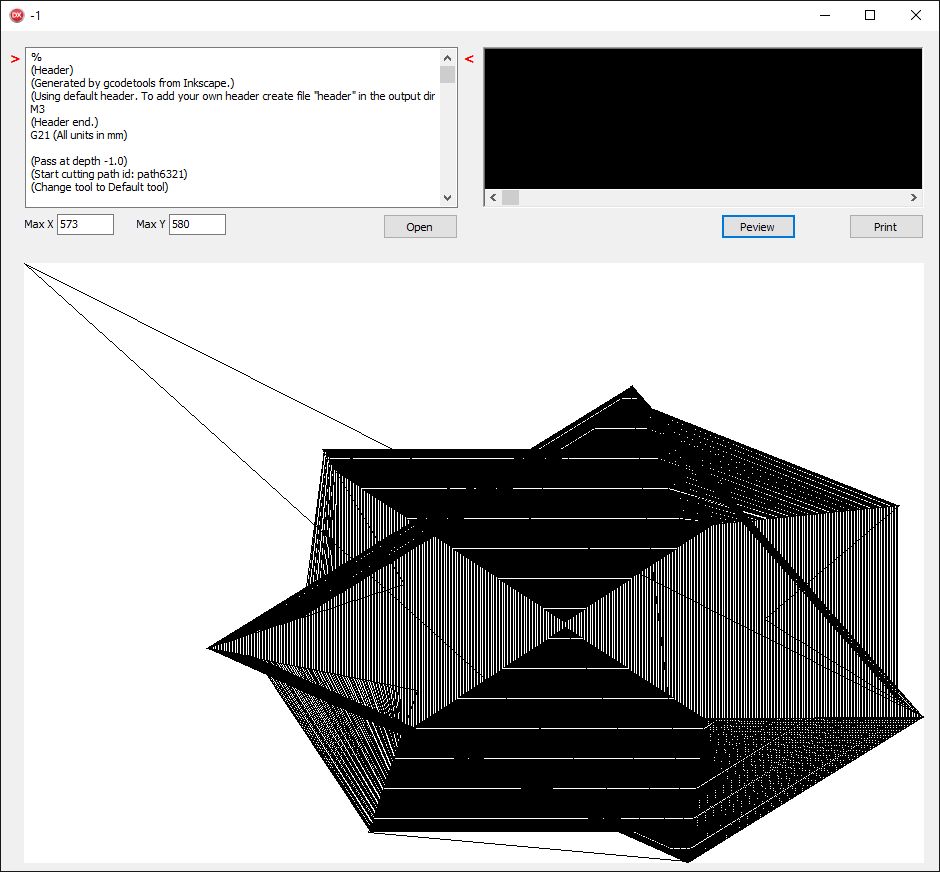
Thanks for the long detailed post. The problem I have is that I don't know how to do this is inkscape. I agree with you, the paths should be just like when you mow and go closer to the center with each row, but... how do I do that in inkscape? I want to get a picture or shape, fill it with lines (like when you mow) and then transfer it to the Etch-A-Sketch. Sounds easy enough, but the inkscape part is the hard part. I figured out how to fill an area, but then when I create the G-code for the CNC (the etch-a-sketch acts exactly like a cnc), the lines go outside of the area, just like I showed in my previous post.
To answer your question, yes, in the video I showed a small application I built that you can use the mouse to draw and then send the drawing to the etch-a-sketch. I also built another application that takes any g-code and sends it to the etch-a-sketch. That's what I'm using to get the images from inkscape to the etch-a-sketch.
Here is the application that sends the g-code. The image at the bottom it's the preview of the g-code. You can see, that my stars are messed up because inkscape puts lines between the arms of the star. On a real CNC this is not a problem, the spindle is lifted, moved to the other arm, lowered and then starts cutting again. I can't lift the drawing needle, so those extra lines appear:
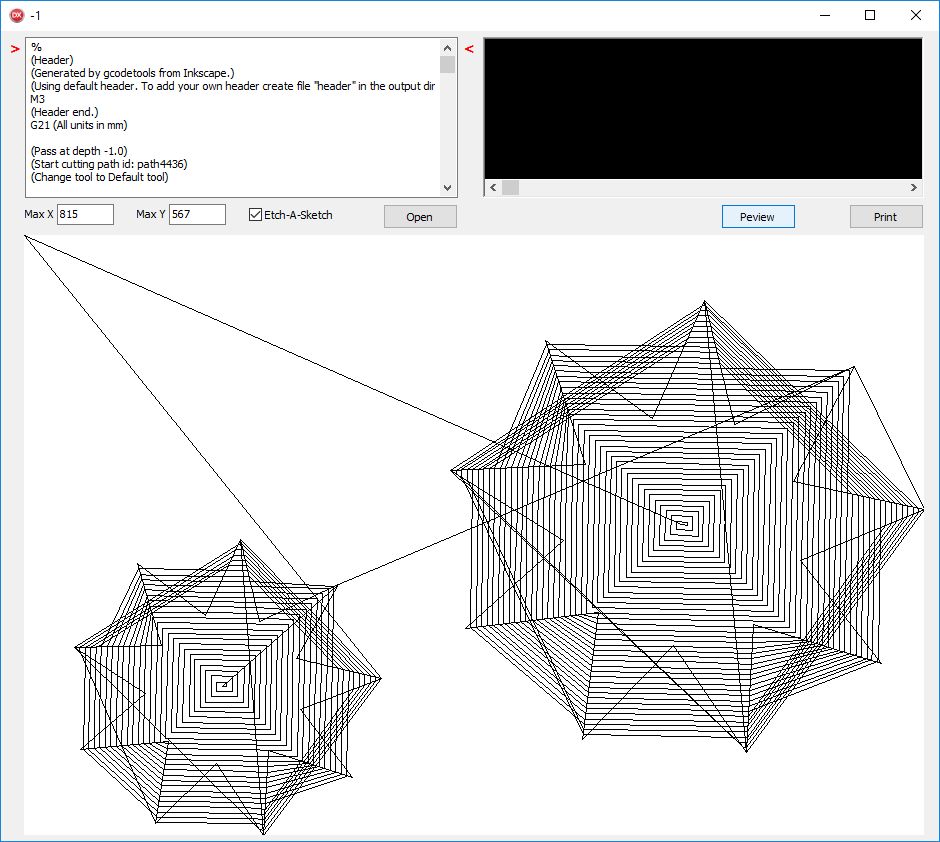
- Clipboard01.jpg (137.37 KiB) Viewed 5316 times
Last edited by ioan on Sat Mar 05, 2016 4:19 pm, edited 1 time in total.
Re: Multiple edge runs; Edit: and staying inside area
I just tried Moini's hatching LPE advice and it seems that is doing exactly what I need. I'll test some more and report back.
Re: Multiple edge runs; Edit: and staying inside area
ioan]The problem I have is that I don't know how to do this is inkscape.[/quote]
[quote="ioan wrote:I just tried Moini's hatching LPE advice and it seems that is doing exactly what I need. I'll test some more and report back.
Ok. I was just about to tell you how I made the "around and around" lawn mower path. I don't think the Hatch LPE will do that. But if you still want to know how, let me know and I'll write it up.
Basics - Help menu > Tutorials
Manual - Inkscape: Guide to a Vector Drawing Program
Inkscape Community - Inkscape FAQ - Gallery
Inkscape for Cutting Design
Manual - Inkscape: Guide to a Vector Drawing Program
Inkscape Community - Inkscape FAQ - Gallery
Inkscape for Cutting Design
Re: Multiple edge runs; Edit: and staying inside area
Hi Brynn,
Yes please! I want to know how you did that path. The Hatch LPE works fine for doodle like drawings, but for nice uniform fill of an area, doesn't work well.
Yes please! I want to know how you did that path. The Hatch LPE works fine for doodle like drawings, but for nice uniform fill of an area, doesn't work well.
Re: Multiple edge runs; Edit: and staying inside area
brynn wrote:But I think the curves might sort of be representing directional arrows.
That is a linked SVG from ocal.
Anyone could check it.
No curves, no arrows.
Dashed lines of the same thing.
Interpolate subpaths lpe and manual node editing in the making.
Re: Multiple edge runs; Edit: and staying inside area
ioan wrote:The Hatch LPE works fine for doodle like drawings
Hatches (rough) lpe can look uniform but does not produce one single line you are after for the etch a sketch.
Re: Multiple edge runs; Edit: and staying inside area
With rough hatch.

Re: Multiple edge runs; Edit: and staying inside area
Leaving this at here as well...:

Re: Multiple edge runs; Edit: and staying inside area
Lazur URH wrote:Leaving this at here as well...:
Can you please give me a short tutorial on how you did those paths?
Re: Multiple edge runs; Edit: and staying inside area
I'm writing up steps for how I made my example, just so you know. But it will take a few minutes.
Basics - Help menu > Tutorials
Manual - Inkscape: Guide to a Vector Drawing Program
Inkscape Community - Inkscape FAQ - Gallery
Inkscape for Cutting Design
Manual - Inkscape: Guide to a Vector Drawing Program
Inkscape Community - Inkscape FAQ - Gallery
Inkscape for Cutting Design
-
Espermaschine

- Posts: 892
- Joined: Thu Jun 05, 2014 9:10 pm
Re: Multiple edge runs; Edit: and staying inside area
Lazur URH wrote:Leaving this at here as well...:
This is beautiful !
Probably utilizing some lazur space tek again
Re: Multiple edge runs; Edit: and staying inside area
Using my star as an example.
1 - Draw the first star.
2 - Object menu > Object to Path
3 - Duplicate
4 - Path menu > Inset
By default, each inset "step" moves the path by 2 pixels. So if you want the "rows" some different distance apart, there are a couple of ways to approach it. You can change the default step in Inkscape Preferences > Behavior > Steps. Or you can use Path menu > Dynamic Offset. This allows you to "manually" drag the offset and stop wherever you want it to be. But you can use the XML Editor to set it a specific distance. With the Dynamic Offset path selected, Edit menu > XML Editor. In the top-right panel, click on "inkscape:radius". Then in the bottom-right section, set the value to whatever you want the distance to be. If you use Dynamic Offset, then after you set the specific distance you want, you'll need to do Object menu > Object to Path again.
Unfortunately, there's a problem with all the path offsets where they tend to round off corners. In my star example, I had to fix only 1 of the 14 corners of the star. I used Guides to set the nodes properly, and I had to delete an extra node that had been added by the inset. I can show you details about how to do that, for a star. But since you're talking about any random kind of shape, it might not be very helpful. But in any case, if you need help with any specific shape, just ask, and we can explain how.
Ok, so continuing on, repeat #3 and #4 until the whole object is full. Instead of fixing the rounding issue for each inset, I made all the insets first, and then fixed all the rounding issues afterwards. (just my preference there -- I don't see any benefit either way)
After the object is full of inset lines, and after fixing all the round corners, it's time for some node editing. Since I decided to make the place where the switch from one inset to the next happens, at the top of the star, it's the top nodes that need to be edited.
1 - With Selection tool enabled, do Ctrl + a (selects all the paths...actually selects everything on the canvas, so if there are other objects, you can use the so-called rubberband selection, or iow, drag a selection box around the whole thing).
2 - Switch to the Node tool, and you will see the nodes displayed.
3 - Drag a selection box aroun all the nodes at the top. (all those selected nodes will be larger and blue, assuming you have a white or transparent background)
4 - If you want the outer path to remain whole, l like I did, hold the Shift key while you click the top node of the outer path (deselects only that node, leaving all the others still selected)
5 - Click "Break paths at selected nodes" button on the Node tool control bar (looks like )
)
6 - Deselect everything (click any open area of canvas)
Now this is very detailed work with the node editing. I've been trying to think of a better way, but so far, I haven't come up with any. Zoom in until the entire canvas is filled with those top nodes, like in my screenshots.
Where those nodes were broken, instead of a single node, now there are 2 nodes (of course) which both lie precisely on the same spot. Now we no longer have a series of closed paths. Now they are open paths with 2 end nodes. In this case, the top nodes are the end nodes on the right end of the path (if the path were extended to become a straight line). And the bottom nodes are the end nodes on the left end.
1 - Grab the top node of the outer inset path, and drag it out of the way (but not offscreen).
2 - Click the remaining (formerly bottom) node.
3 - Hold Shift key while you click the top node of the next path (2 nodes are now selected)
4 - Click "Join selected nodes with a new segment" button on the Node tool control bar (looks like ) (you should see those paths are now connected with a new segment between the nodes)
5 - Set up snapping like the attached screenshot
6 - Snap the first node that you dragged away in the first step, back to where it was originally (sharing precisely the same spot as the other node)
7 - Repeat steps #1 through #6 except that from here, instead of dragging 1 node out of the way, as in step #1, you'll be clicking on the new segment created in #4 (to select both nodes) and dragging 2 nodes out of the way (and then later, snapping them back into place).
I know that sounds a little confusing. This is one of those rare instances where I wish I knew how to make a video. I do have a program that will make "animated" GIFs, so after I post this, I'll try that. Maybe it will help.
Please feel free to ask questions if you don't understand something. It's possible I missed a step in this very complicated process, or just a typo. And I sincerely hope someone can think of an easier way to do this!
1 - Draw the first star.
2 - Object menu > Object to Path
3 - Duplicate
4 - Path menu > Inset
By default, each inset "step" moves the path by 2 pixels. So if you want the "rows" some different distance apart, there are a couple of ways to approach it. You can change the default step in Inkscape Preferences > Behavior > Steps. Or you can use Path menu > Dynamic Offset. This allows you to "manually" drag the offset and stop wherever you want it to be. But you can use the XML Editor to set it a specific distance. With the Dynamic Offset path selected, Edit menu > XML Editor. In the top-right panel, click on "inkscape:radius". Then in the bottom-right section, set the value to whatever you want the distance to be. If you use Dynamic Offset, then after you set the specific distance you want, you'll need to do Object menu > Object to Path again.
Unfortunately, there's a problem with all the path offsets where they tend to round off corners. In my star example, I had to fix only 1 of the 14 corners of the star. I used Guides to set the nodes properly, and I had to delete an extra node that had been added by the inset. I can show you details about how to do that, for a star. But since you're talking about any random kind of shape, it might not be very helpful. But in any case, if you need help with any specific shape, just ask, and we can explain how.
Ok, so continuing on, repeat #3 and #4 until the whole object is full. Instead of fixing the rounding issue for each inset, I made all the insets first, and then fixed all the rounding issues afterwards. (just my preference there -- I don't see any benefit either way)
After the object is full of inset lines, and after fixing all the round corners, it's time for some node editing. Since I decided to make the place where the switch from one inset to the next happens, at the top of the star, it's the top nodes that need to be edited.
1 - With Selection tool enabled, do Ctrl + a (selects all the paths...actually selects everything on the canvas, so if there are other objects, you can use the so-called rubberband selection, or iow, drag a selection box around the whole thing).
2 - Switch to the Node tool, and you will see the nodes displayed.
3 - Drag a selection box aroun all the nodes at the top. (all those selected nodes will be larger and blue, assuming you have a white or transparent background)
4 - If you want the outer path to remain whole, l like I did, hold the Shift key while you click the top node of the outer path (deselects only that node, leaving all the others still selected)
5 - Click "Break paths at selected nodes" button on the Node tool control bar (looks like
)6 - Deselect everything (click any open area of canvas)
Now this is very detailed work with the node editing. I've been trying to think of a better way, but so far, I haven't come up with any. Zoom in until the entire canvas is filled with those top nodes, like in my screenshots.
Where those nodes were broken, instead of a single node, now there are 2 nodes (of course) which both lie precisely on the same spot. Now we no longer have a series of closed paths. Now they are open paths with 2 end nodes. In this case, the top nodes are the end nodes on the right end of the path (if the path were extended to become a straight line). And the bottom nodes are the end nodes on the left end.
1 - Grab the top node of the outer inset path, and drag it out of the way (but not offscreen).
2 - Click the remaining (formerly bottom) node.
3 - Hold Shift key while you click the top node of the next path (2 nodes are now selected)
4 - Click "Join selected nodes with a new segment" button on the Node tool control bar (looks like
) (you should see those paths are now connected with a new segment between the nodes)5 - Set up snapping like the attached screenshot
6 - Snap the first node that you dragged away in the first step, back to where it was originally (sharing precisely the same spot as the other node)
7 - Repeat steps #1 through #6 except that from here, instead of dragging 1 node out of the way, as in step #1, you'll be clicking on the new segment created in #4 (to select both nodes) and dragging 2 nodes out of the way (and then later, snapping them back into place).
I know that sounds a little confusing. This is one of those rare instances where I wish I knew how to make a video. I do have a program that will make "animated" GIFs, so after I post this, I'll try that. Maybe it will help.
Please feel free to ask questions if you don't understand something. It's possible I missed a step in this very complicated process, or just a typo. And I sincerely hope someone can think of an easier way to do this!
- Attachments
-

- snap4.png (4.83 KiB) Viewed 5206 times
Basics - Help menu > Tutorials
Manual - Inkscape: Guide to a Vector Drawing Program
Inkscape Community - Inkscape FAQ - Gallery
Inkscape for Cutting Design
Manual - Inkscape: Guide to a Vector Drawing Program
Inkscape Community - Inkscape FAQ - Gallery
Inkscape for Cutting Design
Re: Multiple edge runs; Edit: and staying inside area
Lazur URH wrote:brynn wrote:But I think the curves might sort of be representing directional arrows.
That is a linked SVG from ocal.
Anyone could check it.
No curves, no arrows.
Dashed lines of the same thing.
Interpolate subpaths lpe and manual node editing in the making.
Well ok, but the Etch-a-Sketch can't pick up it's "pen" to make dashes.
Edit
Here's what Lazur's last one looks like without any fill color (Etch-a-Sketch can't fill).
(too big to attach -- trying zipped...rats, no luck) Ok here:
http://inkscapecommunity.com/jd/ss/star7.png
Basics - Help menu > Tutorials
Manual - Inkscape: Guide to a Vector Drawing Program
Inkscape Community - Inkscape FAQ - Gallery
Inkscape for Cutting Design
Manual - Inkscape: Guide to a Vector Drawing Program
Inkscape Community - Inkscape FAQ - Gallery
Inkscape for Cutting Design