Work In Progress

Post unfinished work here for feedback and advise.
User avatar
ragstian
Posts: 1181
Joined: Thu Oct 11, 2012 2:44 am
Location: Stavanger-Norway

Work In Progress

Postby ragstian » Thu Oct 11, 2012 2:53 am

Hi.

Currently working on a "photorealistic" image.
Still at the beginner level with Inkscape.

Need to "tweak" the "lighted" buttons where the white "leaks" onto frontplate;
Handle not very realistic.
Bevel around screen needs more work.
Image

RGDS Ragnar
Last edited by ragstian on Mon Feb 24, 2014 2:19 am, edited 4 times in total.

User avatar
brynn
Posts: 10309
Joined: Wed Sep 26, 2007 4:34 pm
Location: western USA
Contact:

Re: Work In Progress

Postby brynn » Fri Oct 12, 2012 11:17 am

Image
Welcome to InkscapeForum!

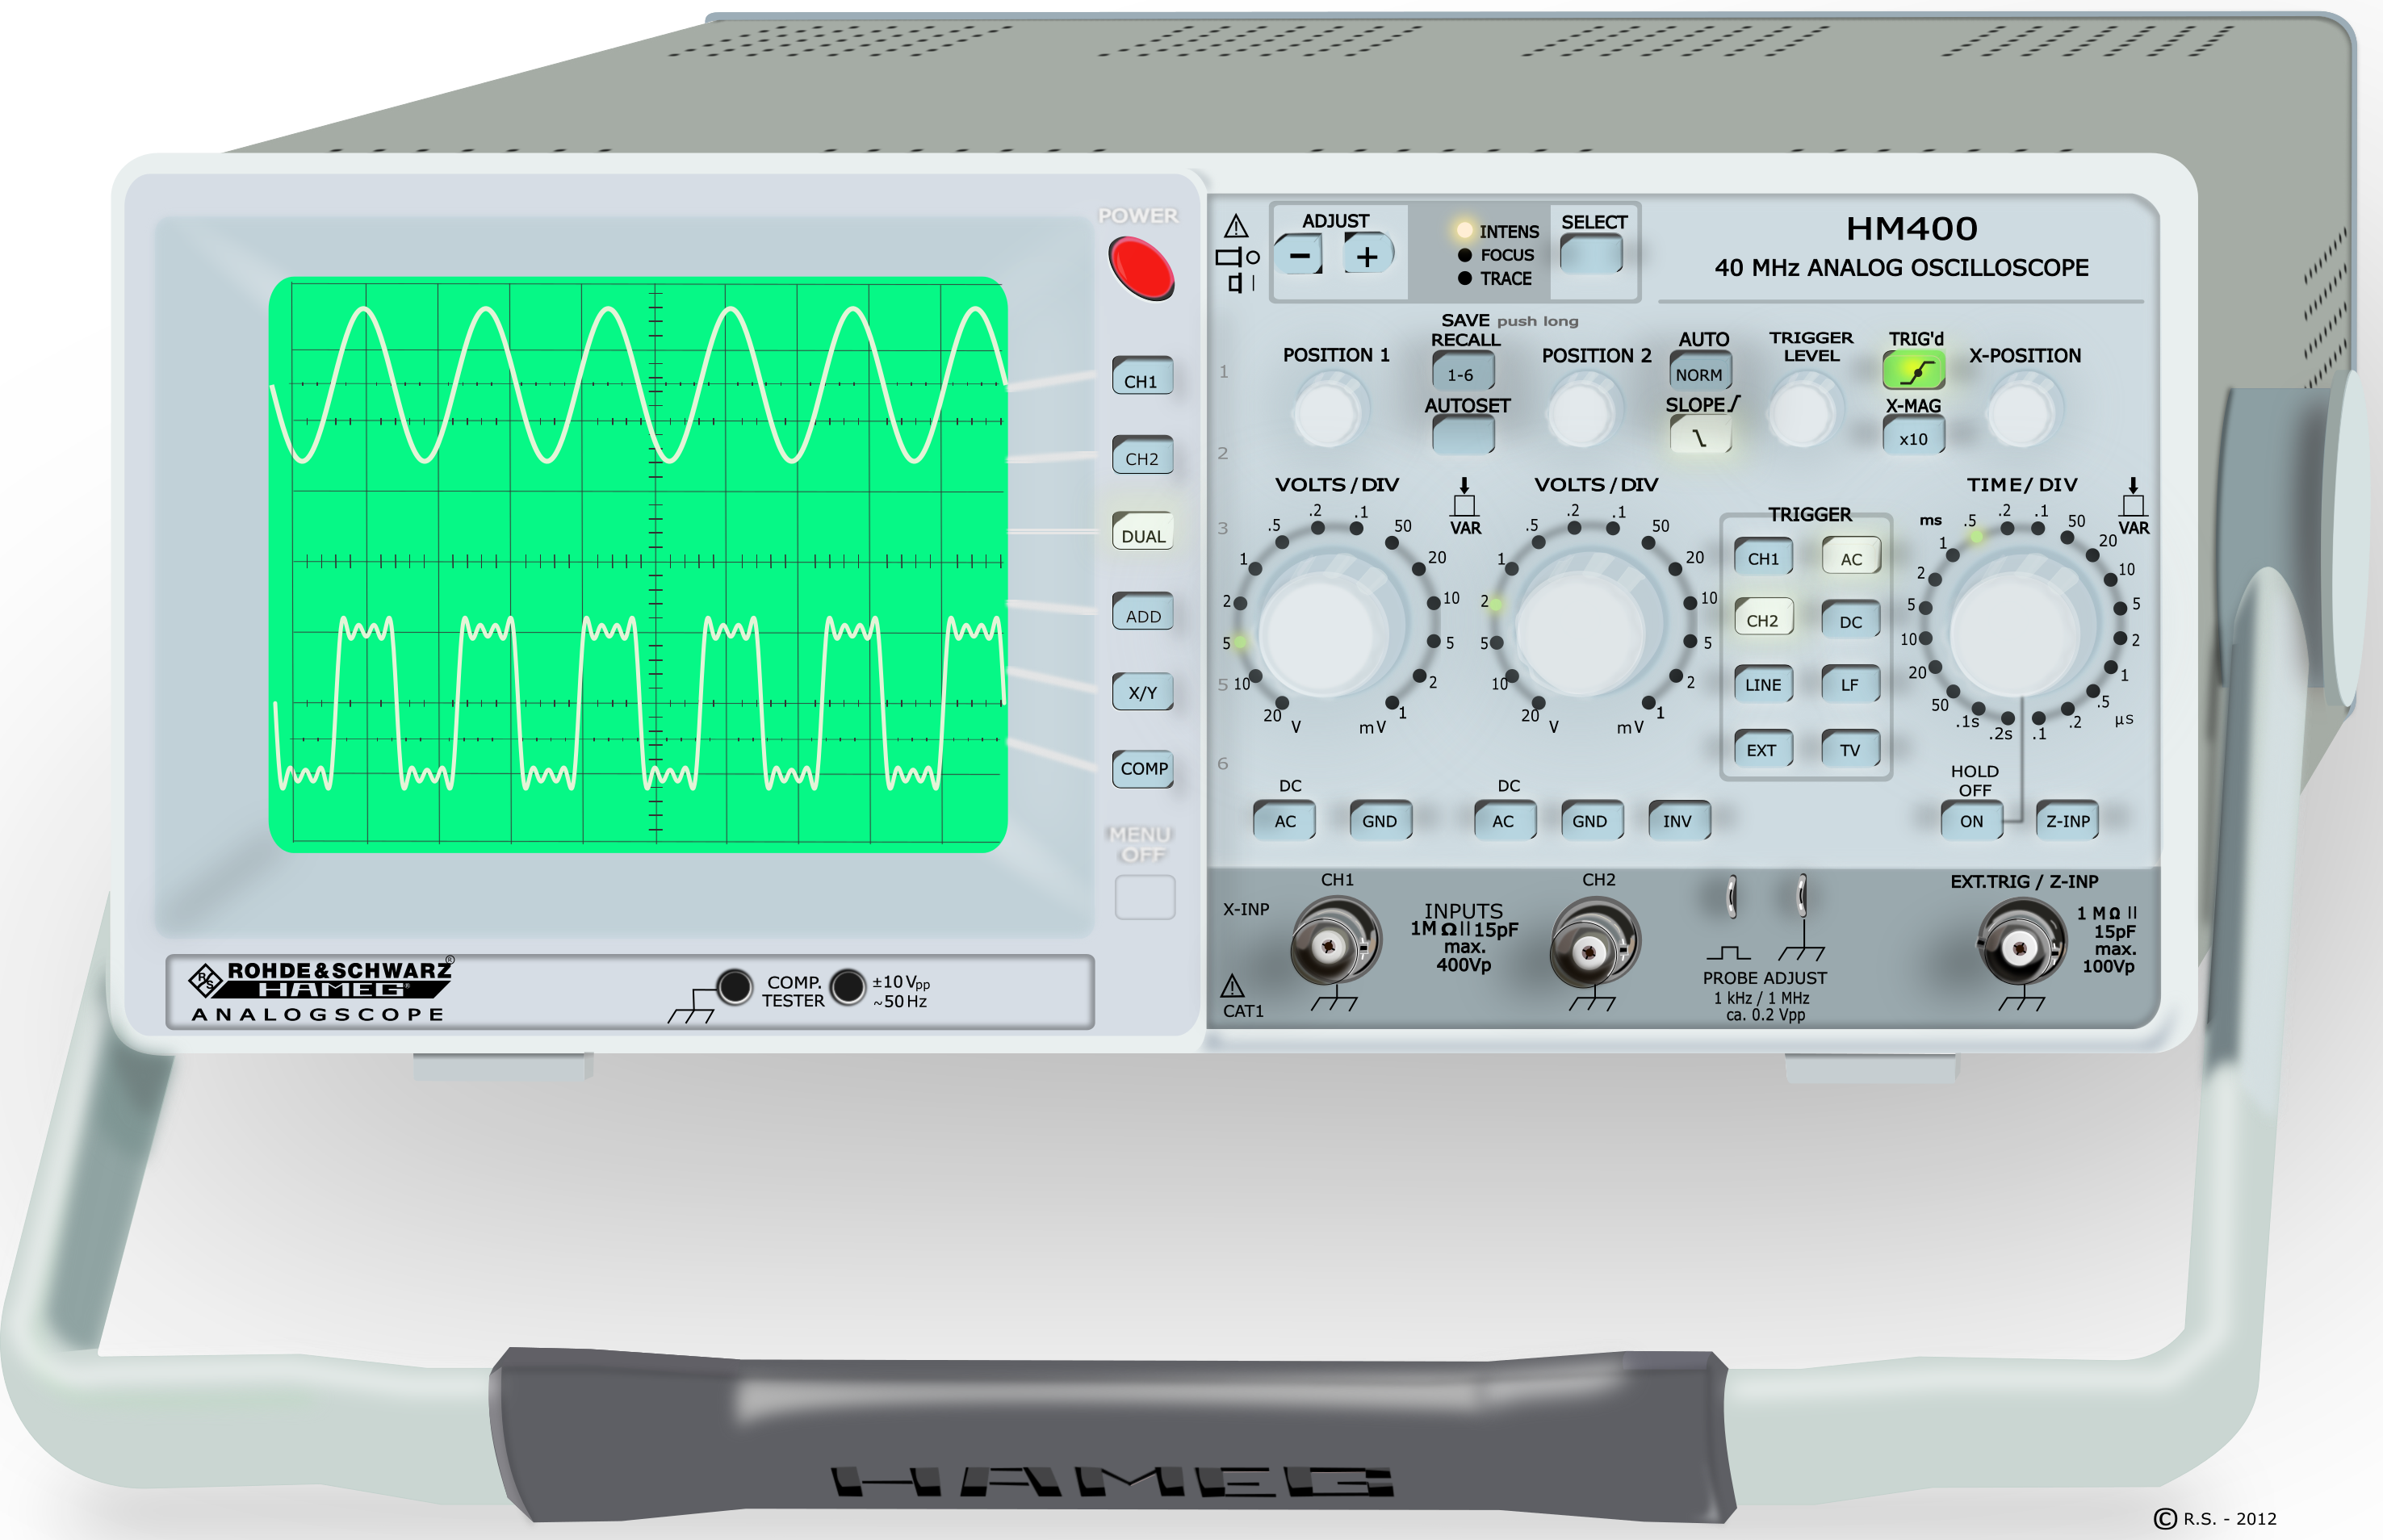
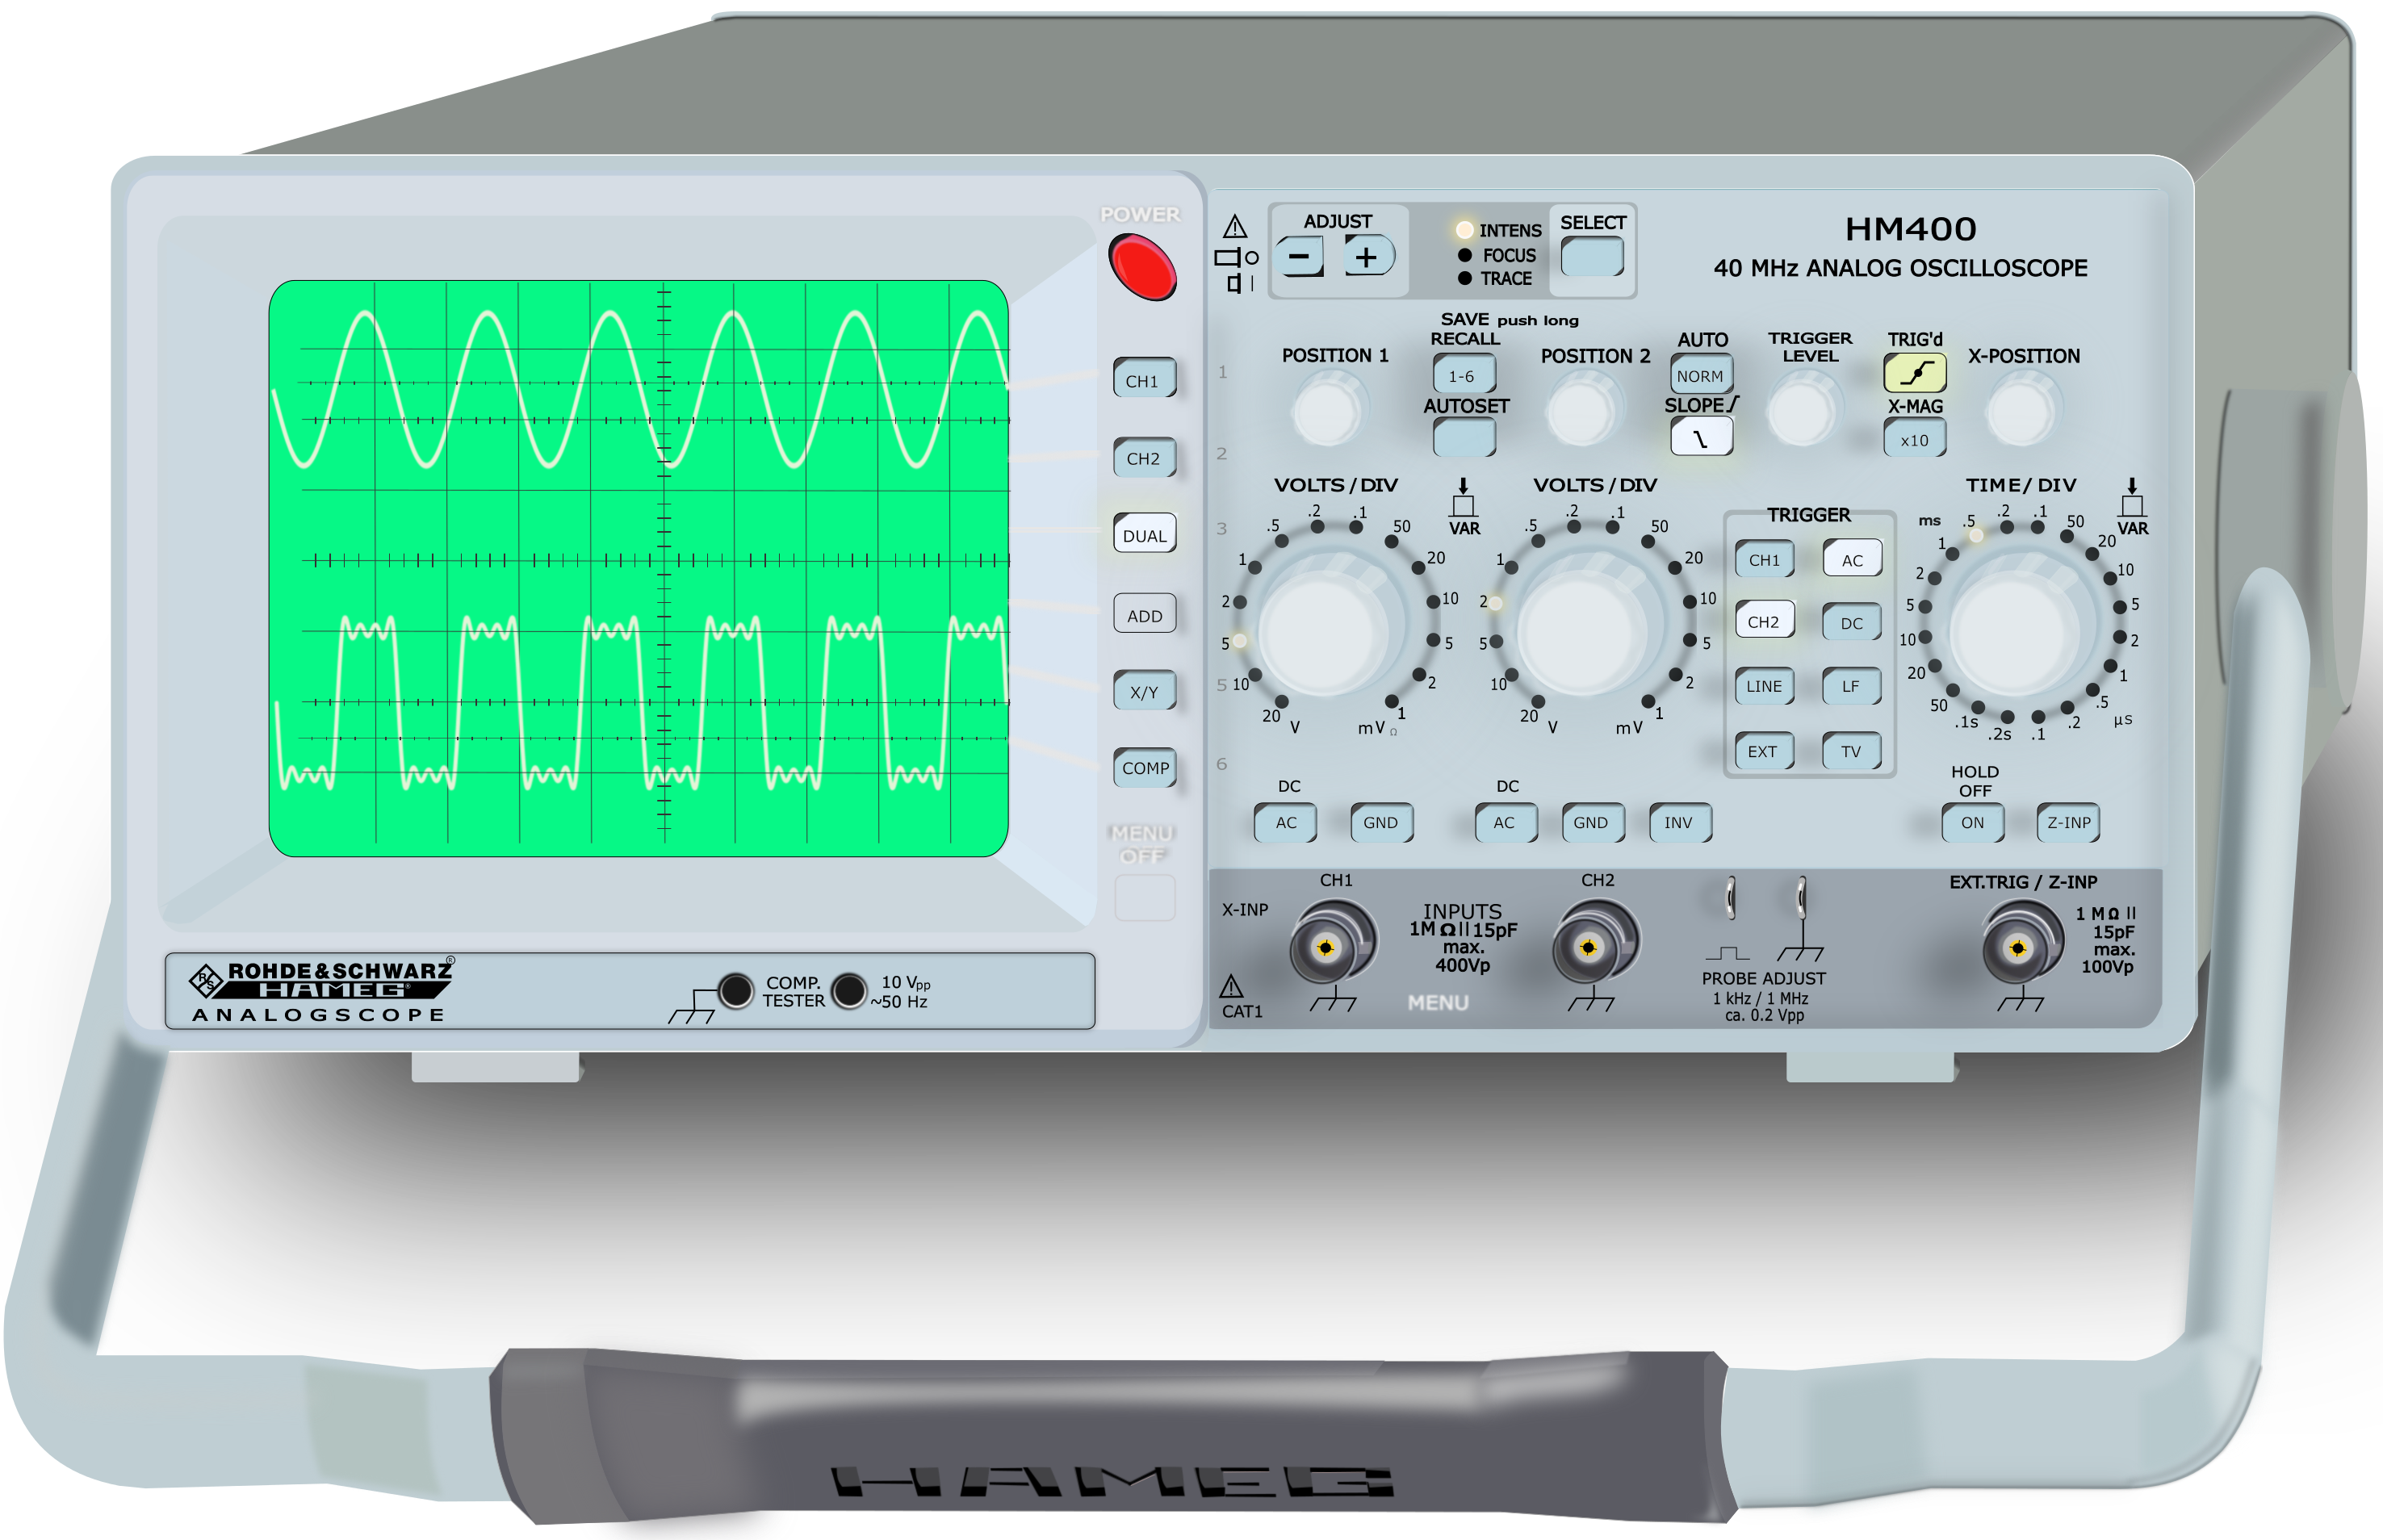
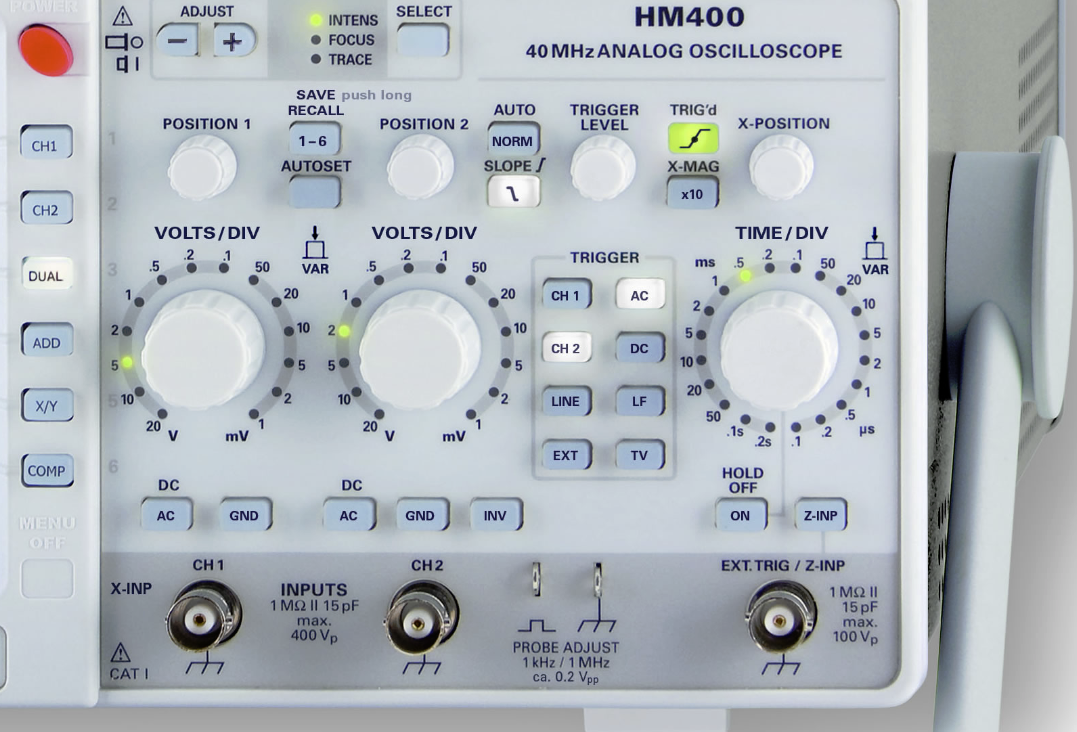
Wow, that's a very good start for a beginner! There's a lot of buttons and knobs there, but I'm not sure about "lighted" buttons. Do you mean like at the top, beside the button labeled "SELECT", where it says "INTENS" with a tiny light beside it (which I guess indicates it's activated)? If that's what you mean, I'm not sure I would change it. I do see how the light radiates outside the border, but that's what I'd expect. Although maybe a little more transparency would reduce the brightness. Or maybe that's not the "lighted" button?

But just in case you want to eliminate it, there is a way to do it, using Clipping. First you'll need to duplicate the path. (You may want to give it some outrageous color. When you perform the clip, the path will seem to disappear. So theoretically it shouldn't matter what color it is. However, if you're working in a situation like this (which often occurs in realistic drawings) you may have several stacked up objects to effect shading/lighting. If you ever need to release the clip later on, for some reason, that clipping path will reappear. If it's the same color as the original, it might be hard to know which objects are which. So if it's some outrageous color, you'll know it's the clipping path.) Select that new path and the original, then do Object menu > Clip > Set.

One area that stands out to me is the knobs/dials. Well, not that I'm very familiar with this machine, but I do have an old stereo that's made with this metalic style. Anyway, the knobs look too light/bright to me. I do think they need to be a tiny bit lighter, to enhance the 3D effect. But maybe not that light? Also...hmm...it's hard to say. It looks like they aren't casting any shadows. Or maybe there's a shadow, but they're too light?

Another thought on the shadows. Using the thing labeled CH2, there seems to be a gap between the shadow and the....I don't know what to call it, it looks like something gets plugged into it. Anyway, the shadow should extend to the base of that thing, rather than start at the edge of it. I know that when you drew it, it probably matched the edge perfectly. But when you add the blur, it causes the apparent gap. In order to get rid of the gap, you need to drag the nodes of the shadow until they are well behind the thing (plug). I could work up a quick illustration, if you don't understand what I mean.

On the handle, I think it's something to do with the lighting and shading, that make it look not realistic. But there's something funky with the lighting, in the image as a whole. On the right half of the face of the machine, the shadows seems to be cast down and to the left, so that the light appears to be coming from top right. But the buttons just to the right of the screen on the left half of face of the machine, seem to cast a shadow to the right and down (indicating light from top left). And on the handle, the light seems to be coming from top left. So once you have the lighting and shading consistent in the whole image, I think the handle will look better.

And one last couple of things that jump out at me. Where the handle connects to the side of the machine, it seems to me the handle should cast a shadow on the side of the machine. And there's a panel of buttons labeled "TRIGGER", where the word trigger seems to have slid off the panel (or maybe onto it).

I agree about the bevel around the screen. I don't know what to suggest, since I'm not familiar with the machine. But you must be working with a photo, or maybe the actual machine?

Very nice work on the whole of it! I can't wait to see how it progresses :D

User avatar
ragstian
Posts: 1181
Joined: Thu Oct 11, 2012 2:44 am
Location: Stavanger-Norway

Re: Work In Progress

Postby ragstian » Fri Oct 12, 2012 1:43 pm

Hi brynn.

Thank you very much for your constructive feedback, it's very much appreciated.

The lighted buttons are like the one under the "Slope" label. You see the white part of the button in the upper right corner. I got that sorted by cutting "holes" in the panel using path difference and then keep the push-button itself on a lower layer.
Old button: Image
Improved version: Image

I have to try your clipping method, was not aware of this way of doing things. I have read most of Tavmjong Bah's book "Inkscape - Guide to a Vector Drawing Program" but the learning curve is steep!

The knobs themselves are made from white plastic on the "real" machine - or "instrument" as we engineers like to call it. I agree with you that they might be too bright.
When it comes to shadows I reckon the way the photograph is taken causes the shadows to be very subtle. For this photo I reckon they used two lamps - one on either side to the front and above - similar to what you see here: http://www.kenrockwell.com/tech/product-photography.htm
Also see a cut of the photo I am trying to "copy": Image


I agree with you that the shadows have to start all the way from the base of the object like the three metal "BNC-Connectors" at the bottom. Will work on that.
Also the "perspective" on the three large round knobs are not right in my version as I just duplicated the first one I made. The perspective on the three BNC-Connectors at the bottom is correct but the metal is terrible - might have to start over from scratch on those. Shiny metal are difficult!

The handle and the shadow under the handle is also "still under construction" - will work on that as well.

Thanks again for the time you spent on this!

RGDS Ragnar

The handle is still "under construction" - hopefully I can improve it.
Last edited by ragstian on Tue Oct 23, 2012 11:56 pm, edited 2 times in total.

User avatar
brynn
Posts: 10309
Joined: Wed Sep 26, 2007 4:34 pm
Location: western USA
Contact:

Re: Work In Progress

Postby brynn » Fri Oct 12, 2012 7:23 pm

Oh, white plastic! White plastic could be as tricky as shiny metal. I see what you mean about the light source on the photo. Most of the knobs, buttons and dials really do have 2 shadows!

And OH! I see that the buttons labeled TRIGGER are not on a panel at all. There seems to be faint line around them, that in your image, makes it look a little like a raised panel.

Well, now that I've seen part of the source photo, ther are many small details that I notice. But since you're still working on it, I should probably save my comments until you're closer to finished. My attention to detail is probably why I like working on realism too. I don't know if the pros think of it this way, but I see a clear difference between realism and photorealism, especially if the photo isn't very sharp. Anyway, I like to go for realism. But often I have to stick with using a photo for reference.

Anyway, you've made a great start :D

User avatar
ragstian
Posts: 1181
Joined: Thu Oct 11, 2012 2:44 am
Location: Stavanger-Norway

Re: Work In Progress

Postby ragstian » Sat Oct 20, 2012 4:16 am

Hi.

Latest version: Image
Still needs some "tweaking" on the front frame etc.
Started over with a "blanks sheet" - started using "CLIP and MASK" as suggested by brynn - great tool!
brynn - any critisism and suggestions are welcome - as a beginner I know I got a lot to learn ;) .

RGDS Ragnar
Last edited by ragstian on Wed Oct 24, 2012 5:23 am, edited 3 times in total.
Good Luck!
( ͡° ͜ʖ ͡°)
RGDS
Ragnar

User avatar
brynn
Posts: 10309
Joined: Wed Sep 26, 2007 4:34 pm
Location: western USA
Contact:

Re: Work In Progress

Postby brynn » Sun Oct 21, 2012 3:13 am

Hi Ragnar,
Oh yes, I see many improvements :D Those 3 metal connectors are stunning, they look so real! And the lighted buttons are right on!

I do notice one tiny detail on the middle and right metal connector. In the photo, there appears to be....I'm not sure how to describe it -- sort of a spur maybe, on the right side of each one. The connector on the left looks most like the photo. That little spur has a black center with a white/light border. But on the middle and right ones, the black center seems to be missing. If you work like I do, it may be hidden underneath somewhere. I often lose tiny details when I have to go back and edit after I'm almost finished. I can't imagine how many objects must be stacked up there, to create those connectors! That's really some nice work!

The only other thing I notice, is that in the photo, there's a line under "40MHz Analog Ocilliscope", that's not in your drawing.

Very good work :D

User avatar
Maestral
Posts: 982
Joined: Sat Aug 27, 2011 7:10 am

Re: Work In Progress

Postby Maestral » Sun Oct 21, 2012 5:17 am

It`s a great work so far and I believe you`ll improve it even further.
There is a one thing in common for all of your previous drawings. Almost all of the squared buttons looks like they have been beveled or at least shaped differently from the hole from which they are coming through. Perhaps you could make a shape which fits the hole and then simply move a duplicate of it to the lower left, connect these two shapes and you should get a better looking buttons. If needed, you may do the same for a smaller inner part of the button (part which is, so to say, behind/inside the panel). To me, almost all of those squared buttons are the same, so you could use duplicates and with some adjustment it should look fine.
Just a thought.
:tool_zoom: <<< click! - but, those with a cheaper tickets should go this way >>> :!:

User avatar
ragstian
Posts: 1181
Joined: Thu Oct 11, 2012 2:44 am
Location: Stavanger-Norway

Re: Work In Progress

Postby ragstian » Sun Oct 21, 2012 5:46 am

Hi.

Brynn - I am impressed - very sharp eye for details.
Have updated the image: Image
and also made an outline one: Image
For some reason "the missing line" disappears when setting blur to anything but 0 - no matter what stroke-width I use. Puzzling! Had to make a box instead of line.
As the "improvements" could go on forever - I will move on to another photo realistic item - just have to find one "candidate" in one of my fields of interests.
Learnt a few Inkscape "tricks" by making this one - hopefully that will continue on the next.
Thanks for the constructive feedback!

RGDS Ragnar
Last edited by ragstian on Wed Oct 24, 2012 12:11 am, edited 3 times in total.
Good Luck!
( ͡° ͜ʖ ͡°)
RGDS
Ragnar


Return to “Work in progress”