Author Topic: Make seperate layers and Export based on Colors  (Read 8407 times)

January 13, 2016, 06:53:30 PM
Read 8407 times

Cheers_To_You

  • Sr. Newbie

  • Offline
  • **

  • 4
I am a Newbee to Inkscape. I have experience in Photoshop and have just started using Cricut Design Space, Inkscape .91 and Have Windows 10.

I have made a Black Stroke circle with Black Stars around it. Then Added Red Text inside the circle.(see attached)

What I need is the layers to be separated by color so when I cut them I can place the correct color vinyl in the Cricut and cut it. 
Also, when I Trace it in Inkscape, I don't see anything happening. Are text and images already Vectorized when crated in Inkscape?.

The attached was from Photoshop and saved a png. I did reproduce it in Inkscape thinking it would download as separate layers but it does not happen.

January 13, 2016, 09:12:53 PM
Reply #1

brynn

  • Administrator

  • Offline
  • ******

  • 3,941
  • Gender
    Female

    Female
    • Inkscape Community
Welcome to Inkscape Community!

Yes, if you've created the whole thing in Inkscape, and you didn't import any pre-existing images, everything is already vector! 

(If you had imported the PNG, that would be traceable.  And it might seem like nothing happens because Inkscape puts the result right on top of the original imported image, so it's hard to notice if anything happened.  But once you drag the result away from the original, you can see it better.  But it's almost always better for an image be created originally as vector -- especially for cutting.  in my opinion)

So you'll just need 2 layers.

 -- Layers menu > Layers (opens the Layers dialog)
 -- Click the blue plus sign, and follow prompts, to add a new layer

Select all the red objects (or all the black, whichever one you want to be on top), then do Shift + PgUp.  That will move the selection up to the next layer.

I'm not familiar with any cutter machines, but it's my understanding they need paths to cut on.  The text won't be paths unless you convert it to path.  But I think with some machines, text can be cut out, even if it's not converted to path.  Here's how to convert, if you need to.

 -- Select the text
 -- Path menu > Union
  • Inkscape version 0.92.3
  • Windows 7 Pro, 64-bit
Inkscape Tutorials (and manuals)                      Inkscape Community Gallery                        Inkscape for Cutting Design                     


"Be ashamed to die until you have won some victory for humanity" - Horace Mann                       

January 14, 2016, 05:20:13 AM
Reply #2

Cheers_To_You

  • Sr. Newbie

  • Offline
  • **

  • 4
Thanks Brynn for your quick response. I selected the image, went to Layers and got lost in trying to find the Blue plus sign.
Also, I did a trace and then tried to break apart. It does it but they are dashes around the images with the same color as the background. I can select one at a time and add color. Is there an easier way to color all the objects which were seperated?

January 14, 2016, 01:47:25 PM
Reply #3

Lazur

  • IC Mentor

  • Offline
  • ******
  • Inkscape Filters Wizard

  • 1,154
  • Gender
    Male

    Male
Hi.

Haven't worked with cutter machines myself either, so had to dig a bit into the manual.


In inkscape if you open the attached raster image, select it and run trace bitmap with three scans in colors mode and tick in the remove background option.

This will result in a group of two compound paths on top of your raster image.
Move it a bit and select/delete the raster image below and,
preferably scale the group down to a reasonable size.

To ungroup it, press Ctrl+Shift+G.
(After that you can move each of the same coloured shapes individually.)
Oh the red shape is containing the black parts too. Needs a bit of node editing, just delete the unnecessary nodes.

For the layers, have a look at this.

Once you made a second layer just use Shift+PgUp to move either the red or the black object to the new layer.


If you could follow along, you will end up with the same file as the attached svg and you can start figuring out how exactly cricut explore works. 


January 17, 2016, 04:13:44 PM
Reply #4

brynn

  • Administrator

  • Offline
  • ******

  • 3,941
  • Gender
    Female

    Female
    • Inkscape Community
I selected the image, went to Layers and got lost in trying to find the Blue plus sign.

First, do Layers menu > Layers (to open the dialog)  That blue plus sign is new in version 0.91.  But you did say you have 0.91.  Maybe you didn't notice the Layers dialog, which will be docked on the right side of the page by default.*  Here's a screenshot, and plus sign is in the red circle:
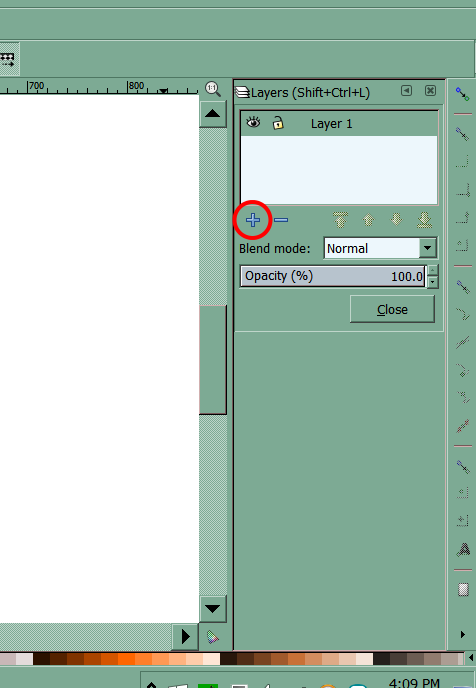
laydp.png
*laydp.png
(25.59 kB . 476x688)
(viewed 4375 times)


I still think it will be much better to use your original drawing than an auto-trace result (Trace Bitmap).  But to answer about that:

When you said you tried to break apart the trace result....well, "Break Apart" (in the Path menu) is the Inkscape terminology for changing a compound path (2 or more sub-paths) into 2 or more unique paths.  (And that's the opposite of what you need to do, to have the colors separate.)  The trace result will be "Grouped" and you need to Ungroup.  There are 3 ways to do that -- a button in the command bar  :ung:, or Object menu > Ungroup, or a key shortcut (Help menu > Key and  Mouse Ref.)

If you actually did use Break Apart (instead of just not knowing the right names yet) you won't be able to use the result very easily.  (it's possible, but  much easier to start over)  If you still want to try with auto-trace, just undo the break apart and ungroup instead.  Since I've been away for a few days, it's probably too late for undo!  So you'll probably just want to trace the PNG again.

I'm not sure what you mean about the dashed lines.  But if you used the proper options in Trace Bitmap, you shouldn't need to color anything.   You might need to tweak the colors, because sometimes they don't come out quite right.  But you should end up with 2 or 3 objects/colors, again depending on settings.

Probably you'll want to use the Multiple Scan option, Colors.  Depending on whether you want a solid background, use 3 scans and uncheck Remove Background below; or transparent, use 2 scans and check Remove Background.

Next, Ungroup.  Next, create the new layer, if you haven't already.  Then select the color you want on top, and do Shift + PgUp to move it to the new layer.  If you do want a solid background, you'll need a 3rd layer, for that 3rd color.

You know, after talking about layers so much, I re-read your original message.  Somehow in my mind, I was thinking you were making a t-shirt and needed real layers.  But you might have just been referring to the z-order when you said layers.

I don't know if you actually need real layers for a vinyl cutter.  You might just need a compound path of all the red objects, and a compound path for all the black ones.

Anyway, before I get carried away with possibilities, without knowing the facts, I'll stop here.  But please let us know if you need real layers, or if you just need the colors to be separate objects.  Also make a decision about whether you want to use  your original vector drawing, or trace the PNG.  Then we can tell you definitely and clearly which steps to take. 

What you really need to do might be much, much less work, than everything I've explained, if you use the original vector drawing.

1 footnote:

* In version 0.91, all dialogs are docked by default.  However, some dialogs are literally huge, and....well for myself, it's ridiculous for them to be docked.  Anyway, you can undock any dialog.  Just grab by its titlebar and drag away.  Sometimes undocked dialogs can get lost outside the screen area, especially if you're using a dual monitor setup.
  • Inkscape version 0.92.3
  • Windows 7 Pro, 64-bit
Inkscape Tutorials (and manuals)                      Inkscape Community Gallery                        Inkscape for Cutting Design                     


"Be ashamed to die until you have won some victory for humanity" - Horace Mann